Deploy on AWS EKS
This guide is for the IT lead deploying Sema4.ai self-hosted edition into your AWS EKS environment. It assumes you're comfortable operating EKS — it doesn't cover general Kubernetes administration.
The application is distributed as a Helm chart installed into an existing EKS cluster. A single cluster can run multiple installations, but each must be in its own dedicated namespace.
For a single-VM install with no Kubernetes cluster to manage, see AWS VM instead. Customers with stricter governance or compliance requirements can work with Sema4.ai to design a tailored architecture. A reference Terraform module (opens in a new tab) is available for AWS.
Provisioning the infrastructure in the bill of materials moves at the speed of your procurement, network, IAM, and security teams — anywhere from 2 days to 2 weeks. The Sema4.ai install itself is under 90 minutes, and a POC can run the same day.
Part 1 — Pre-deployment bill of materials
Hand this to procurement and your cloud/security teams on Day 0.
Decide these carefully — they're painful to retrofit:
- Hostname — TLS, OIDC redirect URIs, and ingress all derive from it; changing it later means re-issuing certs and reconfiguring your IdP.
- Region — moving regions later means a rebuild.
Components
| Category | Component | Spec / SKU | Notes |
|---|---|---|---|
| Compute | EKS cluster + dedicated namespace | A node group with e.g. m8i.xlarge as the minimum node size | Hosts the application compute. One application instance per namespace |
| Network | Cluster ingress | An ingress setup that routes traffic to the Sema4.ai application from end users and API clients | Yours to provide and operate. The application serves plain HTTP on port 8001 with a /health/live probe; terminate TLS in your ingress. The application is typically configured with service type ClusterIP or LoadBalancer |
| Network | DNS record | Hostname for the workspace, e.g. sema4-agents.<customer>.com → the ingress endpoint | |
| Data | PostgreSQL | PostgreSQL 17 or newer. On AWS, Aurora PostgreSQL Serverless v2 with autoscaling from 0.5–10 ACU is a solid choice | Primary data storage for the application. The uuid-ossp and plpgsql extensions must be available — the application enables them itself, so its database user must be able to run CREATE EXTENSION |
| Data | S3 bucket | A bucket accessible to the instance. A configurable key prefix lets multiple deployments share one bucket | Stores files and data frames |
| Data | KMS key | SYMMETRIC_DEFAULT, key usage Encrypt and decrypt | Envelope encryption of secrets at rest |
| Identity | OIDC IdP app | App registration in Entra ID / Okta / Auth0 with redirect URI https://<hostname>/oidc/login/callback, logout URI https://<hostname>/oidc/logout/callback, scopes openid profile email, group claims if access-restricted | Discovery URL, Client ID, and Client Secret needed at install. See Identity providers (OIDC) |
| Identity | Service account → IAM role | A Kubernetes service account bound to an IAM role (IRSA (opens in a new tab)) | The role grants the application access to use the KMS key and the S3 bucket |
| Access | Administrative AWS & EKS access | Suitable AWS and cluster permissions for the deploying administrator, plus kubectl and helm on their workstation | Just-in-time access acceptable |
| Egress | Outbound HTTPS | Unrestricted egress recommended. Needed to reach the Sema4.ai services (image + chart pull, licensing, updates) plus your LLMs and MCP servers | See the network endpoints for the Sema4.ai hosts, and Add networking rules |
Ingress is your responsibility. The application serves plain HTTP on
port 8001 with a /health/live health probe; you expose it with your own
ingress controller or load balancer, terminate TLS there, and decide whether
it is internet-facing or internal. The values template below ships a generic
ingress example — adapt the class, annotations, and service type to your
environment. If you use the AWS Load Balancer Controller, the template
includes a commented-out starting point for it, defaulting to an internal
(private) ALB — which is what most customers want.
Part 2 — Deployment steps
Step 1: Pick the hostname (foundational)
Decide the hostname (e.g. finance-agents.company.com) on a domain you control — whether it resolves publicly or only internally is your choice. TLS, the OIDC redirect URI, and the ingress configuration all derive from it. You'll point DNS at your ingress endpoint later (Step 7).
Step 2: Register the OIDC application
Register an OIDC application in your identity provider and capture the Discovery URL, Client ID, and Client Secret for your values file. Use:
- Redirect URI:
https://<hostname>/oidc/login/callback - Logout URI:
https://<hostname>/oidc/logout/callback - Scopes:
openid,profile,email - Authorization code flow with PKCE where supported; restrict to the allowed group(s) if your IdP supports it.
Follow the guide for your provider: Microsoft Entra ID · Auth0 · Okta.
Step 3: Provision AWS infrastructure
Either apply the reference Terraform for AWS (opens in a new tab), or provision yourself using the bill of materials as the spec. The end state must include:
- An EKS cluster with ingress, and
kubectlaccess configured to that cluster (your EKS admin provides the kubeconfig context — you'll need it for the Helm install). - PostgreSQL 17+ (Aurora Serverless v2 recommended) with the
uuid-osspandplpgsqlextensions available, reachable from the cluster; capture host, port, and admin credentials. - An S3 bucket for the deployment (note any key prefix).
- A KMS key (
SYMMETRIC_DEFAULT, Encrypt/decrypt); capture its full ARN (the string starting witharn:aws:kms:...). - A Kubernetes service account bound to an IAM role granting access to the KMS key and the S3 bucket.
Step 4: Create the application database
The application needs a dedicated database on your PostgreSQL server. Connect to the management database (postgres) with a SQL client and create one:
CREATE DATABASE <database-name>;Capture the database name and the admin username and password — you'll enter them in your values file.
The application enables the uuid-ossp and plpgsql extensions in this database itself on first start, so the user you provide must be able to run CREATE EXTENSION (an admin user is).
Step 5: Prepare your my-values.yaml
Create the values file that configures your deployment before you start the install. Start from this template and replace every REPLACE_ME with your values (the external URL drives the OAuth callback, so it must match the hostname you registered with your IdP). Keep this file — you reuse it for upgrades.
my-values.example.yaml# Helm values for the Sema4.ai Deployment
#
# Only chart-default overrides and the name-derived/shared-infra fields are
# listed below. The image (registry/repository/tag) comes from the chart — tag
# is supplied via --set on helm install. The Replicated SDK injects the proxy
# pull secret from its license, so no imagePullSecrets entry is needed.
# The Terraform-created service account for this namespace.
serviceAccount:
create: false
name: REPLACE_ME
# Ingress is YOUR responsibility: the application serves plain HTTP on port
# 8001 with a /health/live health probe — expose it with your ingress
# controller or load balancer, terminate TLS there, and decide whether it is
# internet-facing or internal. Below is a generic example for an ingress
# controller routing to a ClusterIP service (the chart default is NodePort);
# adapt className, annotations, and the service type to your environment.
service:
type: ClusterIP
ingress:
enabled: true
className: REPLACE_ME
annotations: {}
hosts:
- host: "REPLACE_ME"
paths:
- path: /
pathType: Prefix
port: http
tls: []
# Starting point for the AWS Load Balancer Controller — replace the generic
# className/annotations above with these. 'scheme: internal' keeps the ALB
# private (reachable from your VPC/VPN only), which is what most customers
# want; use 'internet-facing' only if the deployment must be publicly
# reachable. The controller auto-discovers an ACM certificate matching the
# host, or pin one with alb.ingress.kubernetes.io/certificate-arn.
#
# className: alb
# annotations:
# alb.ingress.kubernetes.io/scheme: internal
# alb.ingress.kubernetes.io/target-type: ip
# alb.ingress.kubernetes.io/backend-protocol: HTTP
# alb.ingress.kubernetes.io/healthcheck-path: /health/live
# alb.ingress.kubernetes.io/healthcheck-port: traffic-port
# alb.ingress.kubernetes.io/listen-ports: '[{"HTTPS":443}]'
config:
infrastructurePlatform: "aws"
aws:
region: "REPLACE_ME" # your AWS region, e.g. us-east-2 — must match the bucket and KMS key
s3BucketName: "REPLACE_ME"
kmsKeyArn: "REPLACE_ME"
s3KeyPrefix: "REPLACE_ME"
postgres:
host: "REPLACE_ME"
port: "5432"
user: "REPLACE_ME"
password: "REPLACE_ME"
database: "REPLACE_ME"
# Public base URL (drives OAuth callback + MCP public-API base URLs).
externalUrl: "REPLACE_ME"
# authMode defaults to 'oidc' in the chart.
workroom:
# Register redirect URI <externalUrl>/oidc/login/callback with your IdP.
oidcClientId: "REPLACE_ME"
oidcClientSecret: "REPLACE_ME"
oidcServer: "REPLACE_ME"
# Installs the Sema4.ai MCP Gallery container
mcpGallery:
enabled: trueStep 6: Install the application with Helm
Before you start, make sure your AWS CLI session and kubectl context point at
the target EKS cluster — e.g. authenticate (aws sso login) and run
aws eks update-kubeconfig --name <cluster> --region <region>. Otherwise the
install fails with a cluster-reachability error.
Get the install details from the Sema4.ai Enterprise portal (opens in a new tab). You'll receive an email invitation — activate your account, then sign in. Your Team is your organization; if the same email is used for several self-hosted deployments, switch between them with the Team dropdown.
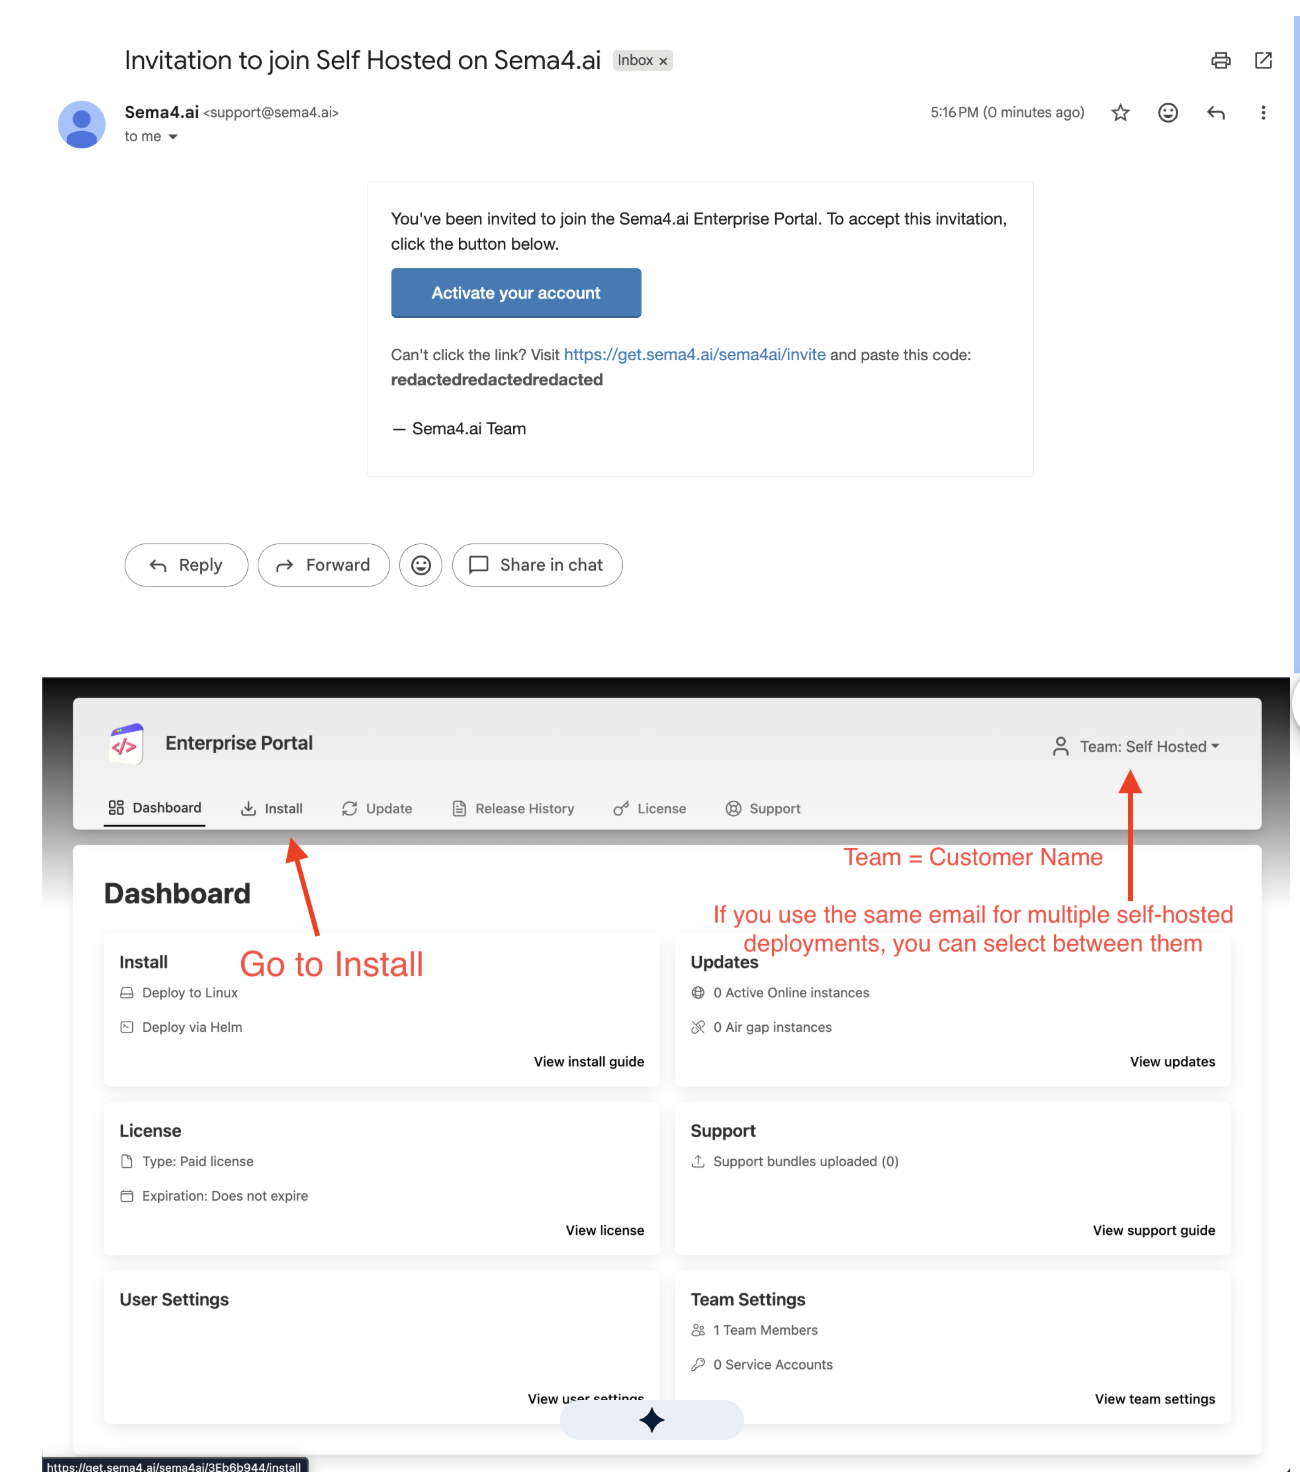
Go to Install and choose Helm. In step 1:
- Instance Name — a label for the deployment in the portal tooling.
- Kubernetes Distribution — choose Amazon EKS.
- Cluster Network Availability and Registry Access — choose the options that match your local setup (whether outbound requests are allowed or go through an HTTPS proxy, and whether your workstation can reach the cluster as well as the registry).
Then click Continue.

The Instance Name is only a label in the portal tooling — it is not the deployment's hostname or subdomain. The hostname is the one you chose in Step 1.
In step 2, the portal walks you through the install:
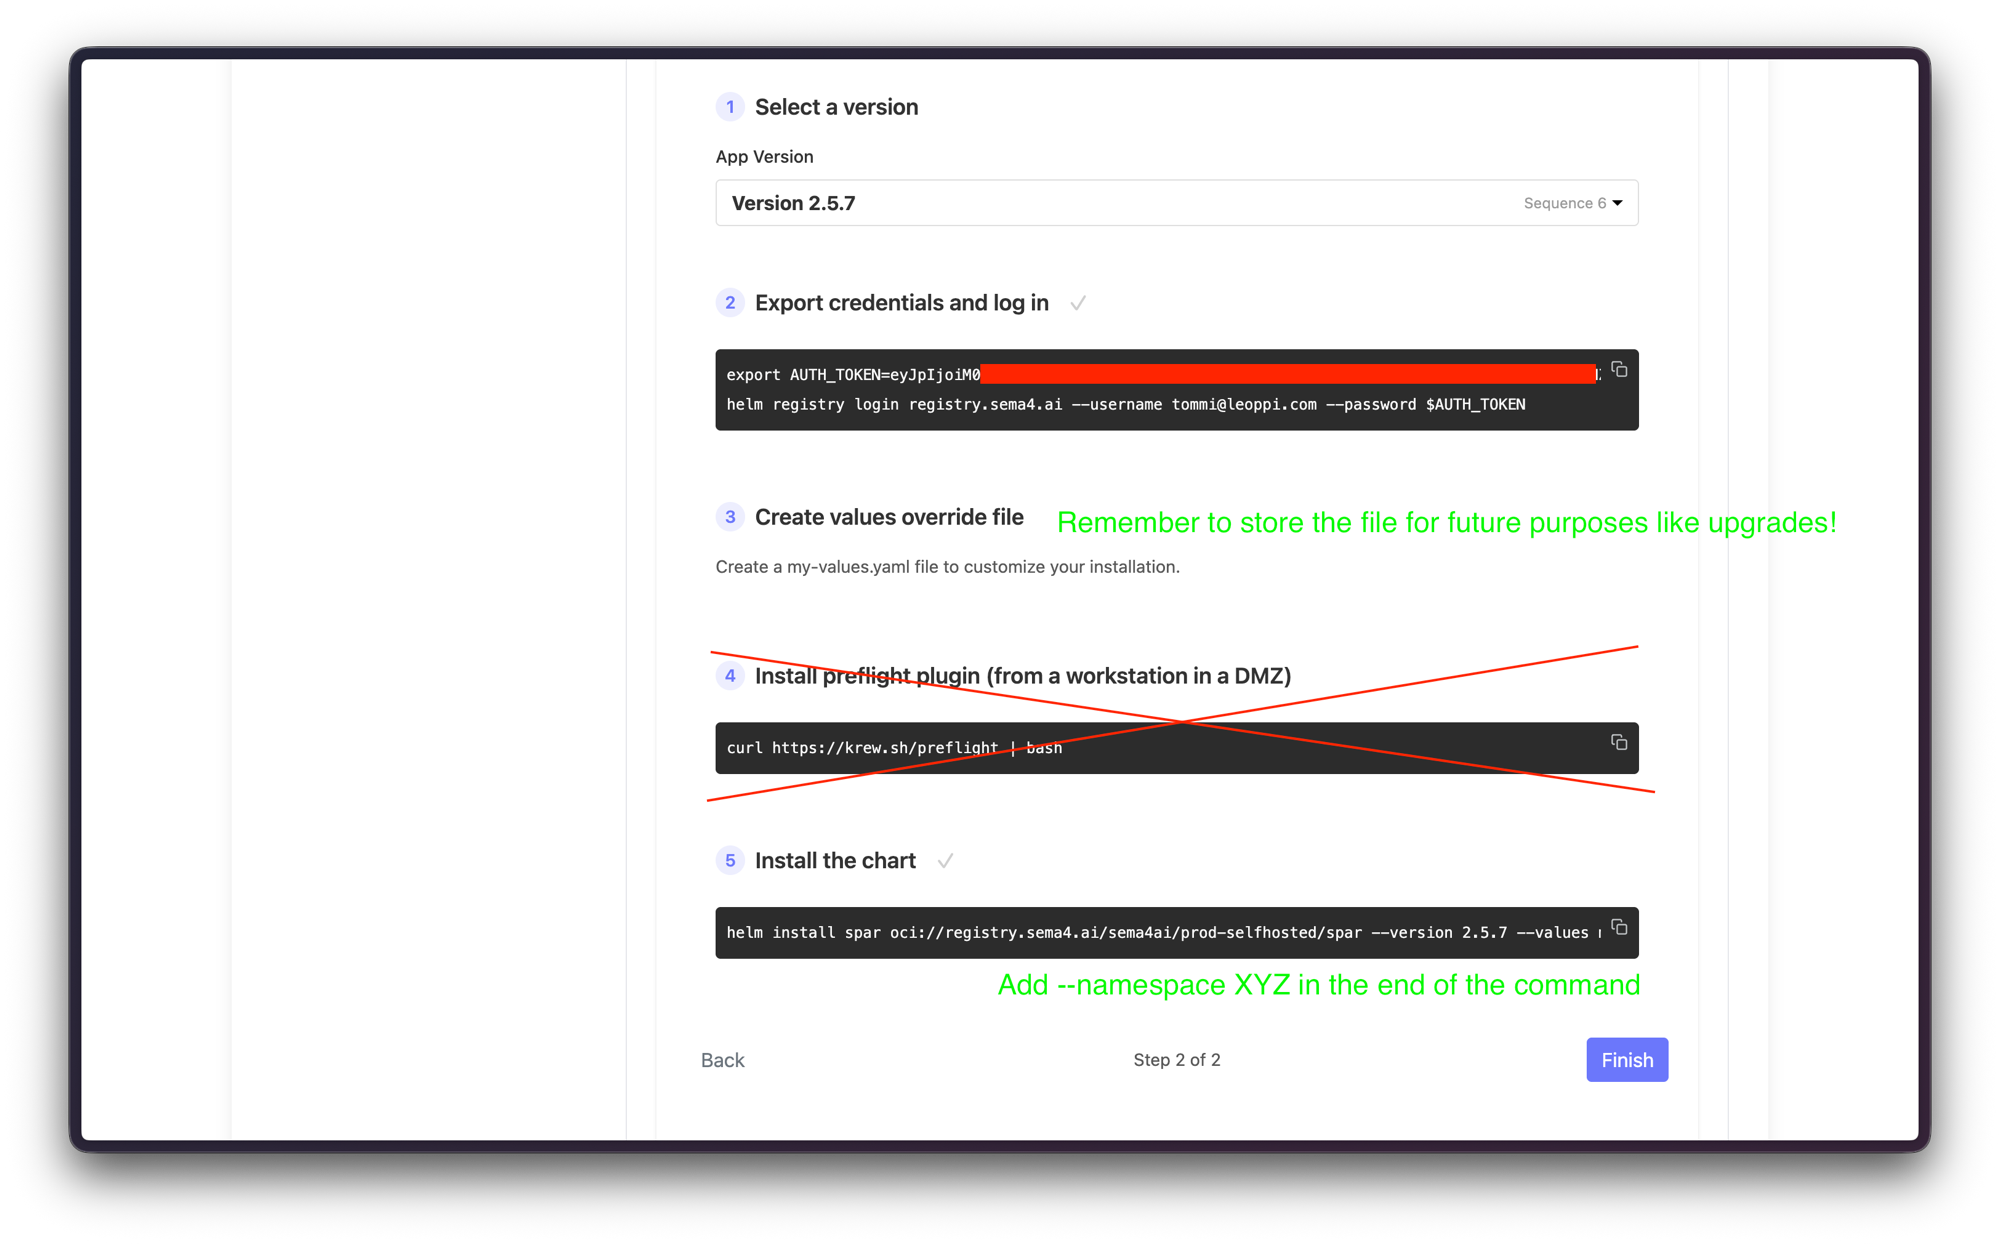
-
Select a version.
-
Export credentials and log in with the commands shown:
export AUTH_TOKEN=<token from the portal> helm registry login registry.sema4.ai --username <your-email> --password $AUTH_TOKEN -
Skip "Create values override file" — you already prepared
my-values.yamlin Step 5. -
Skip "Install preflight plugin" — it isn't needed for this install.
-
Install the chart. Take the
helm installcommand from the portal, point--valuesat your file, and add your namespace:helm install spar oci://registry.sema4.ai/sema4ai/prod-selfhosted/spar \ --version <version> \ --values my-values.yaml \ --namespace <your-namespace>
The command you copy from the portal omits the namespace — append
--namespace <your-namespace> yourself.
Step 7: Point DNS at your ingress
Point your hostname at whatever endpoint exposes the application — this depends on your ingress and service type (a shared or dedicated ALB, an NLB, an existing gateway, etc.), so the exact target and record type are yours to determine. Create the DNS record in your DNS provider (for example, Route 53) resolving the hostname to that endpoint. Sign-in won't complete until the hostname resolves and TLS is serving.
Step 8: Validate
- Browse to
https://<hostname>— login should redirect to your IdP. - Sign in with a permitted user; you should land in the Sema4.ai workspace.
- Run a smoke-test agent to confirm the data plane (Postgres, S3).
Keep your my-values.yaml — you reuse it for upgrades. See
Update the Sema4.ai application.
Next steps
With the application running, continue to First-time setup to connect LLMs, set up MCP OAuth, and configure the rest of the workspace.