Using the Cortex Analyst Example
This guide walks you through the process of using the Snowflake Cortex Analyst Template to create an intelligent agent that is able to perform complex analysis on your data - using natural language to SQL capabilities of Snowflake Cortex Analyst.
Overview
The Snowflake Cortex Analyst Template demonstrates how to use natural language queries to better understand your Snowflake data. In this guide, we'll work with an revenue dataset to show how Cortex Analyst can help users explore and analyze data through conversational queries.
You'll learn how to:
- Set up and configure a Cortex Analyst service
- Grant necessary permissions
- Deploy and interact with an AI agent that can answer questions about your data
Prerequisites
Before starting this guide, ensure you have:
- Access to Snowflake with appropriate privileges (
ACCOUNTADMINor similar) - Completed steps 1-2 of the Snowflake Cortex Analyst Tutorial (opens in a new tab)
After following the Snowflake tutorial to create a Cortex Analyst service, you should have the following objects created:
| Object Name | Description |
|---|---|
cortex_analyst_demo.revenue_timeseries.daily_revenue | Table containing daily revenue data |
cortex_analyst_demo.revenue_timeseries.product_dim | Table containing product dimension data |
cortex_analyst_demo.revenue_timeseries.region_dim | Table containing region dimension data |
cortex_analyst_demo.revenue_timeseries.raw_data | A stage containing the raw data AND the revenue_timeseries.yaml semantic model file |
Here's what the data looks like:
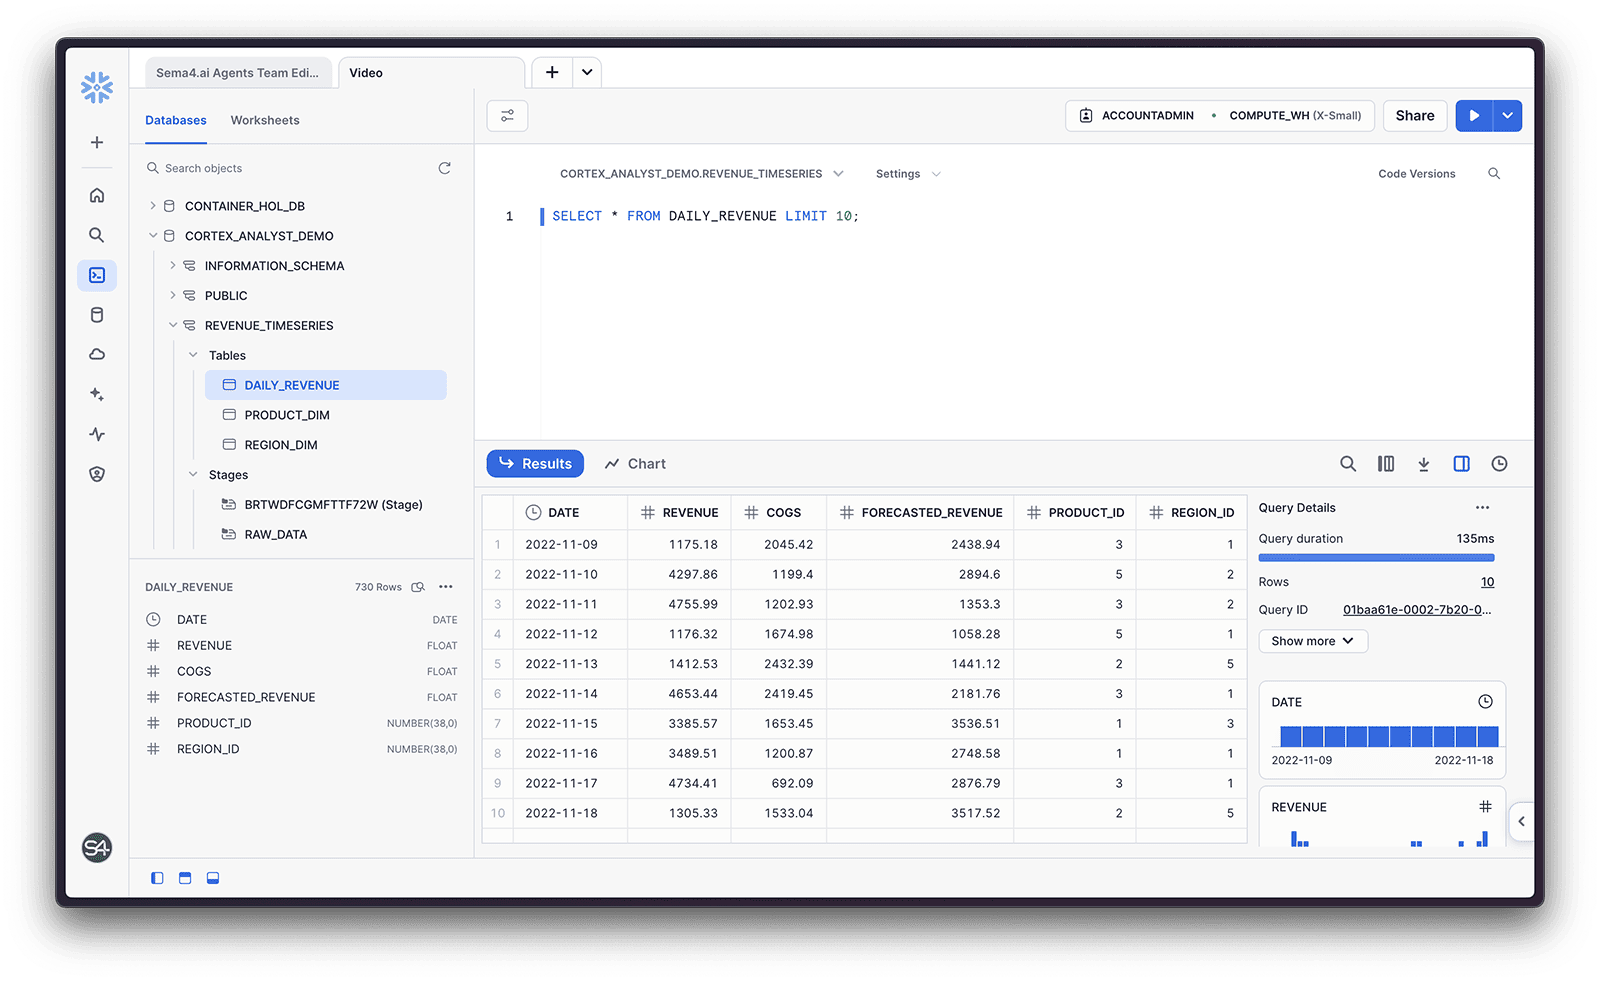
In the Snowflake tutorial the revenue_timeseries.yaml semantic model spec is given to you. For a tutorial on creating your own semantic model, see the Complete Semantic Model Spec tutorial (opens in a new tab).
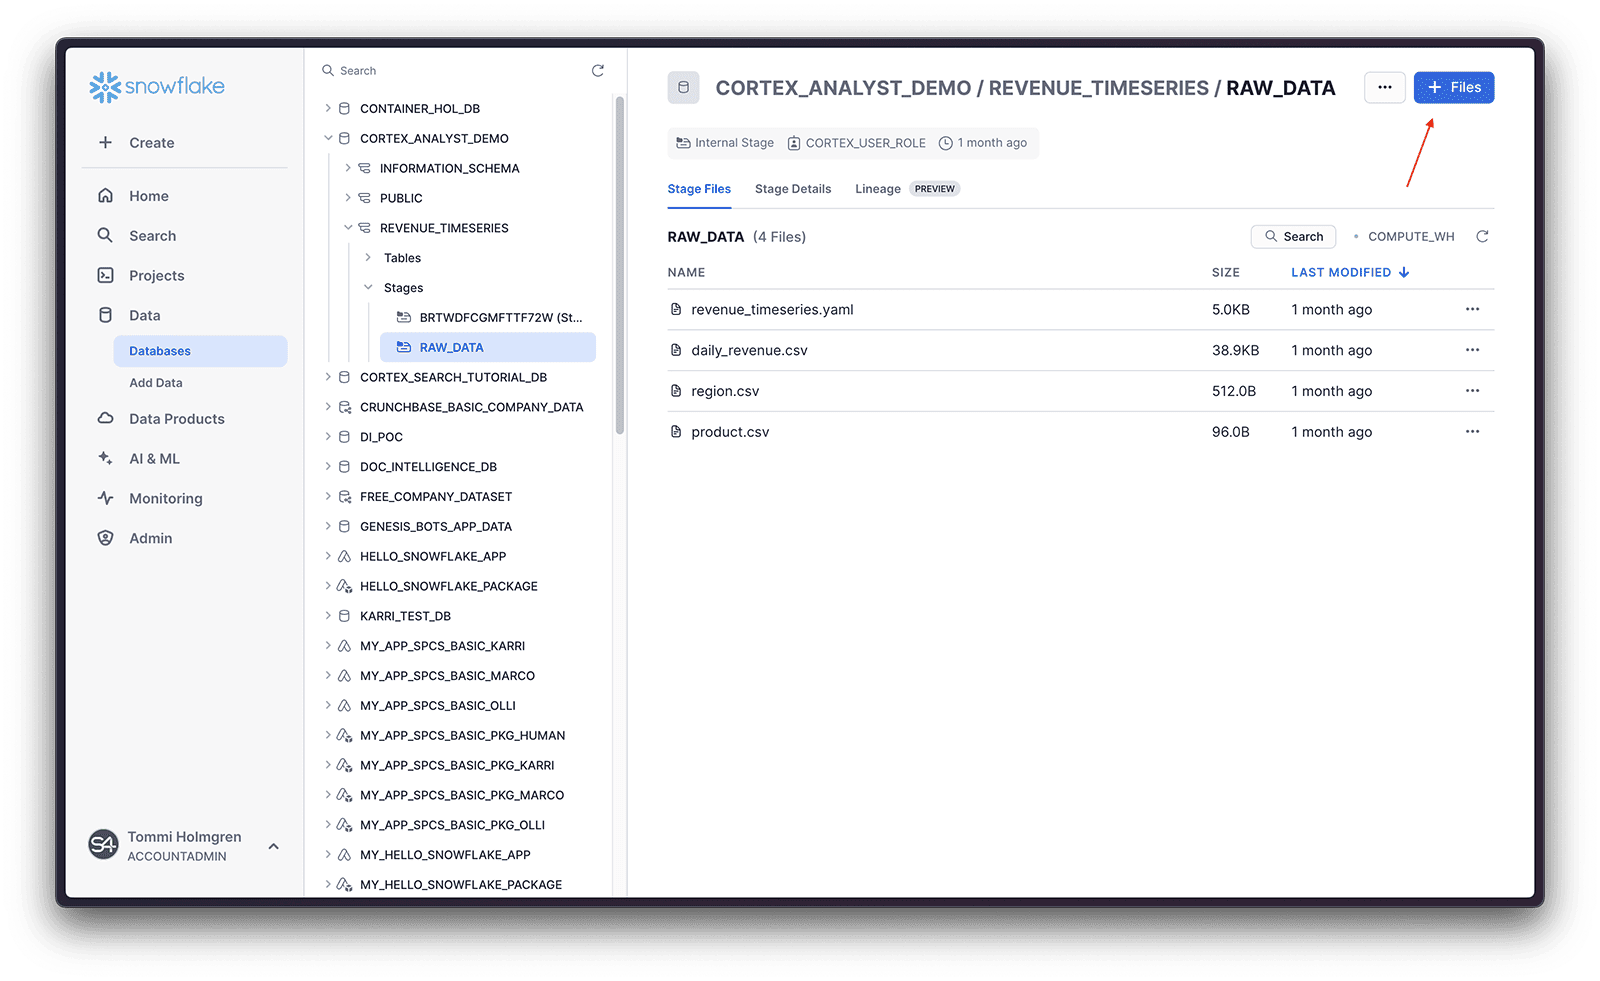
In order to upload the model file to the stage, navigate to Data -> Databases -> CORTEX_ANALYST_DEMO -> Stages -> RAW_DATA, and click + Files and upload the revenue_timeseries.yaml file given in the tutorial above.
Using the Template
Grant Required Permissions
Before your agent can use the Cortex Analyst service from Sema4.ai Studio, you need to grant it the necessary permissions. Run the following SQL commands as a user with appropriate privileges (ACCOUNTADMIN or similar).
Remember to update the following statements with the role you used when linking Studio to Snowflake.
GRANT USAGE ON DATABASE CORTEX_ANALYST_DEMO TO PUBLIC;
GRANT USAGE ON SCHEMA CORTEX_ANALYST_DEMO.REVENUE_TIMESERIES TO PUBLIC;
GRANT SELECT ON ALL TABLES IN SCHEMA CORTEX_ANALYST_DEMO.REVENUE_TIMESERIES TO PUBLIC;
GRANT USAGE ON ALL STAGES IN SCHEMA CORTEX_ANALYST_DEMO.REVENUE_TIMESERIES TO PUBLIC;
GRANT READ ON STAGE CORTEX_ANALYST_DEMO.REVENUE_TIMESERIES.RAW_DATA TO PUBLIC;
GRANT USAGE ON WAREHOUSE CORTEX_ANALYST_WH TO PUBLIC;
When executing the above SQL commands in Snowsight, remember to make sure to run them all one by one.
Create the Agent
- Open Sema4.ai Studio
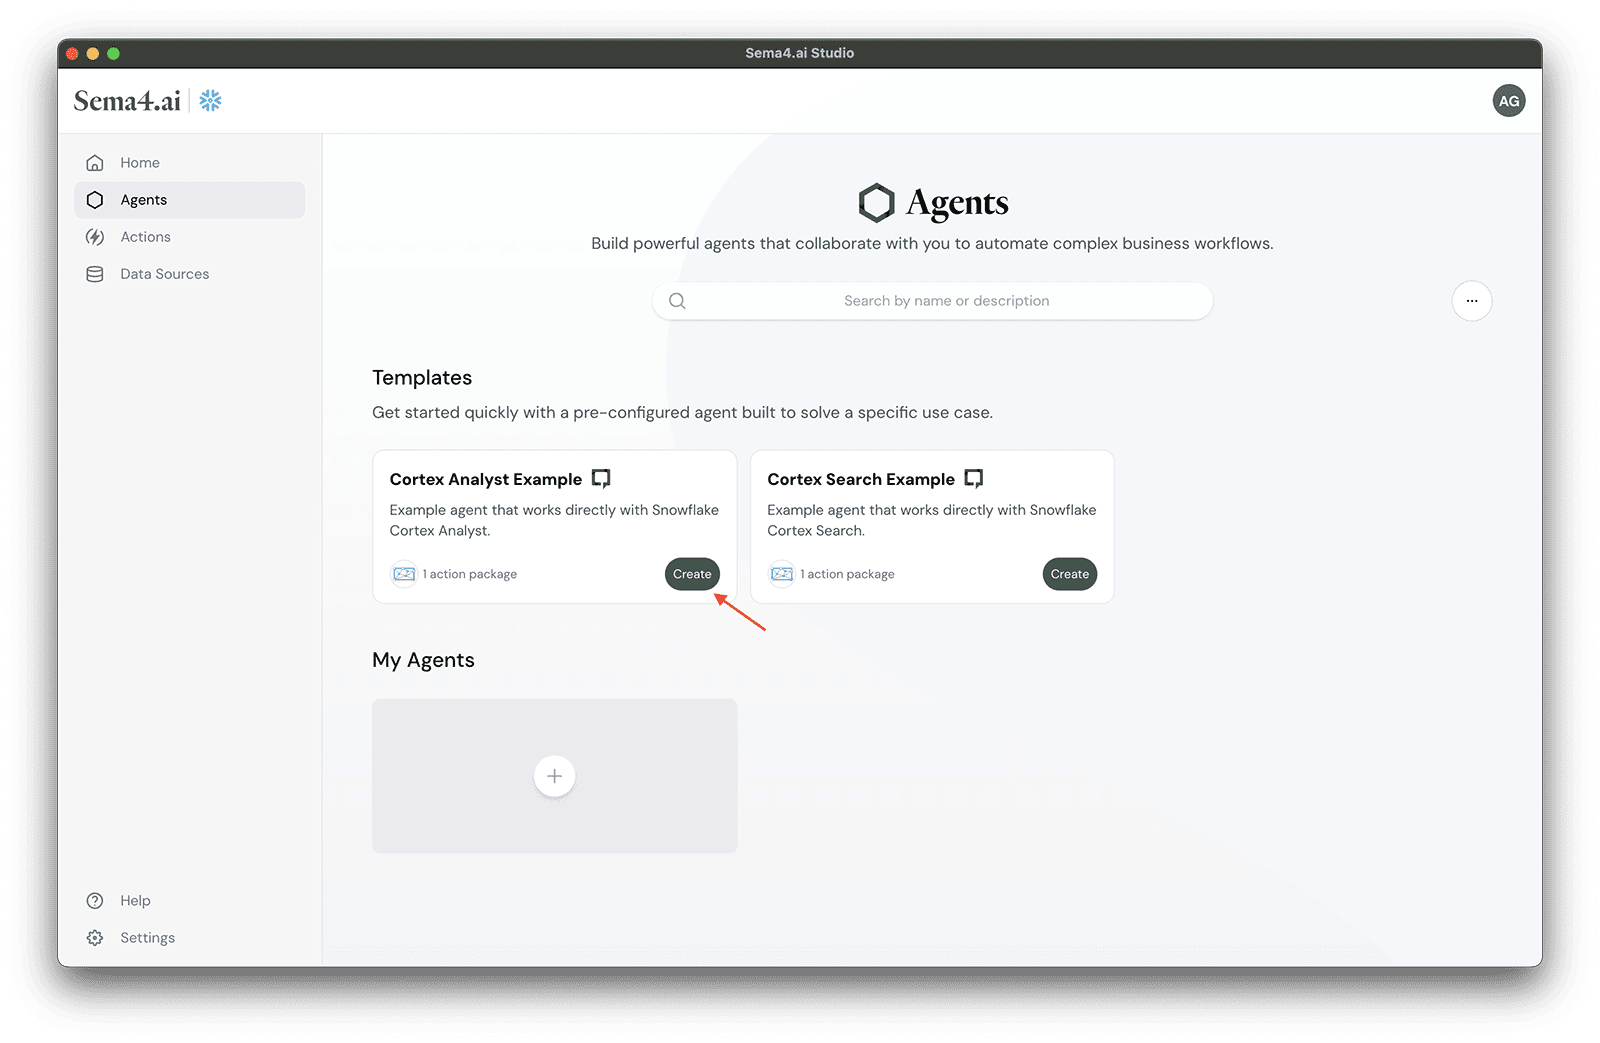
- Click the Try Now button under Template Agents section, or click Agents in the left-hand sidebar.
- Find the Cortex Analyst Example template and click the Create button.
Configure the Snowflake Cortex Analyst Actions
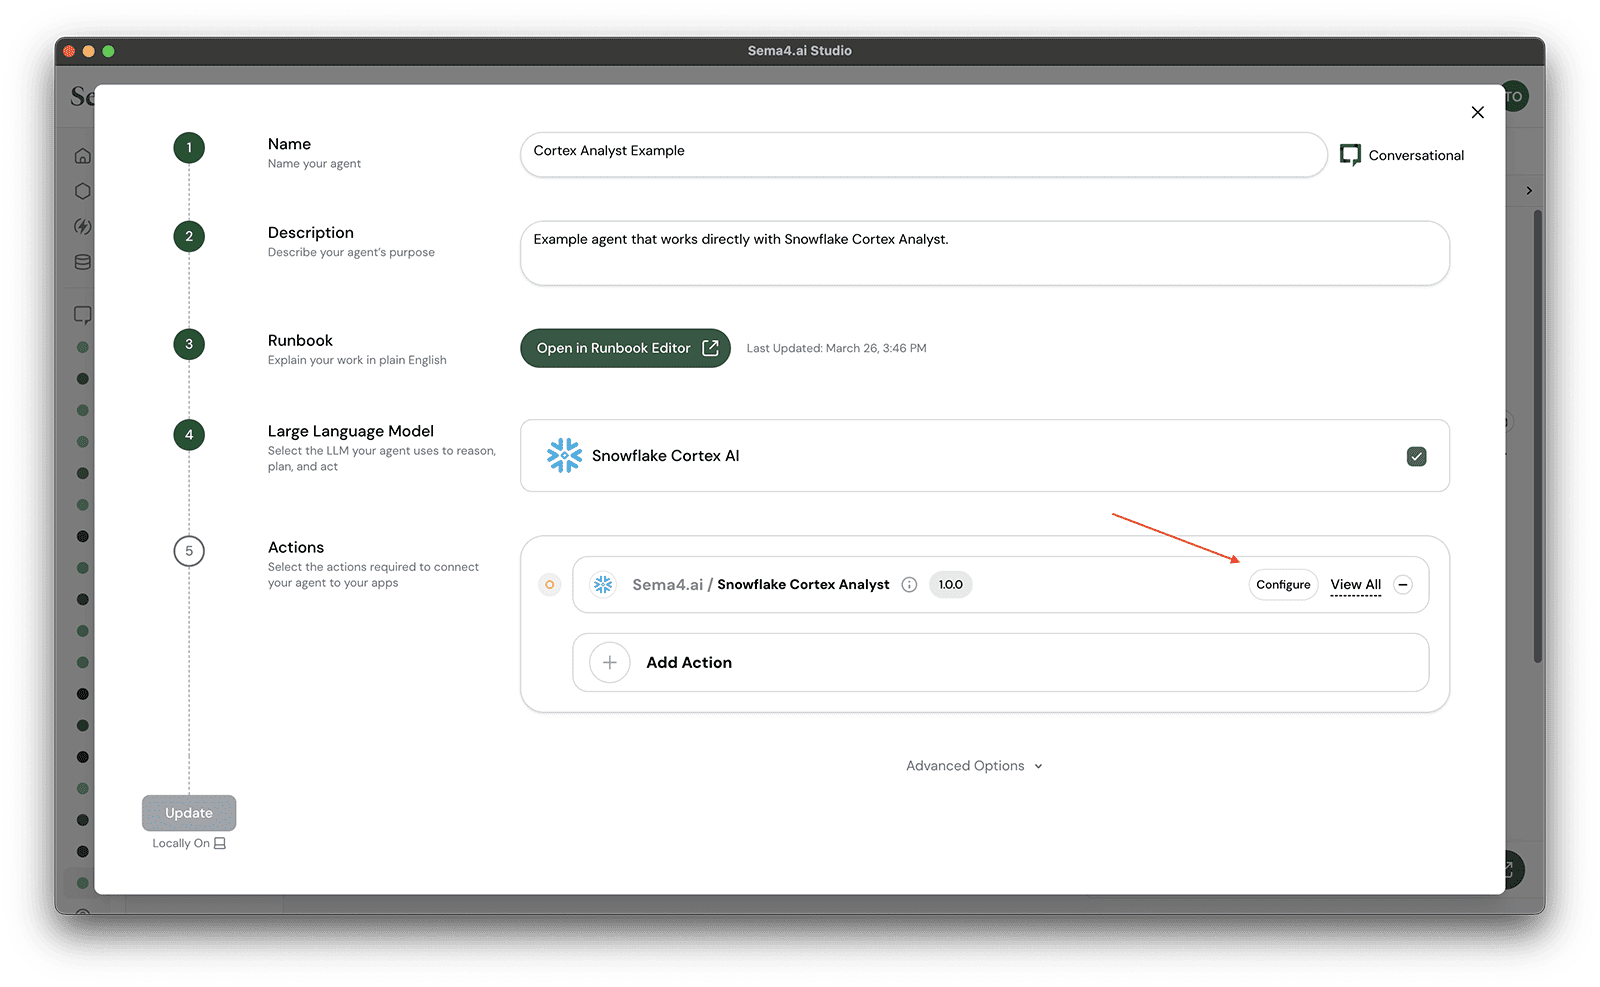
This agent has one action package: Snowflake Cortex Analyst, containg all the actions needed to use the Cortex Analyst service. It needs to be configured with the correct database, schema, and the location of the semantic model file (in Stage).
- Click Configure next to the Snowflake Cortex Analyst action
- Add the following configuration:
Setting Value Database CORTEX_ANALYST_DEMO Schema REVENUE_TIMESERIES Semantic Model File @CORTEX_ANALYST_DEMO.REVENUE_TIMESERIES.RAW_DATA/revenue_timeseries.yaml Warehouse CORTEX_ANALYST_WH -- or any other compute warehouse you have access to
You can click the icon in any input field to reveal its contents.
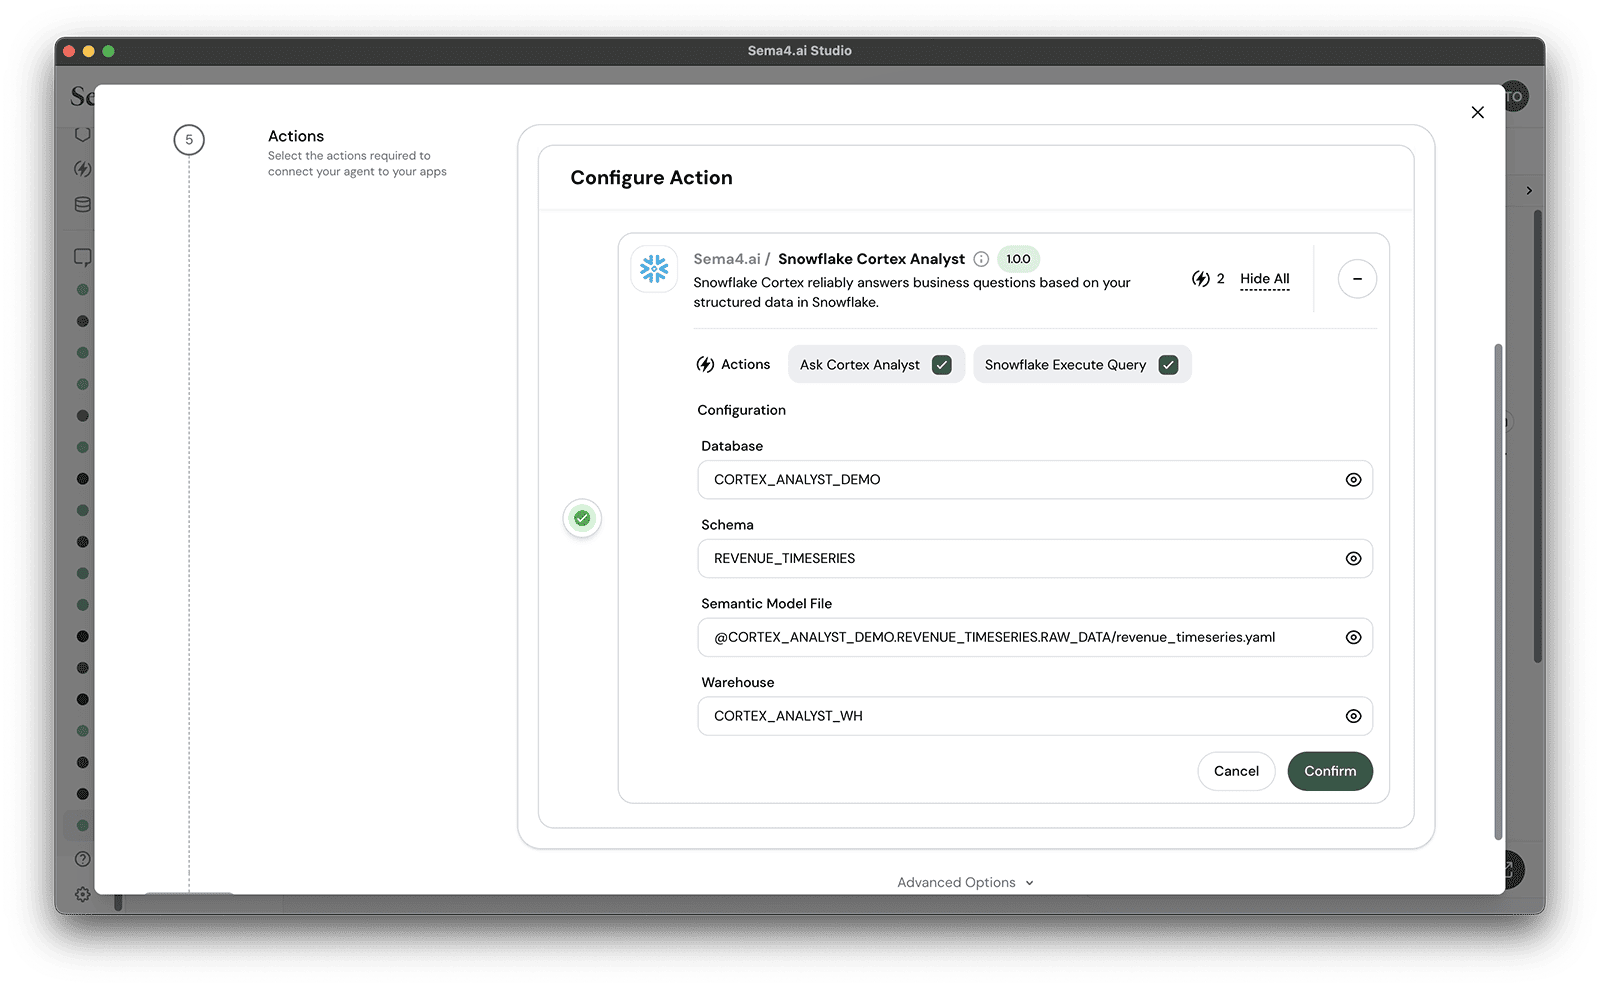
- Click Confirm to save the configuration
Deploy the Agent
Once configuration is confirmed, the Deploy button will become active. Click it to deploy your agent. It'll take a minute or two to deploy.
Review the Runbook
Once your agent is up and running, you'll be taken to the agent chat view. Take a moment to review what you have created. Open the runbook to review what the agent is tasked with. You don't need to make any changes to the runbook, but it is what you edit to change the agent's behavior.
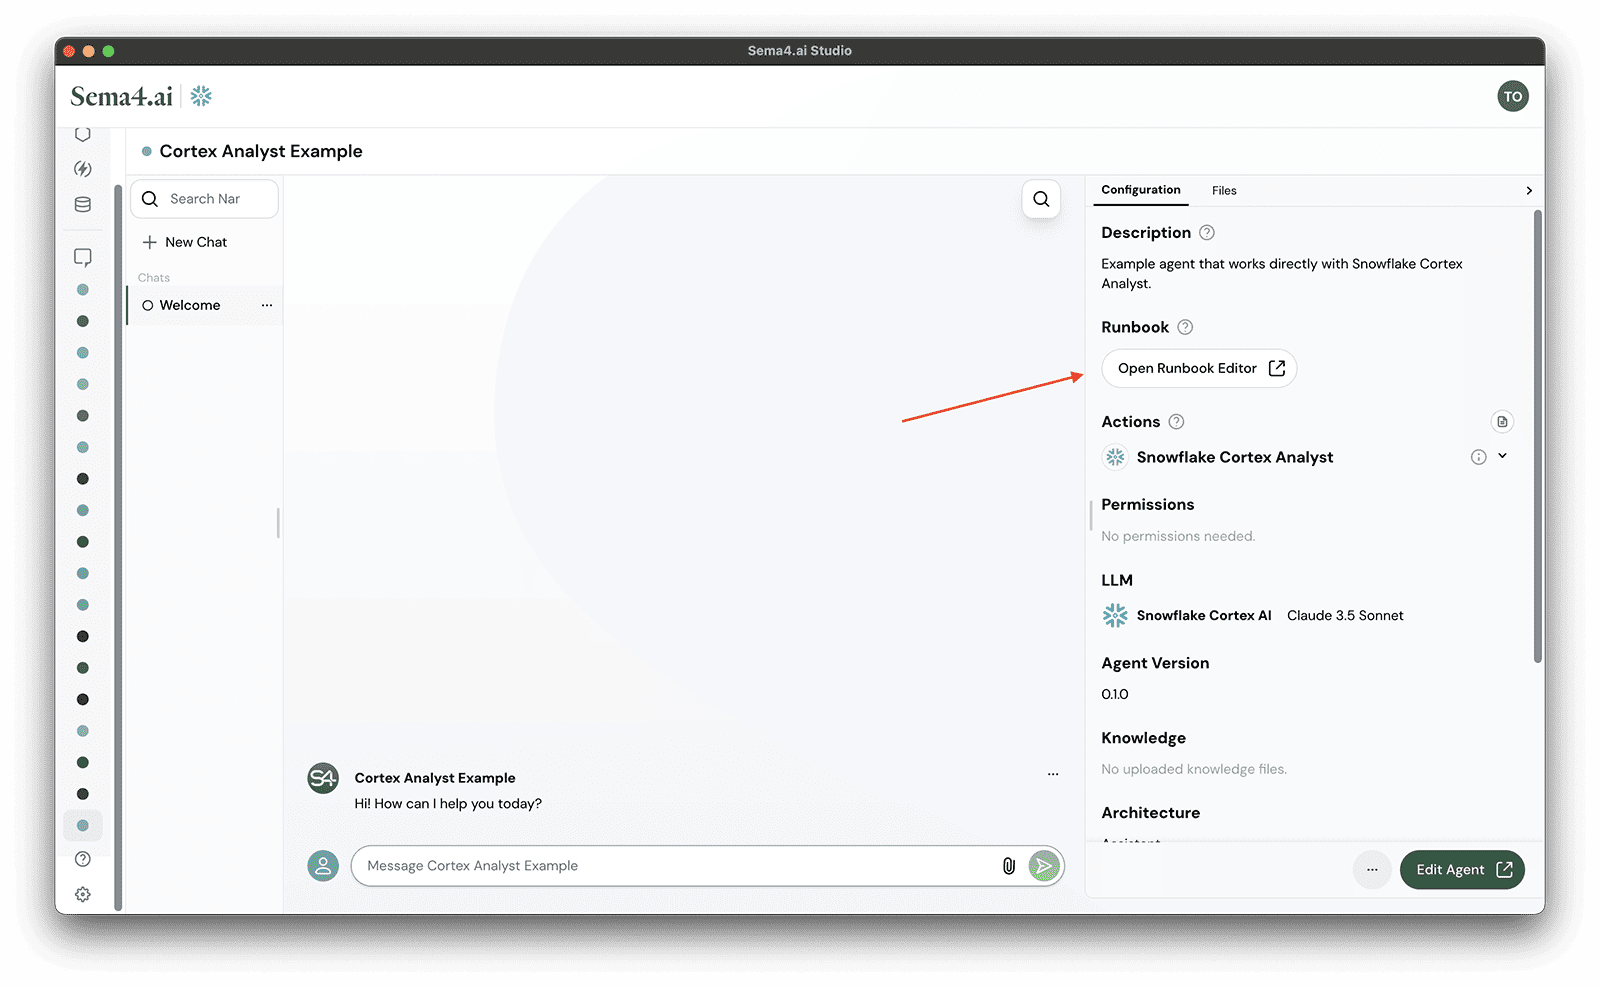
Close the editor when you are ready to start chatting with the agent.
Start Chatting
Close the runbook and start interacting with your agent. Try asking questions like:
Which regions are experiencing the fastest growth in sales in 2024?
The agent will use the Cortex Analyst service to generate a SQL query and show it to you - and then ask if you want to execute it.
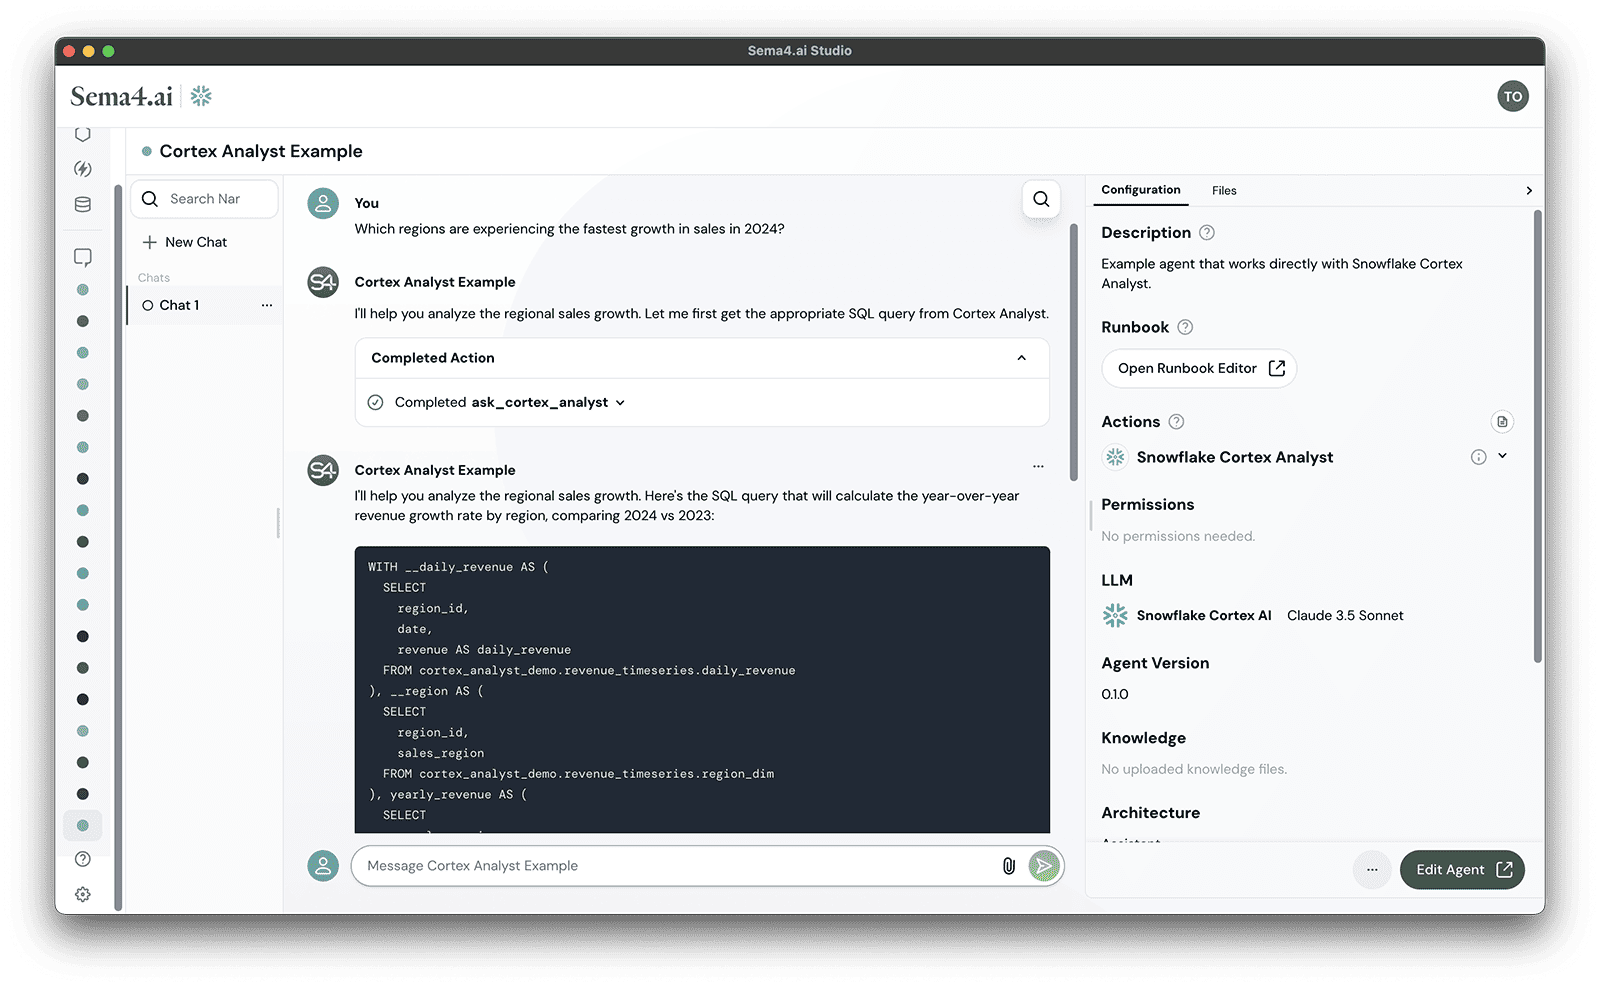
The agent uses natural language understanding to interpret your questions and leverages the Cortex Analyst service to find relevant information in your data.
Conversation Guide
Use these example messages to explore your data with Cortex Analyst. Each message gives you a sense for the different capabilities of the agent, from basic data exploration to complex analysis.
Analyze the monthly sales trends for each product line.
Examine how sales fluctuate month-to-month for different product lines, identifying peak sales periods and potential seasonal trends.
What are the top-performing regions for electronics sales?
Identify which regions generate the highest revenue from electronics, allowing for targeted marketing efforts and resource allocation to maximize sales in high-performing areas.
Can you compare the growth rates of different product lines over the past year?
Evaluate the year-over-year growth rates for each product line to determine which products are gaining popularity and which may need strategic adjustments to boost sales.
How do sales of home appliances vary by region?
Analyze regional differences in home appliance sales to understand market preferences and tailor product offerings to meet local demand, enhancing customer satisfaction and sales performance.
Perform a profitability analysis for the toys product line across all regions.
Assess the profitability of the toys product line by region, considering factors such as cost of goods sold and revenue.
Additional actions can be added to agents at any time simply by clicking Edit Agent > Add Action
Deploying agent in Team Edition Control Room
When deploying the agent in Team Edition Control Room running in SPCS, you will need to ensure that you grant the necessary privileges to the application. If you have installed the application with something else than standard app name, remember to update the statements below.
GRANT USAGE ON DATABASE CORTEX_ANALYST_DEMO TO APPLICATION ENTERPRISE_AI_AGENTS_TEAM_EDITION;
GRANT USAGE ON SCHEMA CORTEX_ANALYST_DEMO.REVENUE_TIMESERIES TO APPLICATION ENTERPRISE_AI_AGENTS_TEAM_EDITION;
GRANT SELECT ON ALL TABLES IN SCHEMA CORTEX_ANALYST_DEMO.REVENUE_TIMESERIES TO APPLICATION ENTERPRISE_AI_AGENTS_TEAM_EDITION;
GRANT USAGE ON ALL STAGES IN SCHEMA CORTEX_ANALYST_DEMO.REVENUE_TIMESERIES TO APPLICATION ENTERPRISE_AI_AGENTS_TEAM_EDITION;
GRANT READ ON STAGE CORTEX_ANALYST_DEMO.REVENUE_TIMESERIES.RAW_DATA TO APPLICATION ENTERPRISE_AI_AGENTS_TEAM_EDITION;
GRANT USAGE ON WAREHOUSE CORTEX_ANALYST_WH TO APPLICATION ENTERPRISE_AI_AGENTS_TEAM_EDITION;
Next Steps
Now that you've successfully set up the Cortex Search template with sample data, you can:
- Edit the runbook to remove the SQL display and confirmation step - in real scenarios you'd usually want the agent to execute the query and return the results to you.
- Apply this template to your own datasets by creating a new Cortex Analyst semantic model
- Explore the Snowflake Cortex Search Template for data exploration capabilities