Step-by-step walkthrough
Prerequisites
Before starting this tutorial, make sure you have:
- Installed Sema4.ai Studio and connected it to Snowflake
- Installed the Sema4.ai SDK extensions
- Completed the Data setup guide to create the required database objects and load sample data
- The following Snowflake requirements:
- Admin level access to a Snowflake account
- Key-pair authentication set up for your Snowflake user
- Cortex AI LLM usage granted to your account/role (and cross-region inference enabled in case your Snowflake account is in a region where it's needed, read more here (opens in a new tab))
Part 1: Build your first agent
You'll learn how to:
- Build your first agent from the scratch
- Work with a natural language runbook
- Connect with Snowflake Cortex Analyst
- Test your agent locally
Open Sema4.ai Studio
We'll get started using Sema4.ai Studio. Open it up and take a moment to look around the Studio. These are the main tabs you'll be using:
- Agents - This is where you'll see all your agents, create new ones, and manage existing ones.
- Actions - Home of the actions that your agents can use. We've included a gallery of prebuilt actions to common platform (tagged with prefix
Sema4.ai) and you can also create your own (will be tagged with prefixMy Actions). - Data Sources - Connections to data sources that you can use in your agents.

Build a new agent
Now that you're all set up, let's build your first agent! We are going to build one from the scratch (but worry not, all details are provided in the tutorial).
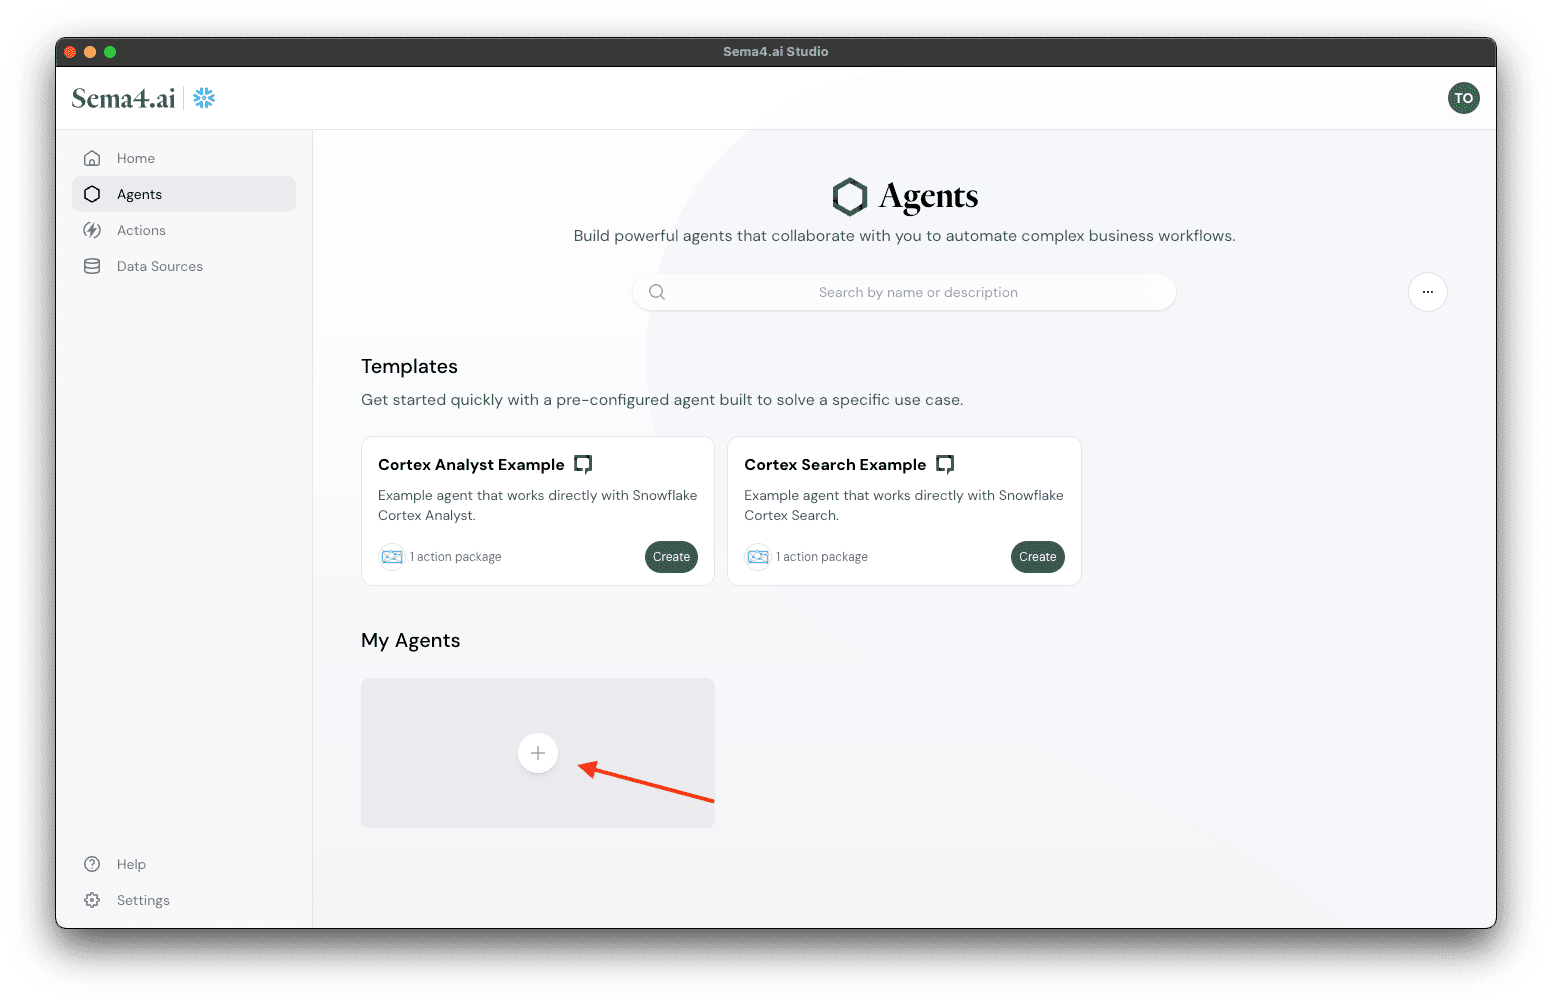
- Navigate to the Agents screen from the main navigation (or click Try Now button in the home screen)
- Under My Agents tab, click button.
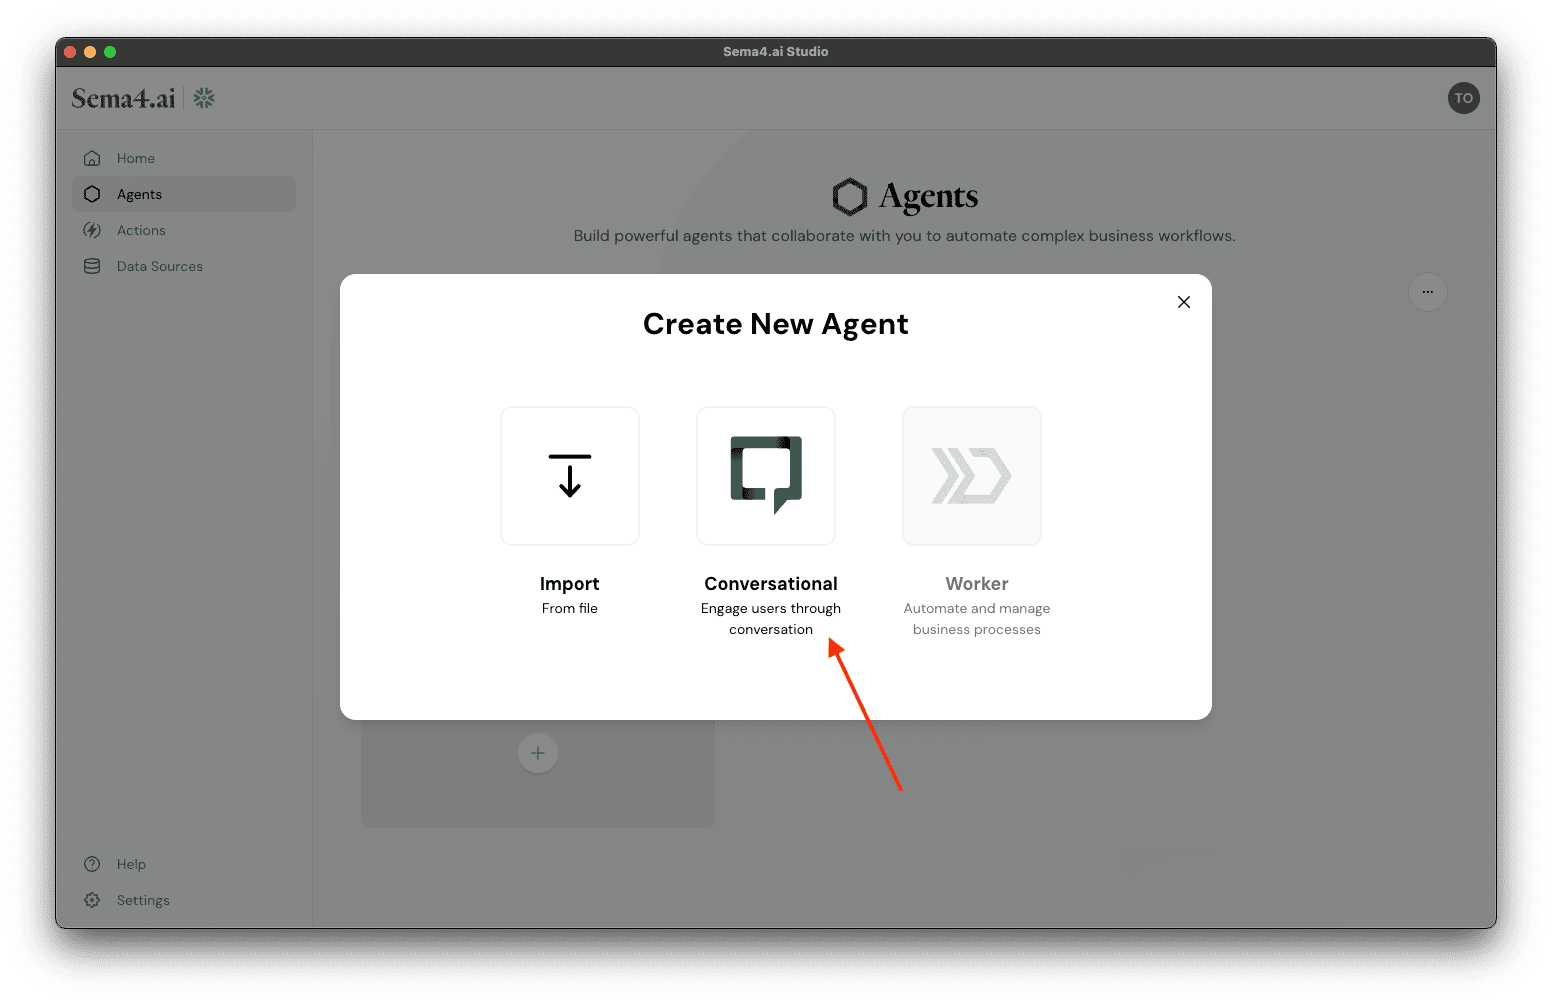
- Choose Conversational as the agent type.
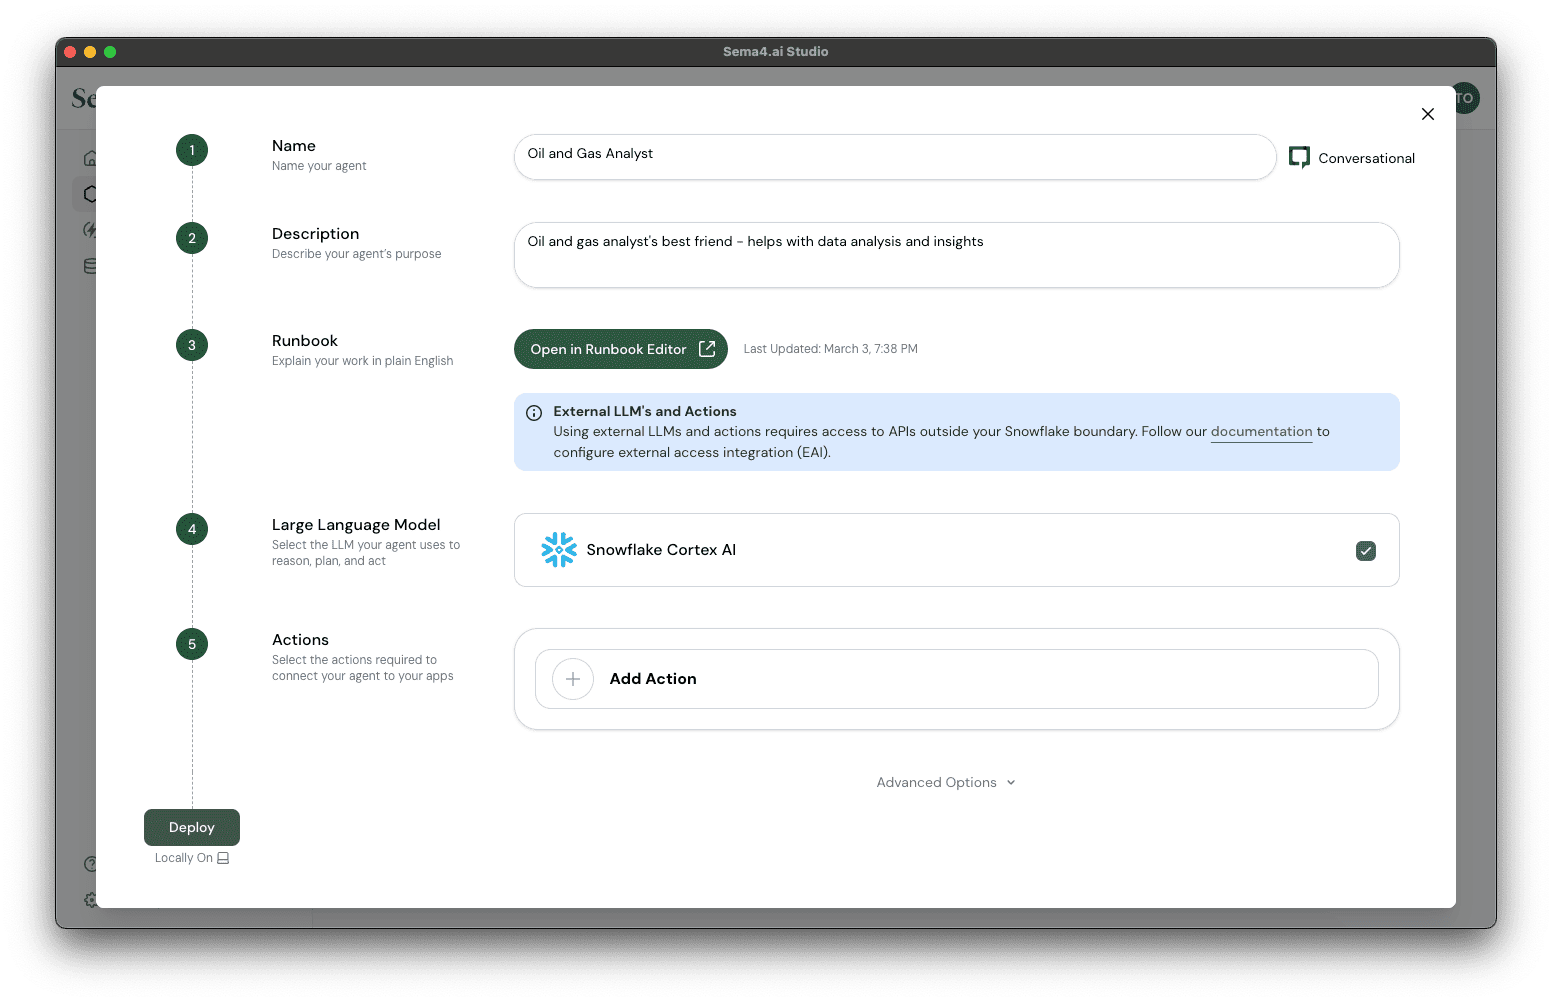
- Give your agent a name, for example
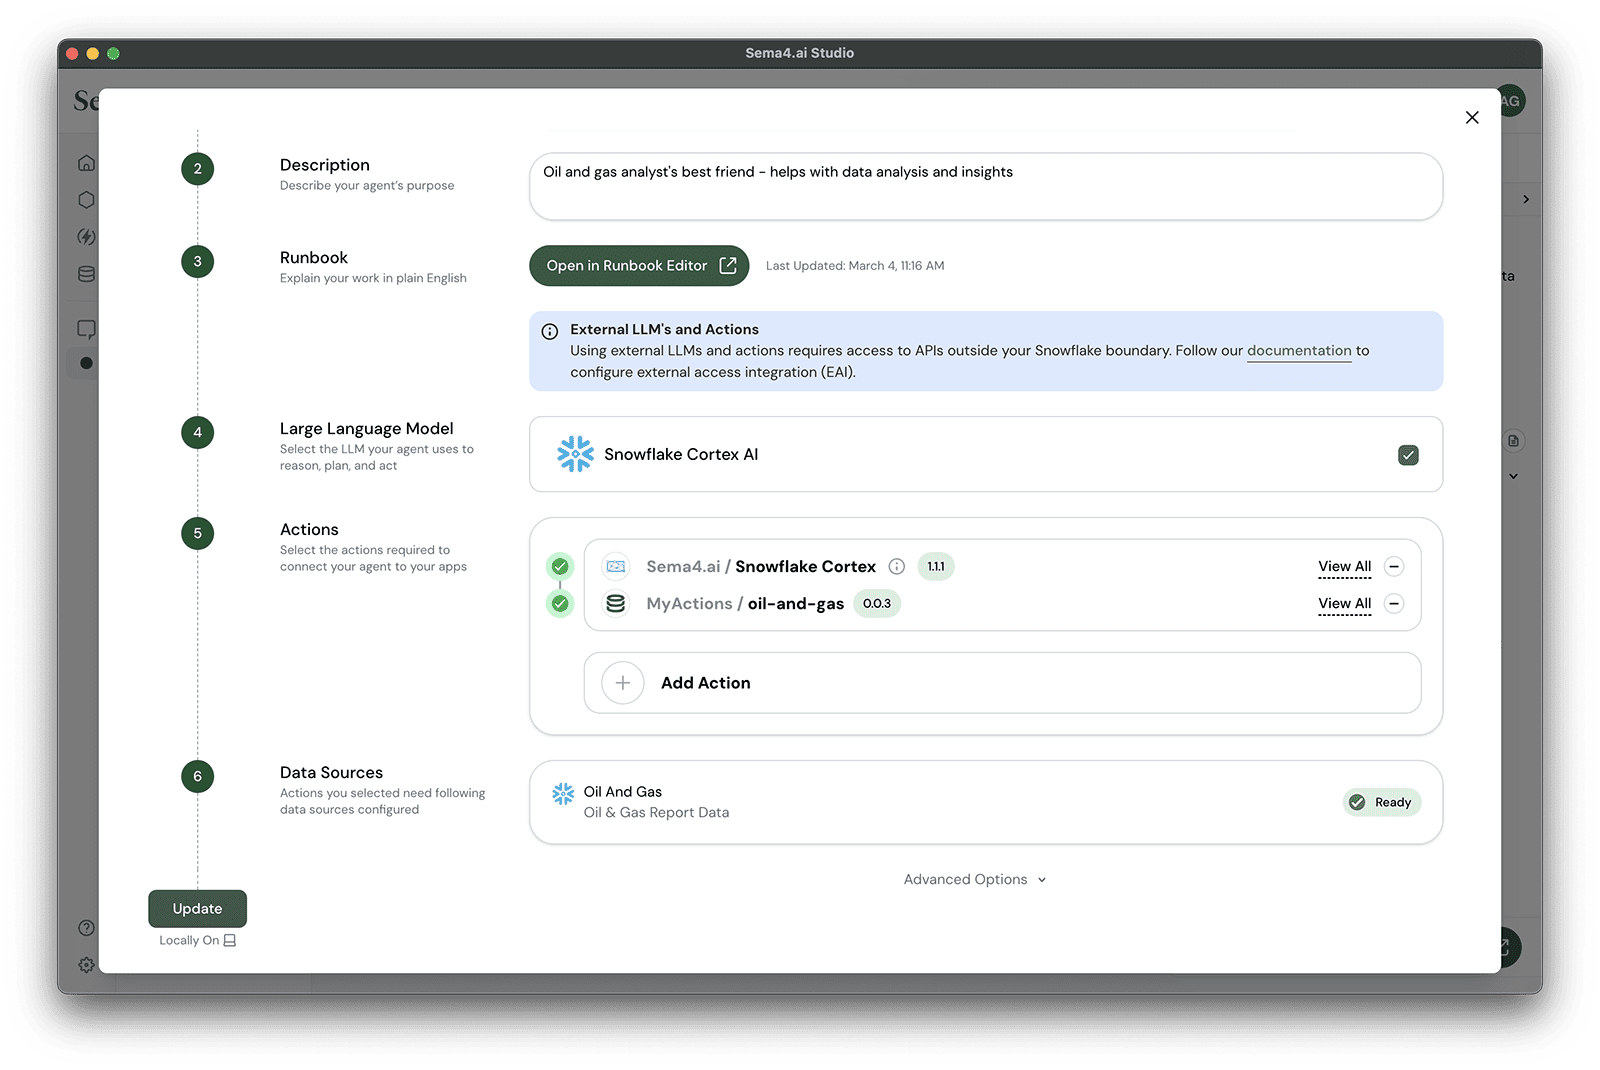
Oil and Gas Analyst. - Give your agent a description, for example
Oil and gas analyst's best friend - helps with data analysis and insights. - Next, we'll create a runbook for your agent. Click Create Runbook button to open the editor. By default the editor shows an outline of a runbook that you can use to get started.
- We've made this easy for you: Download the runbook.md (opens in a new tab) file first.
- Then click the import button with icon and select the runbook file you just downloaded with the file browser.

- Click Save button in the top right corner to save your changes, and then close the runbook editor with the button.
- Because you're connected to your Snowflake account, we've automatically configured Snowflake Cortex AI as your default LLM. Let's not change that.
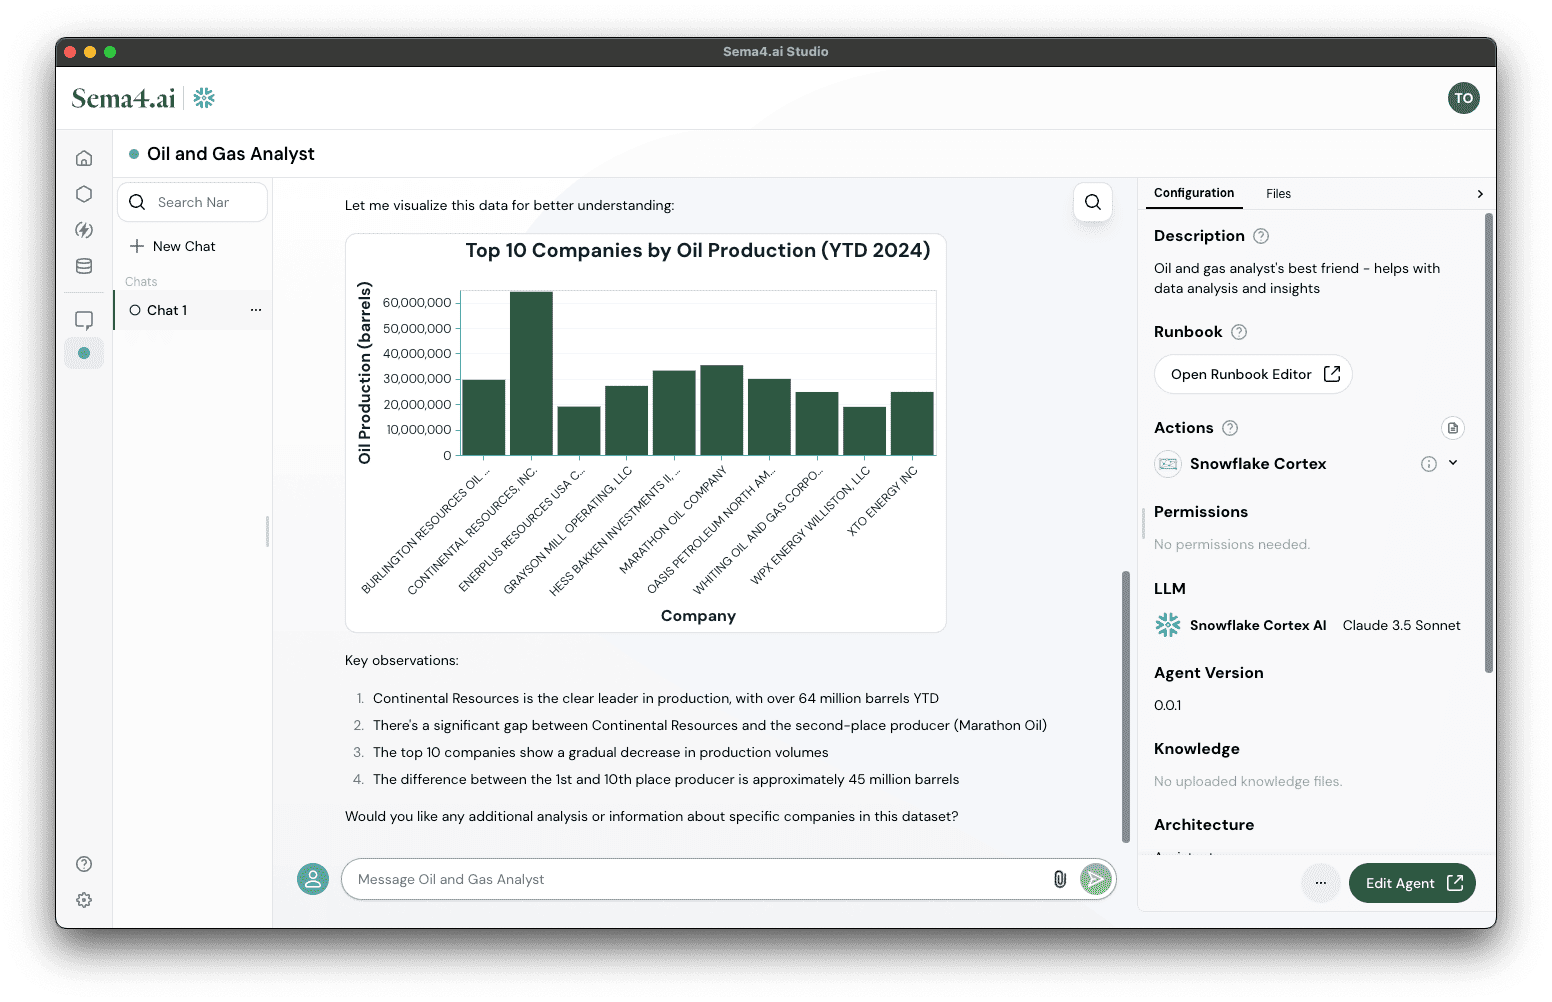
Ok, taking a bit of a breather here. Now all the basics configurations of your agent are done. This is what you should see:
Add actions
Next up, we'll add actions to your agent. We've prepared a gallery of pre-built actions that make it easy to connect agents to your enterprise apps. We have covered creating your own custom actions with Python in other tutorials.
Adding the Snowflake Cortex Analyst action package
- Click Add Action.
- Scroll to or search for
Sema4.ai / Snowflake Cortex Analystaction package.
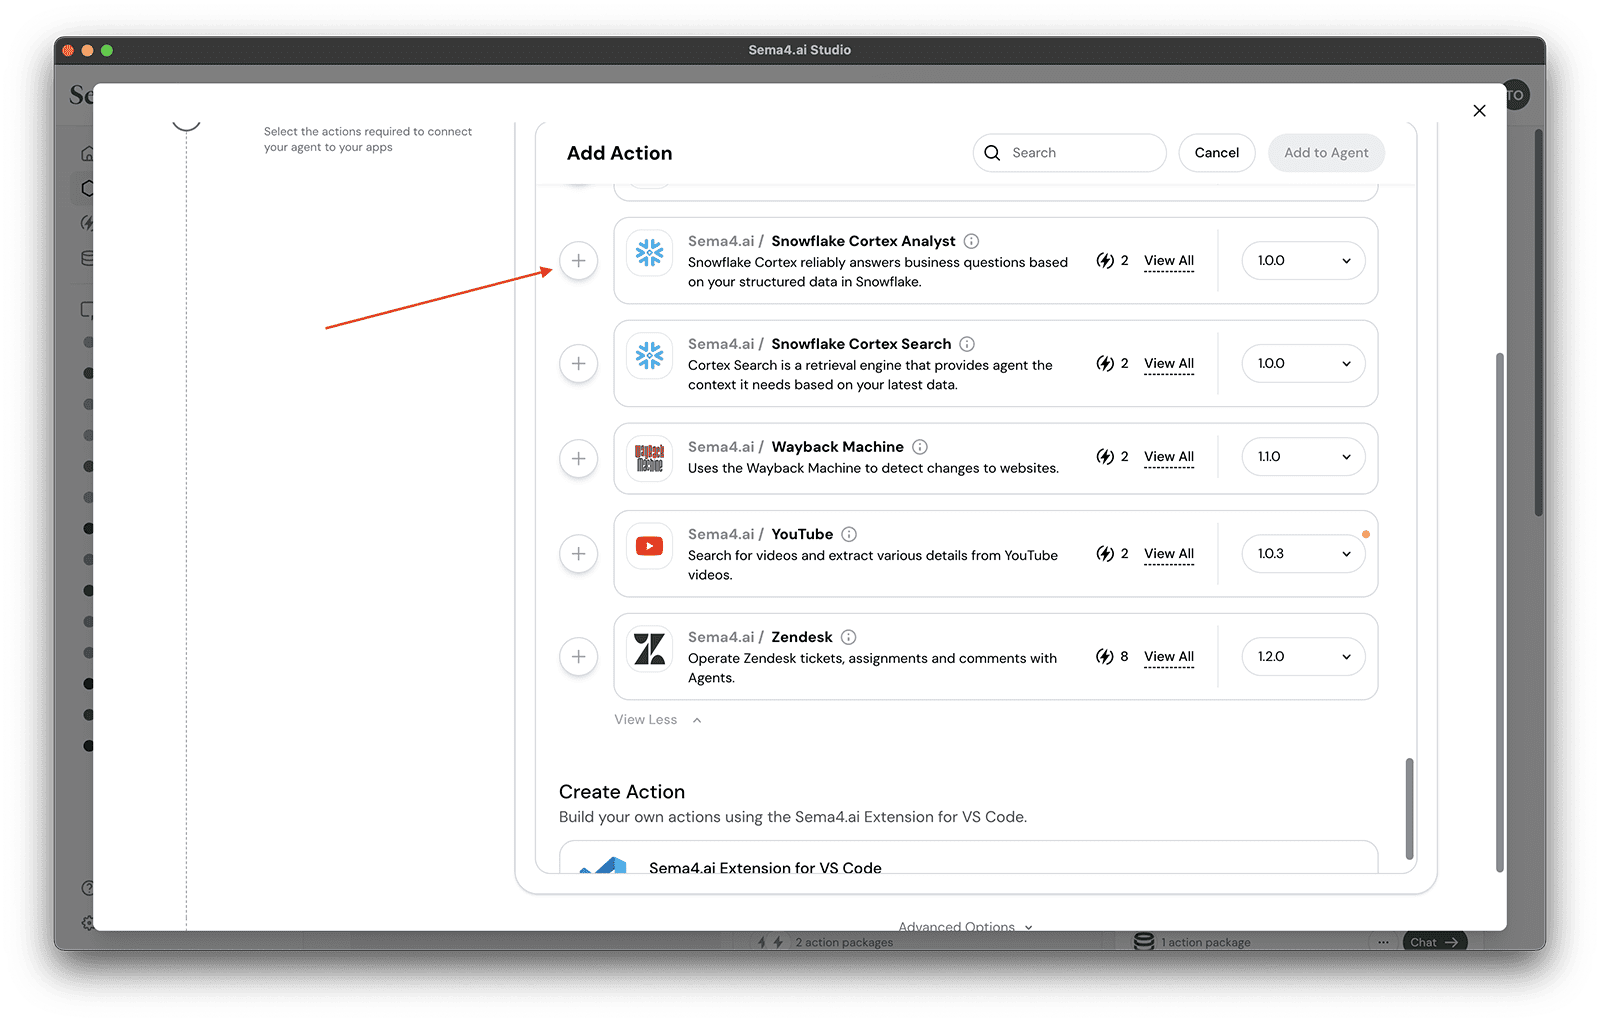
- Click button to add a new action to your agent - it may take a bit as the action package and the Python environment are automatically loaded.
- Then click Add to Agent button at the top.
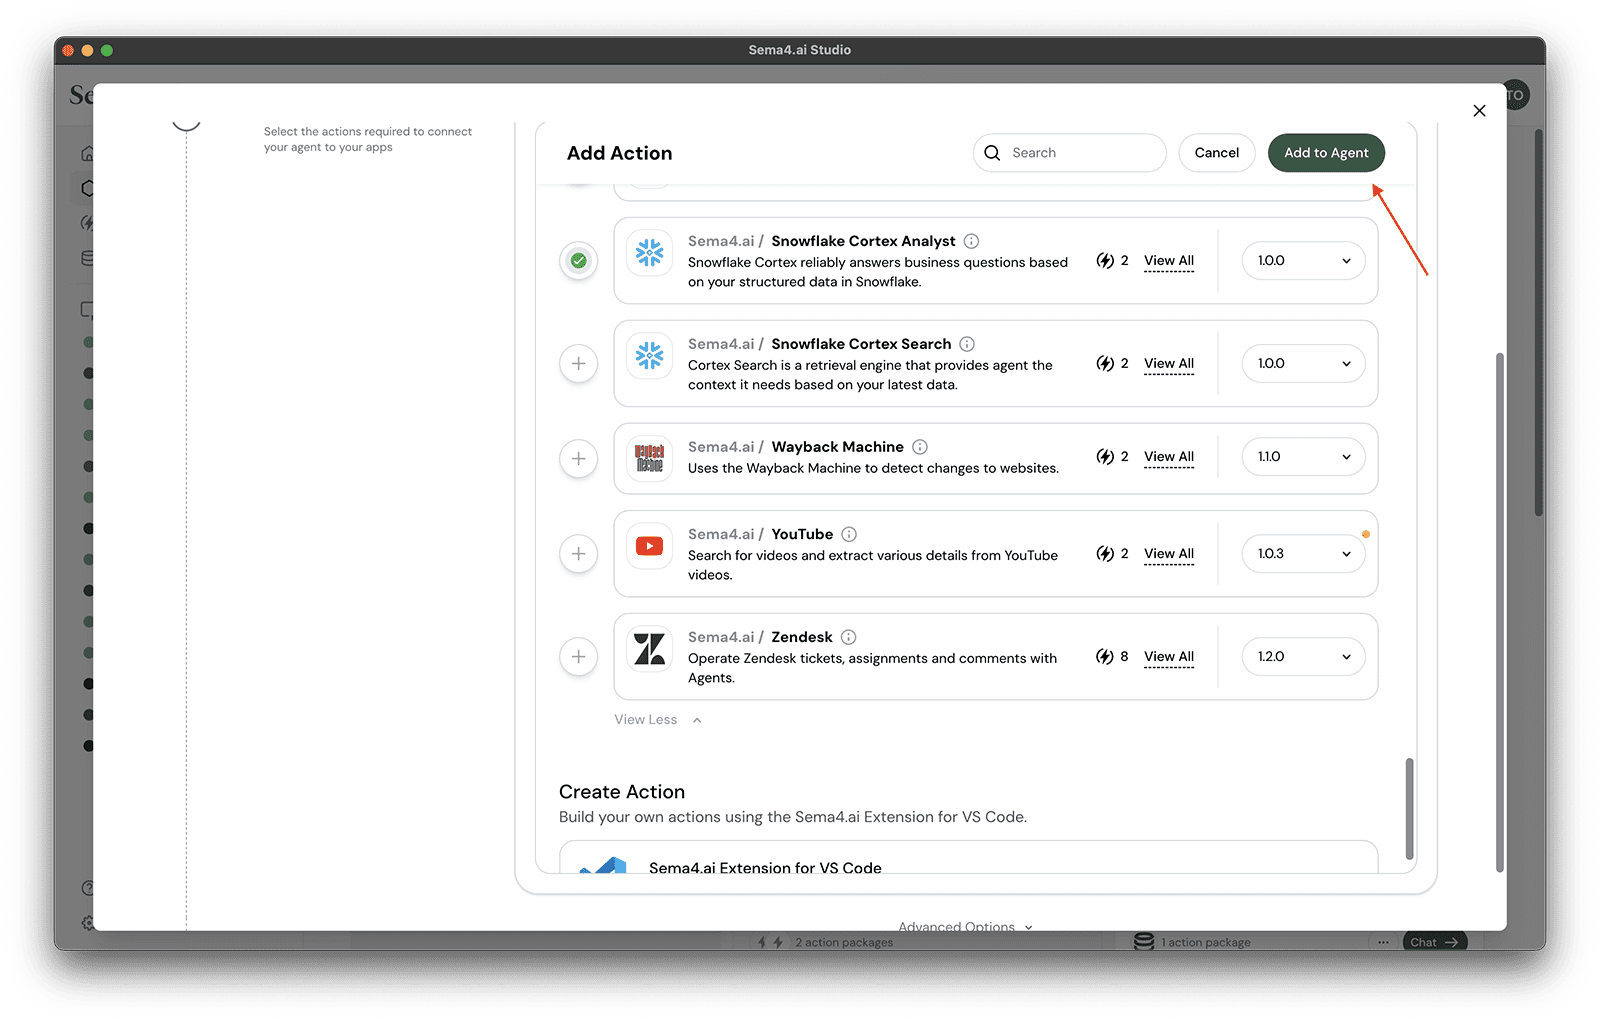
- You'll see that the action package is "yellow" which means you need to provide some configuration details.
- Click the Configure button.
- Finally, we'll provide the values that let the action connect with your Snowflake Cortex services. Input these values to the fields:
| Configuration | Value |
|---|---|
| Database | OIL_AND_GAS |
| Schema | PUBLIC |
| Semantic model file | @OIL_AND_GAS.PUBLIC.CORTEX_ANALYST/oil_gas.yaml |
| Warehouse | SEMA4_DEMO_WH |
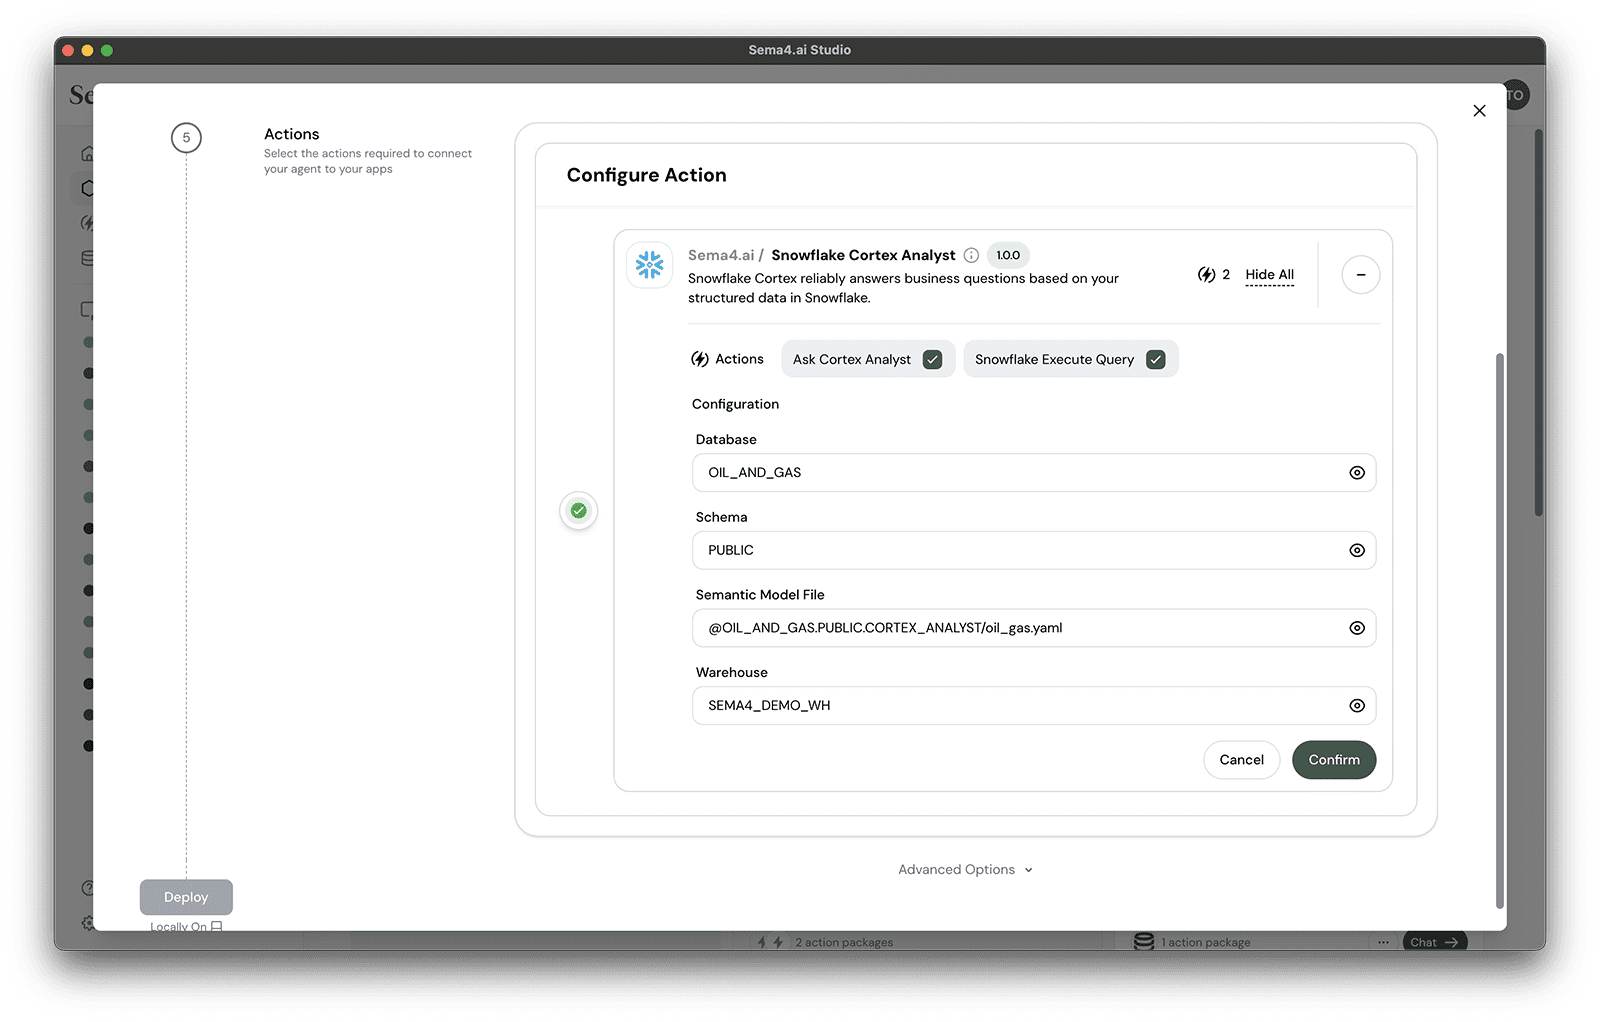
- Click Confirm.
- Click Deploy on the bottom left to bring your agent to life!
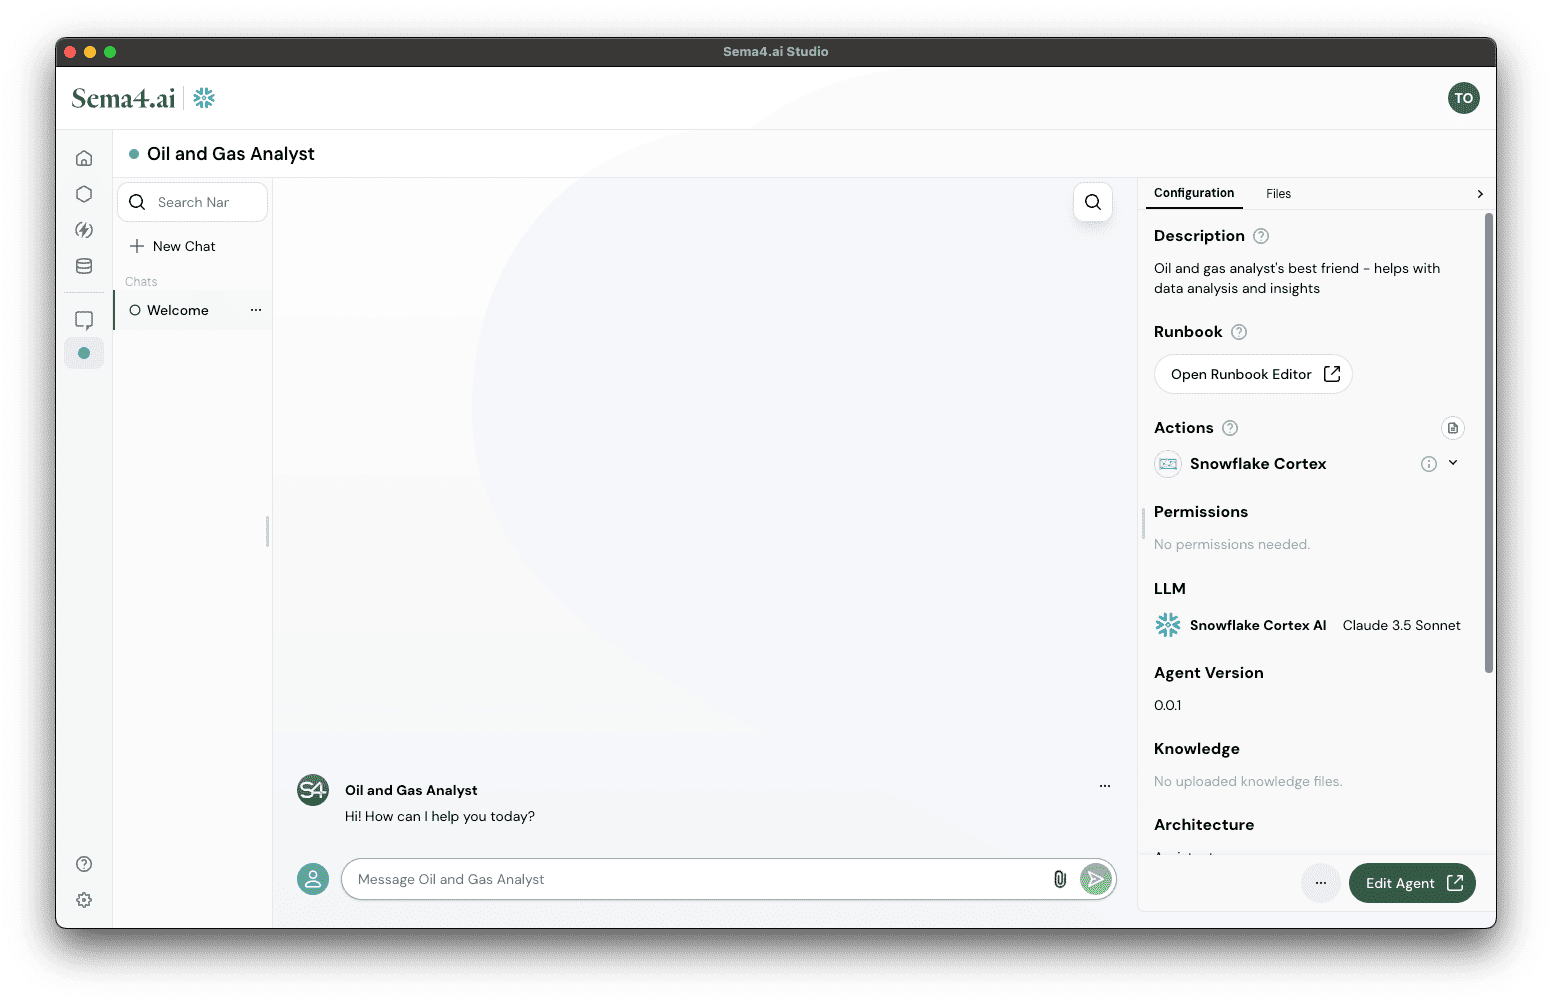
Test your agent locally
Once agent deployment is complete, you'll see the chat interface along with the agent details on the right panel.
- Create new Chat from the left panel
- Ask agent a question relevant to data, for example:
What is the total oil production by company for year to date 2024?
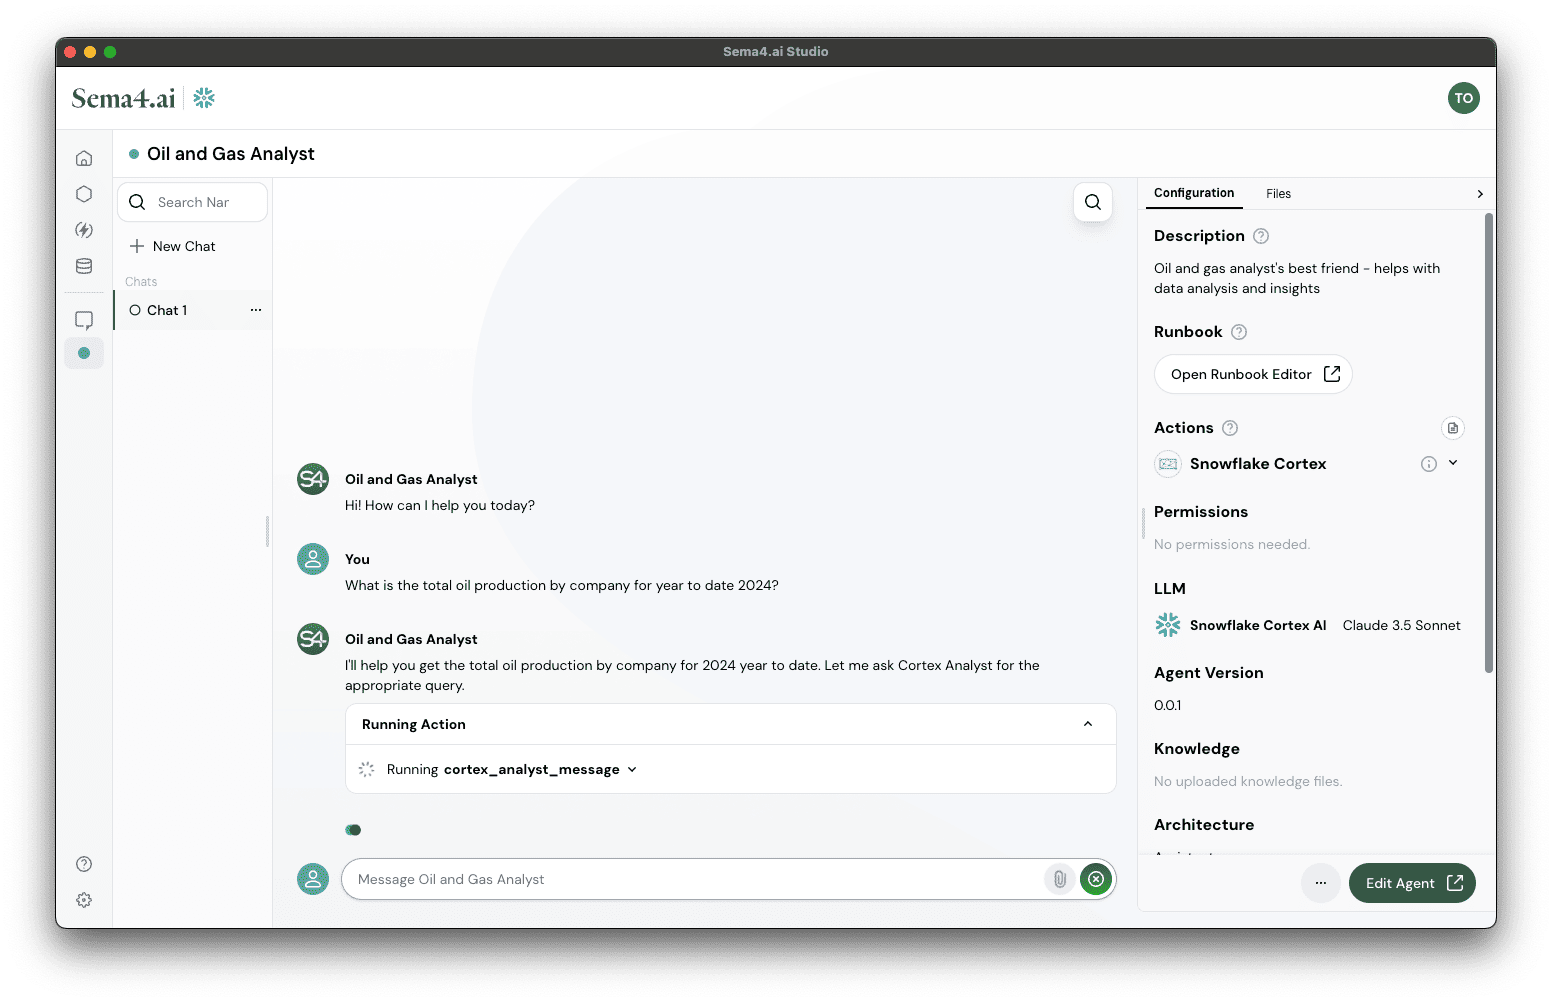
- Observe how calls the Cortex Analyst action to generate a query that answers your question, and then executes the query using the Snowflake Execute Query action.
- Finally, the agent produces a chart of the results, in cases where chart makes sense - this is because we instructed the agent to do so in the runbook.
Now it's your turn!
Try asking the agent a few questions to see how it performs. Here are some examples:
Show me my top 5 producing wells
Can you show me the monthly production data for TEDDY FEDERAL 12X-5F
What other wells are operated by this same company?
Can you show me a pie chart of the distribution of well types for XTO?
Great job! You've completed the first part of the tutorial and built and tested your first agent all on your laptop. Now let's move on and make your agent more powerful by adding data actions!
Part 2: Connect to data
You'll learn how to:
- Connect to your Snowflake data sources
- Create and test data actions
- Use data actions with your agent
Open VSCode or Cursor
- Open VSCode or Cursor
- Create a new empty directory and open it in your IDE
- It should look something like this:
Create a new action package
Now let's build your first data action. The templates provided by our SDK are the easiest way to get started as they provide the basic structure and some example code to get you going quickly.
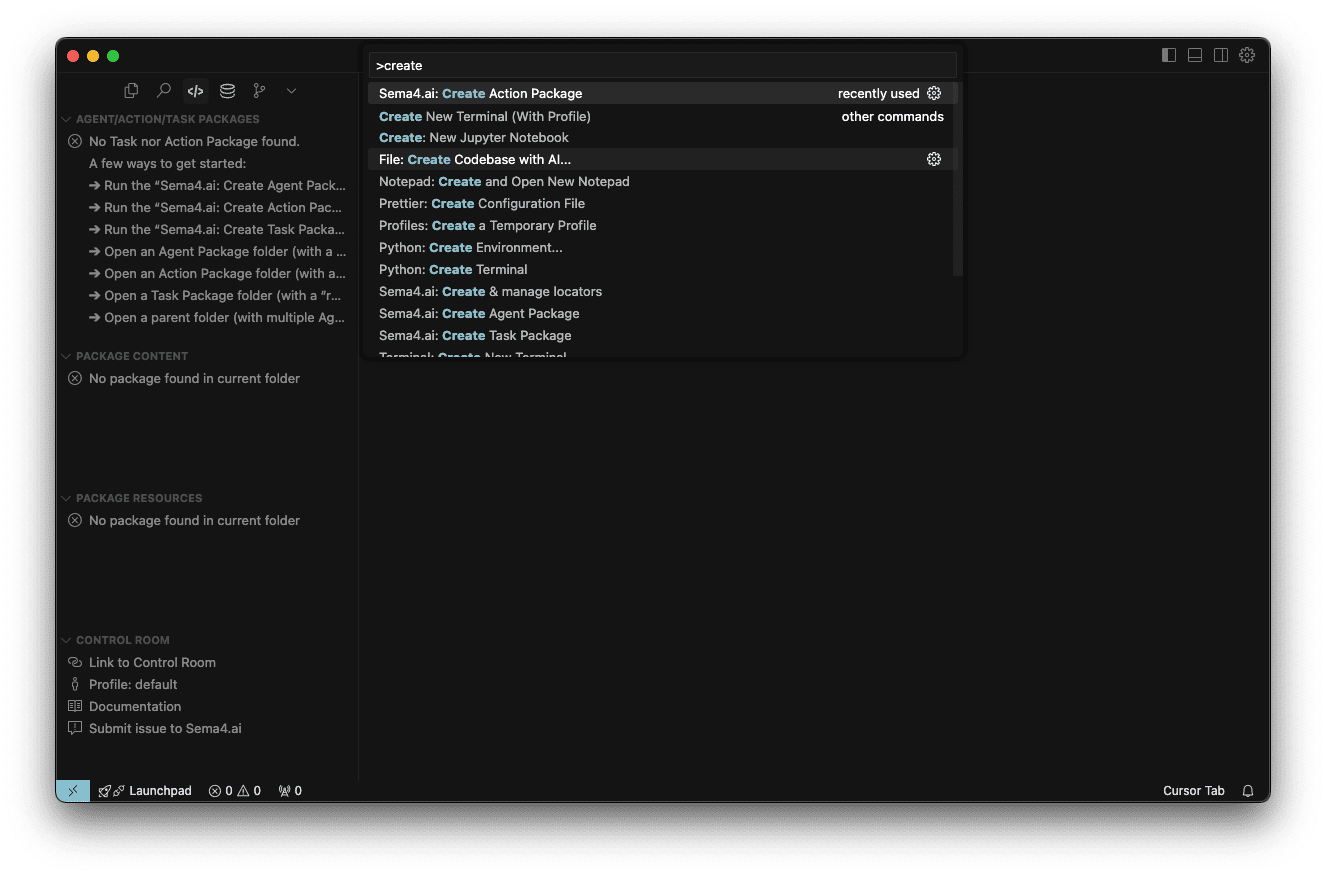
- Make sure your VS Code/Cursor is opened in an empty directory
- Open the SDK Extension
- Use Command Palette (Ctrl+Shift+P or ⌘+Shift+P)
- Start typing "Create Action Package" and you'll see a command Sema4.ai: Create Action Package appear. Click it.
- Choose project location (typically your workspace folder)
- Give a name to your action package, for example
oil-and-gas - Select a template from the list, in this case please pick the Data Access/Query
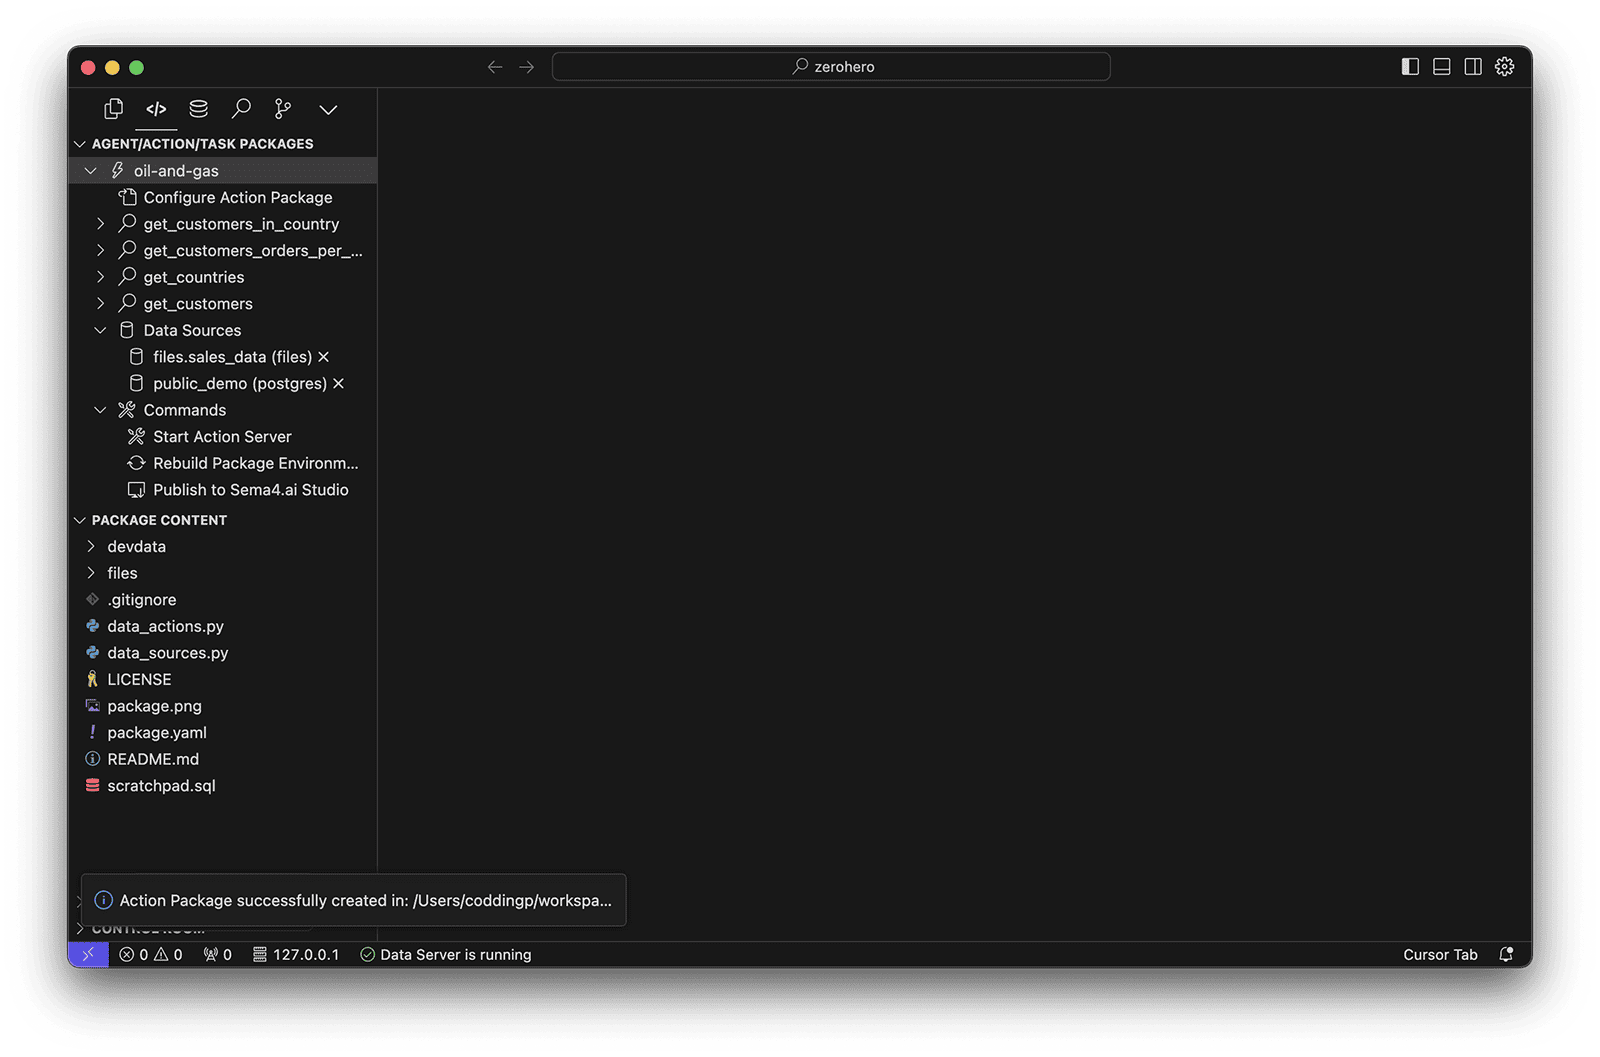
- The extension builds your Python environment and create the project structure, this will take a few moments
Once your environment is ready, you'll see that the action list in the side panel get updated to reflect the chosen template, and you can see the project structure in the PACKAGE CONTENT panel. Feel free to collapse the PACKAGE RESOURCES and CONTROL ROOM panels to get a better view of the project structure.
Explore data action structure
Your new action project contains:
package.yaml- Configuration for dependencies and metadatadata_actions.py- Main Python code for your data actionsdata_sources.py- Definition of your data sources and modelsdevdata/*.json- Test input files for local developmentpackage.png- Icon for your action package
Exploring the data_actions.py file further, you'll see that it contains a few examples of data actions, to give you a sense for how to use the Python functions, decorators, parameters and different return types.
@query
def get_customers_in_country(country: str) -> Response[Table]:
    """
    Get all customer names, their id's and account managers in a given country.
	...
The @query decorator exposes this function to the agent. The docstring helps the agent understand how and when it should be used, and the parameters with their type hints (e.g. country: str) informs the agent what parameters are required to invoke this data action.
Configure data sources
Now that our data action package is created, we need to configure our data sources.
- Open the
data_sources.pyfile. This template file shows you an example of how to use a CSV file and a Postgres database, but in this example we'll focus on using a single Snowflake data source. - Replace the contents of the
data_sources.pyfile with the following:
"""
The data_sources.py is used to define both the datasources as well as the data server bootstrap.
"""

from typing import Annotated
from sema4ai.data import DataSource, DataSourceSpec

OilGasDataSource = Annotated[
    DataSource,
    DataSourceSpec(
        name="oil_and_gas",
        engine="snowflake",
        description="Oil & Gas Report Data",
    ),
]
Setup Data Source
- Open up the SDK Extension
- Expand Data Sources
- Click the button next to
oil_and_gas (snowflake)to setup the connection needed to access this data.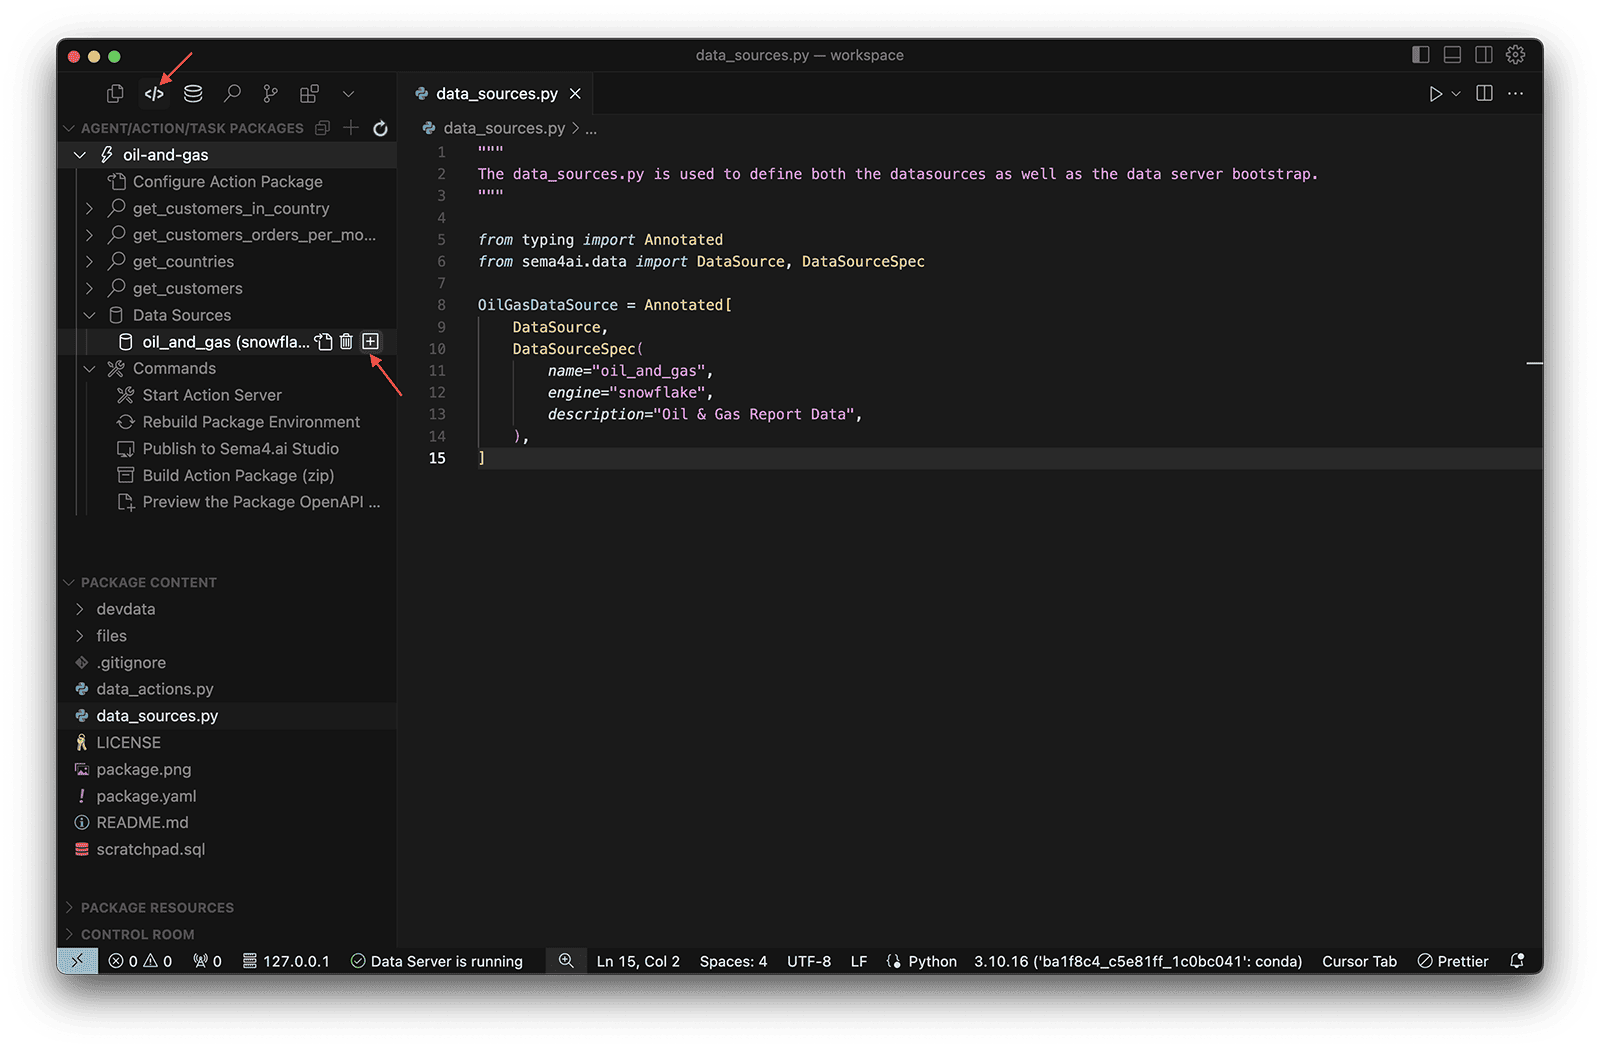
Setup Data Source - Now, fill in the details to connect to the warehouse, database, and schema you created in the previous step.
| Setting | Value |
|---|---|
| Engine | Snowflake |
| Name | oil_and_gas |
| Credential Type | linked |
| Warehouse | SEMA4_DEMO_WH |
| Database | OIL_AND_GAS |
| Schema | PUBLIC |
The 'linked' credential type means that the connection will use the same credentials provided when linking Studio to Snowflake.

- Click Add to complete data source setup.
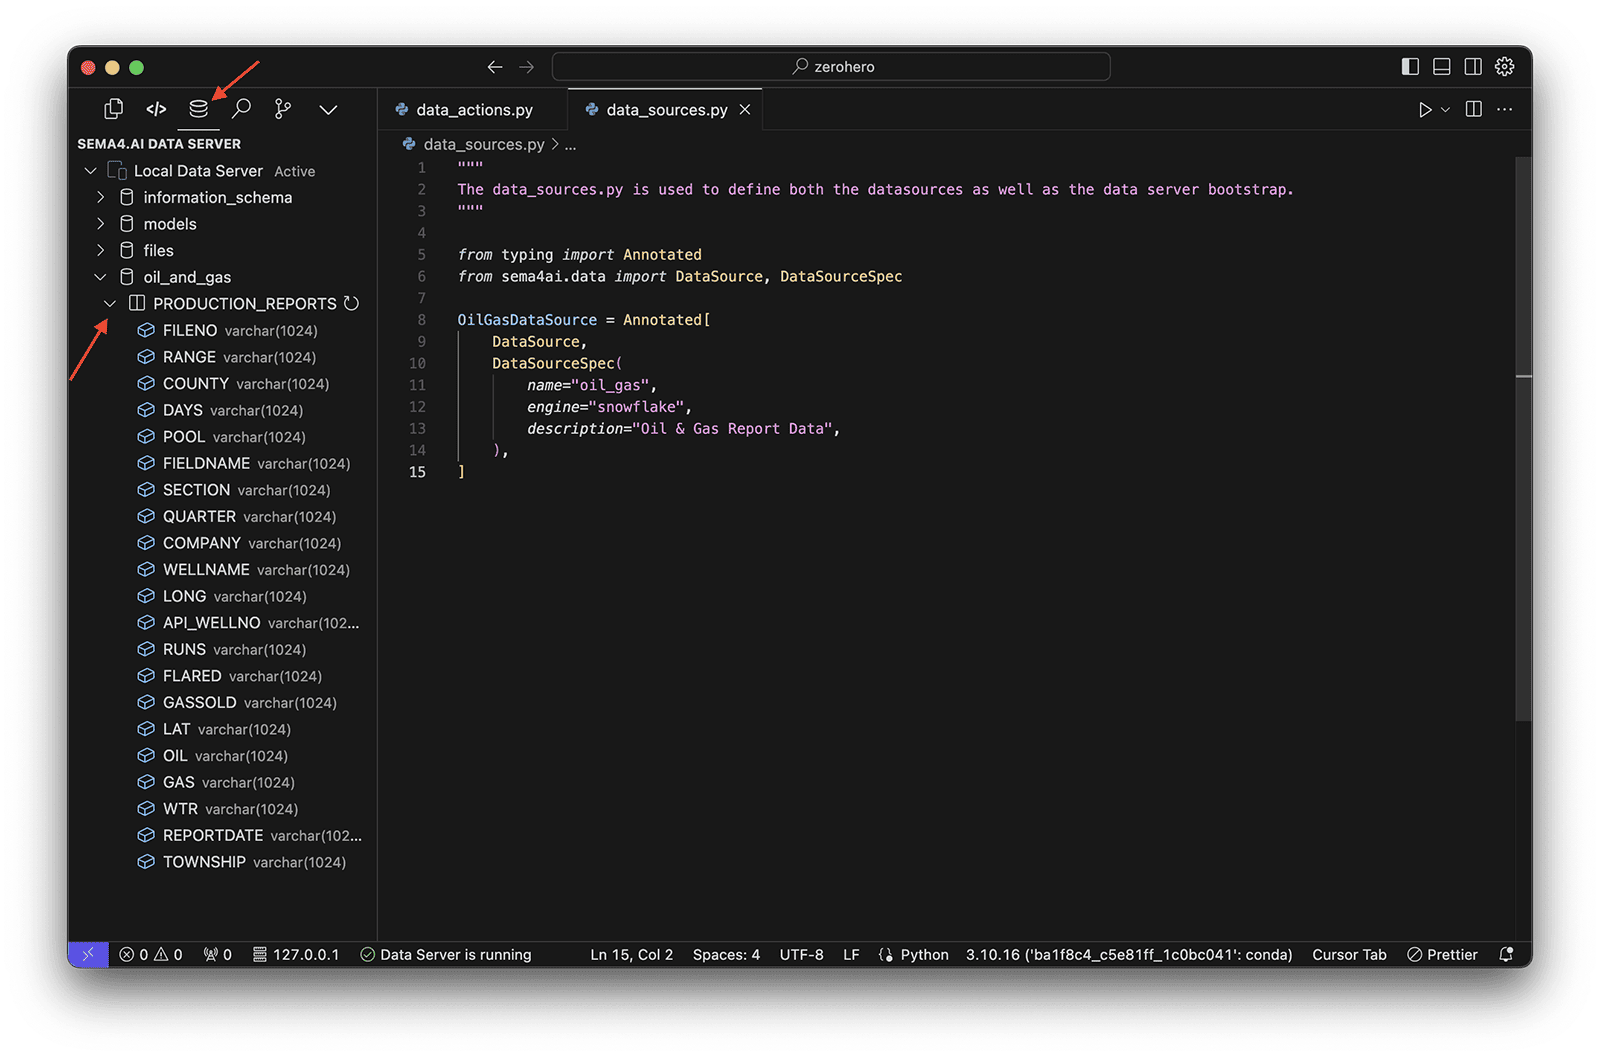
Browse tables
- Open the Sema4.ai Data Access extension
- Expand the
oil_and_gasdata source to see the tables available in the data source. - Click on the
PRODUCTION_REPORTStable to view its contents.
Adding data actions
- Open up the SDK Extension
- Open the
data_actions.pyfile under PACKAGE CONTENT - Replace the contents of the file with the following:
from data_sources import OilGasDataSource
from typing import Annotated
from sema4ai.actions import ActionError, Response, Table
from sema4ai.data import DataSource, query, get_connection
import pandas
import numpy as np
import math
from scipy import stats
from datetime import datetime

@query
def get_production_for_well(wellName: str) -> Response[Table]:
    """
    Get production details for a specific well.

    Args:
        wellName: Name of the specific well.

    Returns:
        str: The complete production results for the well.
    """
    query = """
        SELECT * FROM oil_and_gas.production_reports
        WHERE WELLNAME = $wellName;
        """
    params = {'wellName': wellName}

    result = get_connection().query(query=query, params=params)
    return Response(result=result.to_table())

@query
def get_wells_by_company(
    company: str) -> Response[Table]:
    """
    Get all wells operated by a specific company.

    Args:
        company: Name of the company.

    Returns:
        str: List of wells operated by the company.
    """
    company = "%" + company + "%"
    query = """
        SELECT DISTINCT WellName, API_WELLNO, FieldName
        FROM oil_and_gas.production_reports
        WHERE Company LIKE $company
        ORDER BY WellName;
        """
    params = {'company': company}

    result = get_connection().query(query=query, params=params)
    return Response(result=result.to_table())

@query
def get_top_producing_wells(limit: int) -> Response[Table]:
    """
    Get the top producing wells based on oil production.

    Args:
        limit: Number of top wells to return.

    Returns:
        str: List of top producing wells with their production figures.
    """
    query = """
    SELECT WellName,
        SUM(Oil) as Oil,
        SUM(Wtr) as Wtr,
        SUM(Gas) as Gas
    FROM oil_and_gas.production_reports
    WHERE Oil > 0
    GROUP BY WellName
    ORDER BY Oil DESC
    LIMIT $limit;
    """
    params = {'limit': limit}

    result = get_connection().query(query=query, params=params)
    return Response(result=result.to_table())


@query
def get_well_location(wellName: str) -> Response[Table]:
    """
    Get the locations of a specific.

    Args:
        wellName: Name of the well.

    Returns:
        str: Latitude and longitude for a specific well.
    """
    query = """
        SELECT DISTINCT WellName, Lat, Long
        FROM oil_and_gas.production_reports
        WHERE WellName = $wellname
        ORDER BY WellName;
        """

    params = {'wellname': wellName}

    result = get_connection().query(query=query, params=params)
    return Response(result=result.to_table())

@query
def find_wells_within_radius(datasource: OilGasDataSource, wellName: str, radius: int) -> Response[Table]:
    """
    Find wells within a specified radius of a given well.

    Args:
        wellName: Name of the well to use as the center point.
        radius: Radius in meters.

    Returns:
        str: List of wells within the specified radius.
    """
    query = """
    SELECT DISTINCT p2.wellname, p2.company
    FROM
        production_reports AS p1
    JOIN production_reports AS p2 ON ST_DWITHIN (
        ST_MAKEPOINT (p1.long, p1.lat),
        ST_MAKEPOINT (p2.long, p2.lat),
        $radius
    )
    AND p1.wellname <> p2.wellname
    WHERE p1.wellname = $wellname;
  """
    params = {'wellname': wellName, 'radius': radius}

    result = datasource.native_query(query=query, params=params)
    return Response(result=result.to_table())


@query
def fit_exponential_decline_curve(
    wellName: str,
    startDate: str,
    endDate: str
) -> Response[str]:
    """
    Fit an exponential decline curve to the production data of a specific well.

    Args:
        wellName: Name of the well
        startDate: Start date of the analysis period (format: 'MM/DD/YYYY')
        endDate: End date of the analysis period (format: 'MM/DD/YYYY')

    Returns:
        Parameters of the fitted exponential decline curve.
    """
    # Convert input dates from MM/DD/YYYY to YYYY-MM-DD for SQL
    start_date_obj = datetime.strptime(startDate, '%m/%d/%Y')
    end_date_obj = datetime.strptime(endDate, '%m/%d/%Y')
    sql_start_date = start_date_obj.strftime('%Y-%m-%d')
    sql_end_date = end_date_obj.strftime('%Y-%m-%d')

    query = """
    SELECT
        ReportDate,
        Oil
    FROM oil_and_gas.production_reports
    WHERE WellName = $well_name
    AND ReportDate BETWEEN $start_date AND $end_date
    AND Oil > 0
    ORDER BY ReportDate
    """
    params = {'well_name': wellName, 'start_date': sql_start_date, 'end_date': sql_end_date}
    result = get_connection().query(query=query, params=params).as_dataframe()

    if not result.empty:
        # Updated datetime parsing to handle timestamps
        dates = [datetime.strptime(str(date).split('.')[0], '%Y-%m-%d') for date in result['REPORTDATE']]
        production = result['OIL'].astype(float).tolist()

        # Calculate days since first production
        first_date = min(dates)
        days = [(date - first_date).days for date in dates]

        # Use numpy and scipy for curve fitting
        log_production = np.log(production)
        slope, intercept, r_value, p_value, std_err = stats.linregress(days, log_production)

        q_i = math.exp(intercept)
        D = -slope
        tau = 1 / D

        result_dict = {
            'WellName': wellName,
            'Initial Production (q_i)': round(q_i, 2),
            'Decline Rate (D)': round(D, 6),
            'Characteristic Time (tau)': round(tau, 2),
            'R-squared': round(r_value**2, 4)
        }
        return Response(result=pandas.DataFrame([result_dict]).to_markdown())

    return Response(result="No data available for the specified well and date range.")

@query
def get_full_company_name(company: str) -> Response[Table]:
    """
    Get the full company name that match the given search term.

    Args:
        company: Partial name of the company to search for.

    Returns:
        Table: List of distinct company names matching the search term.
    """
    company = "%" + company.upper() + "%"
    query = """
        SELECT DISTINCT Company
        FROM oil_and_gas.production_reports
        WHERE Company LIKE $company
        ORDER BY Company;
        """
    params = {'company': company}

    result = get_connection().query(query=query, params=params)
    return Response(result=result.to_table())

@query
def get_well_file_number(wellName: str) -> Response[Table]:
    """
    Get the file number for a specific well.

    Args:
        wellName: Name of the well to search for.

    Returns:
        Table: The file number for the specified well.
    """
    query = """
        SELECT DISTINCT WellName, FileNo
        FROM oil_and_gas.production_reports
        WHERE WellName = $wellName;
        """
    params = {'wellName': wellName}

    result = get_connection().query(query=query, params=params)
    return Response(result=result.to_table())
These queries form the foundation of our oil and gas analyst, allowing the agent to answer questions about well production data, locations, and company operations quickly. All other questions are answered using Cortex Analyst.
| Data Action | Description |
|---|---|
get_production_for_well | Retrieves all production data for a specific well by name |
get_wells_by_company | Finds all wells operated by a given company, supporting partial name matches |
get_top_producing_wells | Returns the top N wells based on total oil production, including oil, water, and gas totals |
get_well_location | Gets the latitude and longitude coordinates for a specific well |
find_wells_within_radius | Identifies other wells within a specified radius (in meters) of a given well using geospatial functions |
fit_exponential_decline_curve | Analyzes production decline by fitting an exponential curve to a well's production data over a specified date range |
get_full_company_name | Searches for full company names based on partial matches |
get_well_file_number | Retrieves the file number associated with a specific well |
The data actions above use two different methods for querying data:
get_connection().query()- Standard query method uses Sema4.ai's SQL dialect and provides basic SQL functionality and parameterization and works consistently across all supported data sources.datasource.native_query()- Used for advanced queries that need database-specific, e.g. Snowflake features like the geospatial functions infind_wells_within_radius.
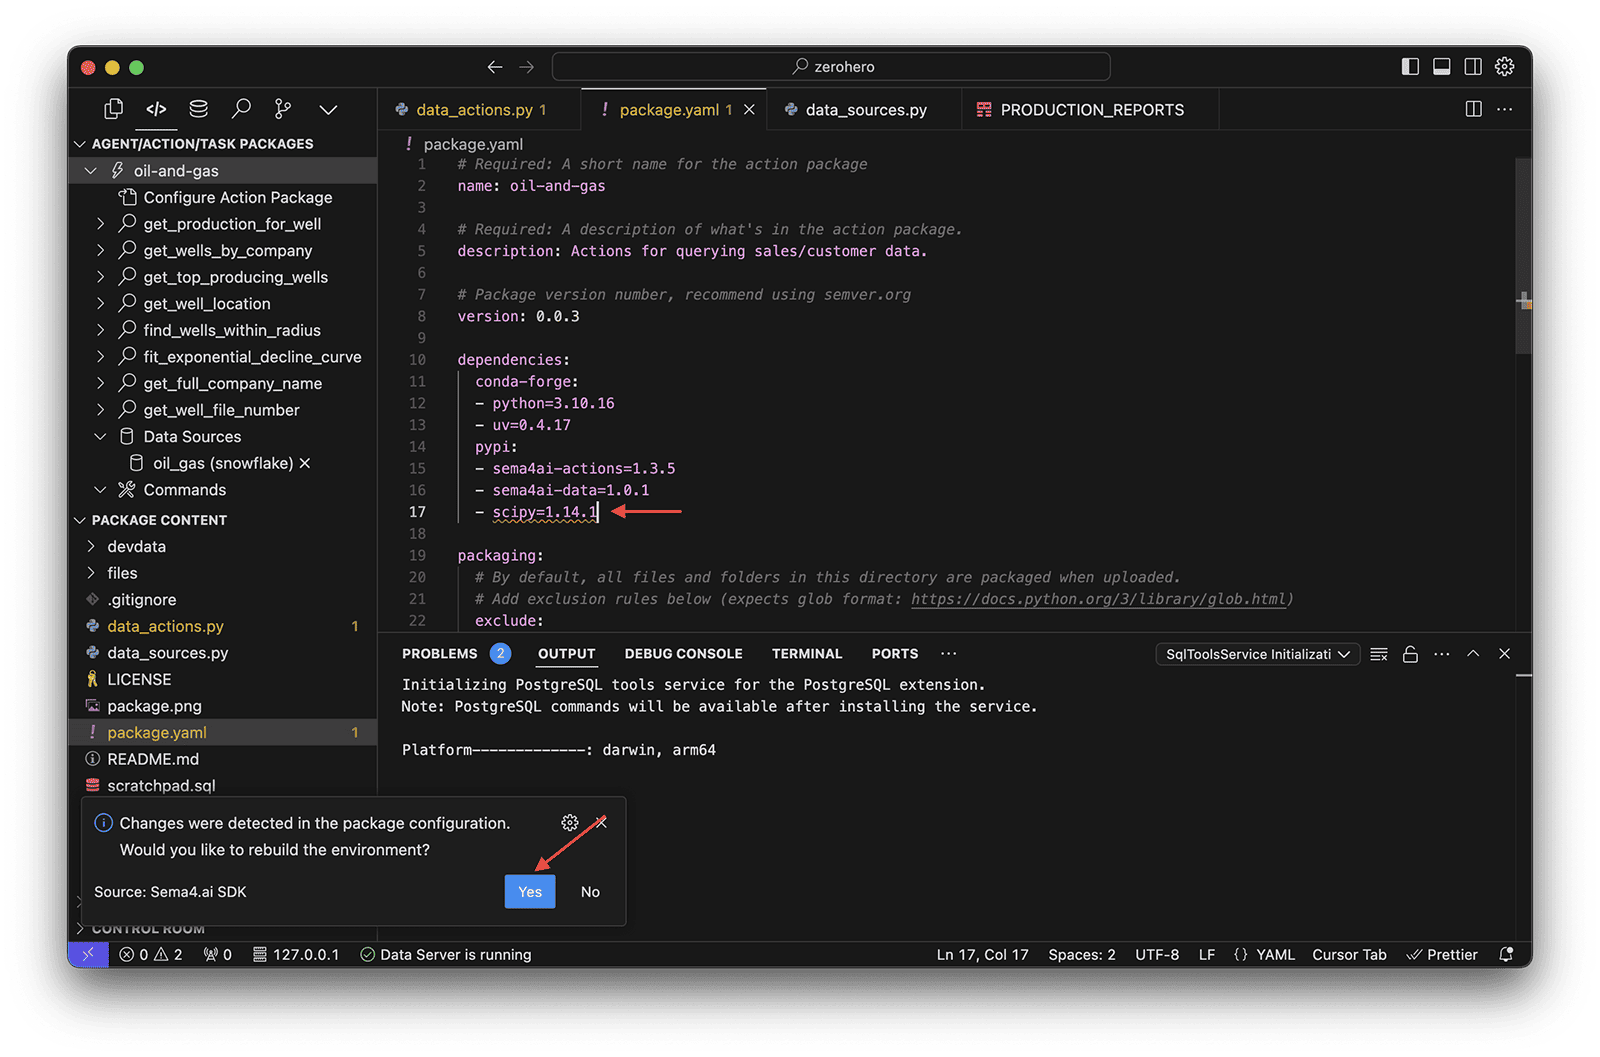
Update package.yaml
Our data actions enable you to not only query data but also perform calculations and transformations using Python libraries. One of our data actions, fit_exponential_decline_curve, uses the scipy library for curve fitting. We need to update the package.yaml file to include this dependency.
- Open the
package.yamlfile - Update the
dependencies>pypisection and add the following:
- scipy=1.14.1
- tabulate=0.9.0- Also update the description to 'Actions for working with oil and gas data'
- Save the file
- If prompted to rebuild the environment, click Yes
Test data actions
Our VS Code extension makes it easy to test your data actions locally, using test data. This makes it simple to quickly test, debug, and optimize your data actions before using them with your agent.
- Locate the get_production_for_well action in the list of actions.
- Click the arrow to expand the action, then click Run Action. Before we can run the action, we need to create an action input file that contains the parameters for the action.
- When prompted to create the file, click 'Create "devdata/input..."'. It will take a few seconds to create the file.
If the input file fails to create the first time, just try again.
- The input file will be automatically created in the
devdatafolder and opened in your editor. - Update the
inputValueand Save the file.
"inputValue": {
	"wellName": "TEDDY FEDERAL 12X-5F"
}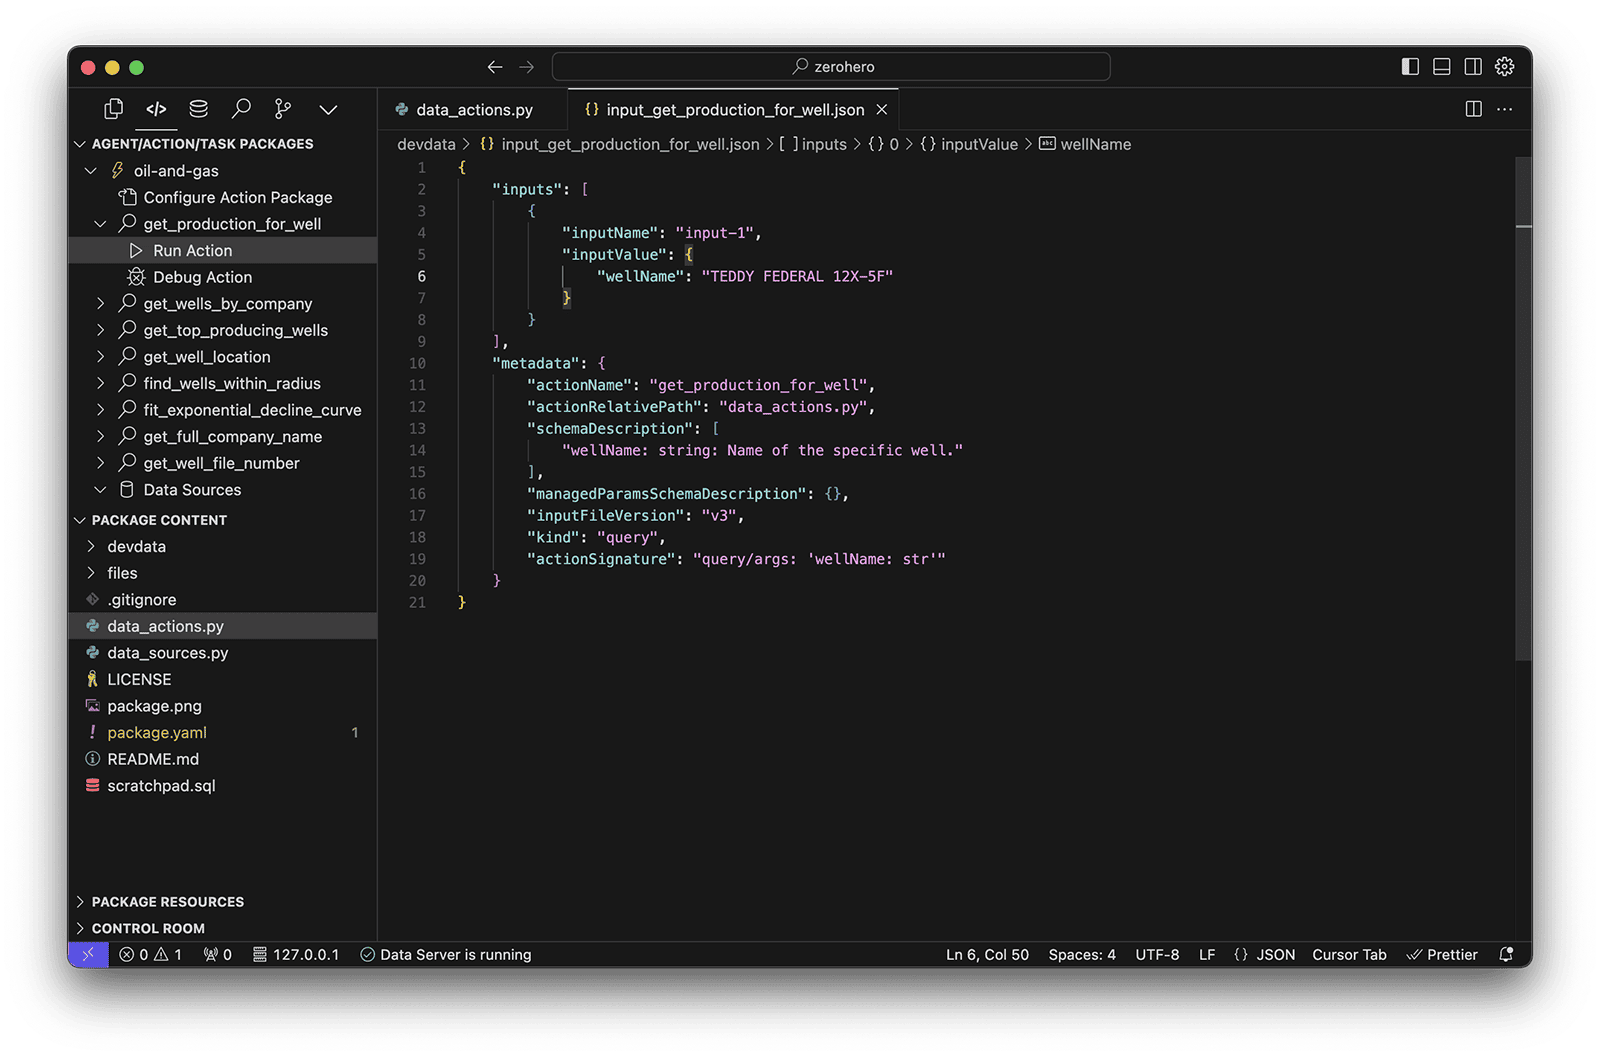
- Click the Run Action button to run the action.
- View the results in the Terminal pane.
Publish data actions
At this point, you have a set of working data actions that you can use with your agent. All you need to do now is publish it to Studio.
- Scroll to the bottom of the action list and click Publish to Studio.
- Open up Studio and you'll notice the action is importing in the Actions tab.
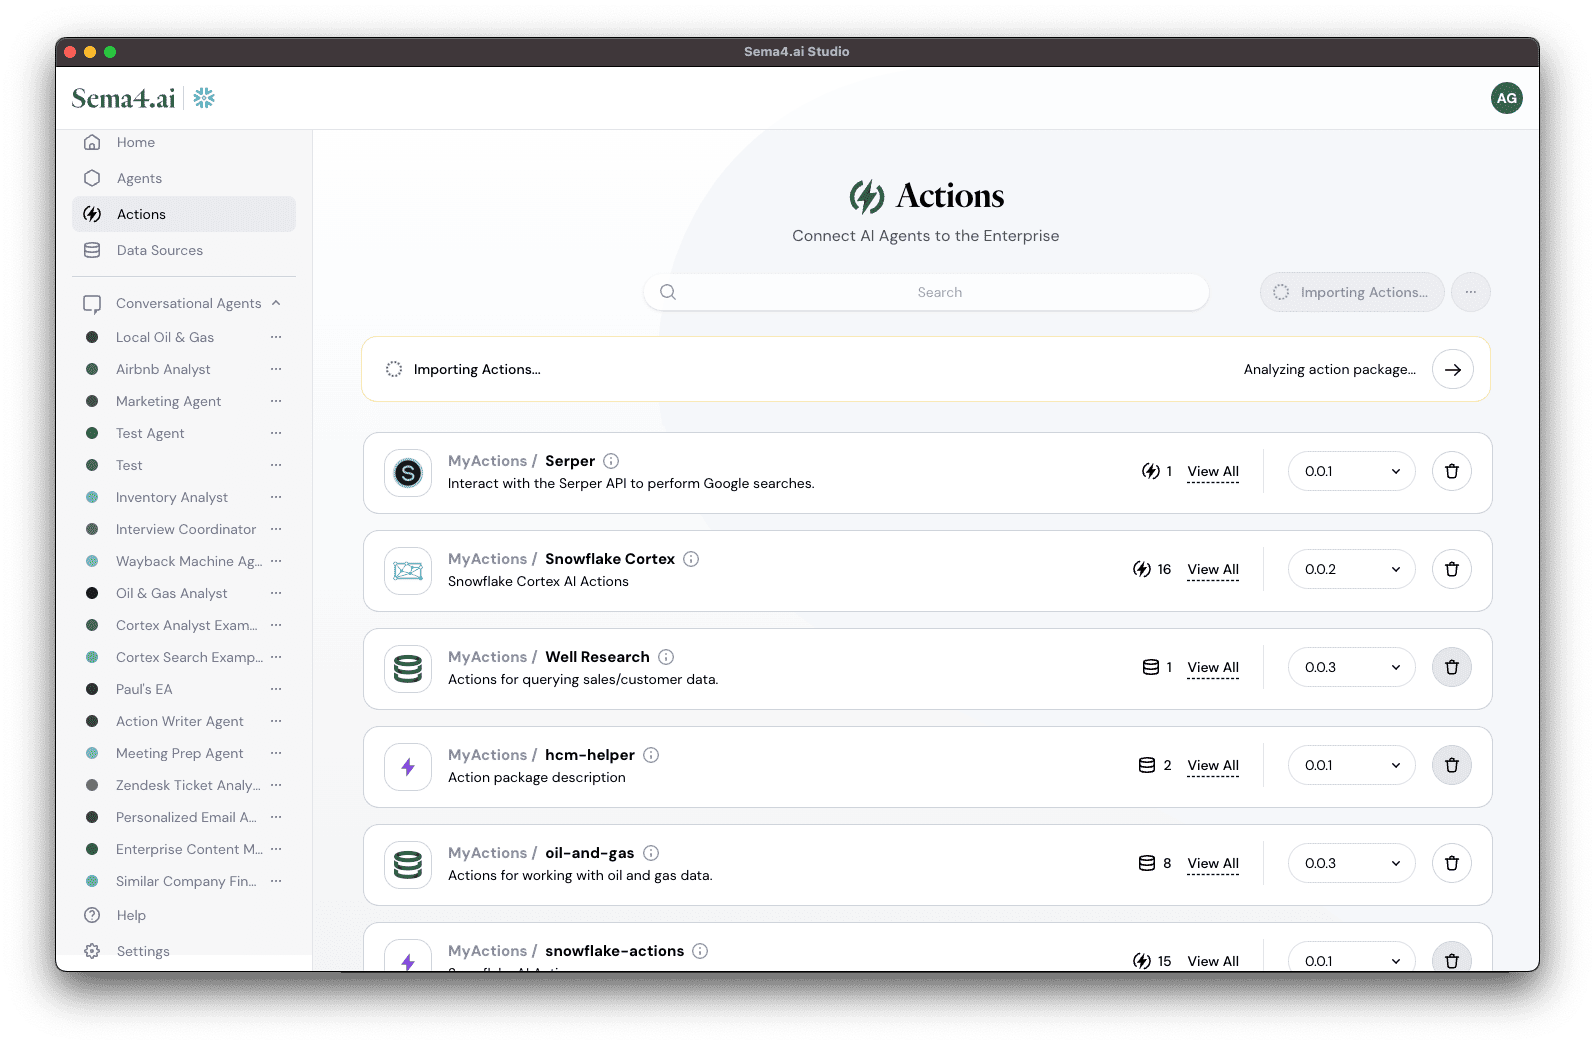
Whenever you need to make changes to your actions, simply update the code and publish again to Studio. The new updtes will automatically be applied to your agent and it will immediately start using the updated actions.
Part 3: Updating your agent to use your new actions
Edit your agent
- Open your Oil and Gas agent from the list of Agents.
- Click the Edit Agent button in the lower-right hand corner to open the agent editor
- Click the Add Action button.
- Locate your MyActions / oil-and-gas action and click the button.
- Click Add to Agent to add the action to your agent.
- Click Update in the lower-left hand corner to update your agent.
Part 4: Using your agent
Try asking the agent a few questions to see how it performs. Here are some examples that use the new data actions you just published:
Can you show me the monthly production data for Porter 26-35 4H
Can you show me the exponential decline curve for this well using 2024 data?
Show me the map link for this well
Show me all the wells within 200 meters of this well
How many wells does Grayson operate?
Show me a heatmap of wells per field
Recommended resources
Congratulations on making it through this walkthrough! We hope you enjoyed it, and we are looking forward to your feedback!
Use these following resources to get to the next level with Sema4.ai:
Actions Gallery
Data Access