Admin Guide
In this guide, you'll learn how to:
- Using the Admin Streamlit app in Snowflake
- Manage user access through Snowflake roles and permissions
- Grant application access to Snowflake objects
- Configure External Access Integrations (EAI) for external services
- Set up network rules for custom actions and LLMs
- Manage costs through service suspension
Administration view
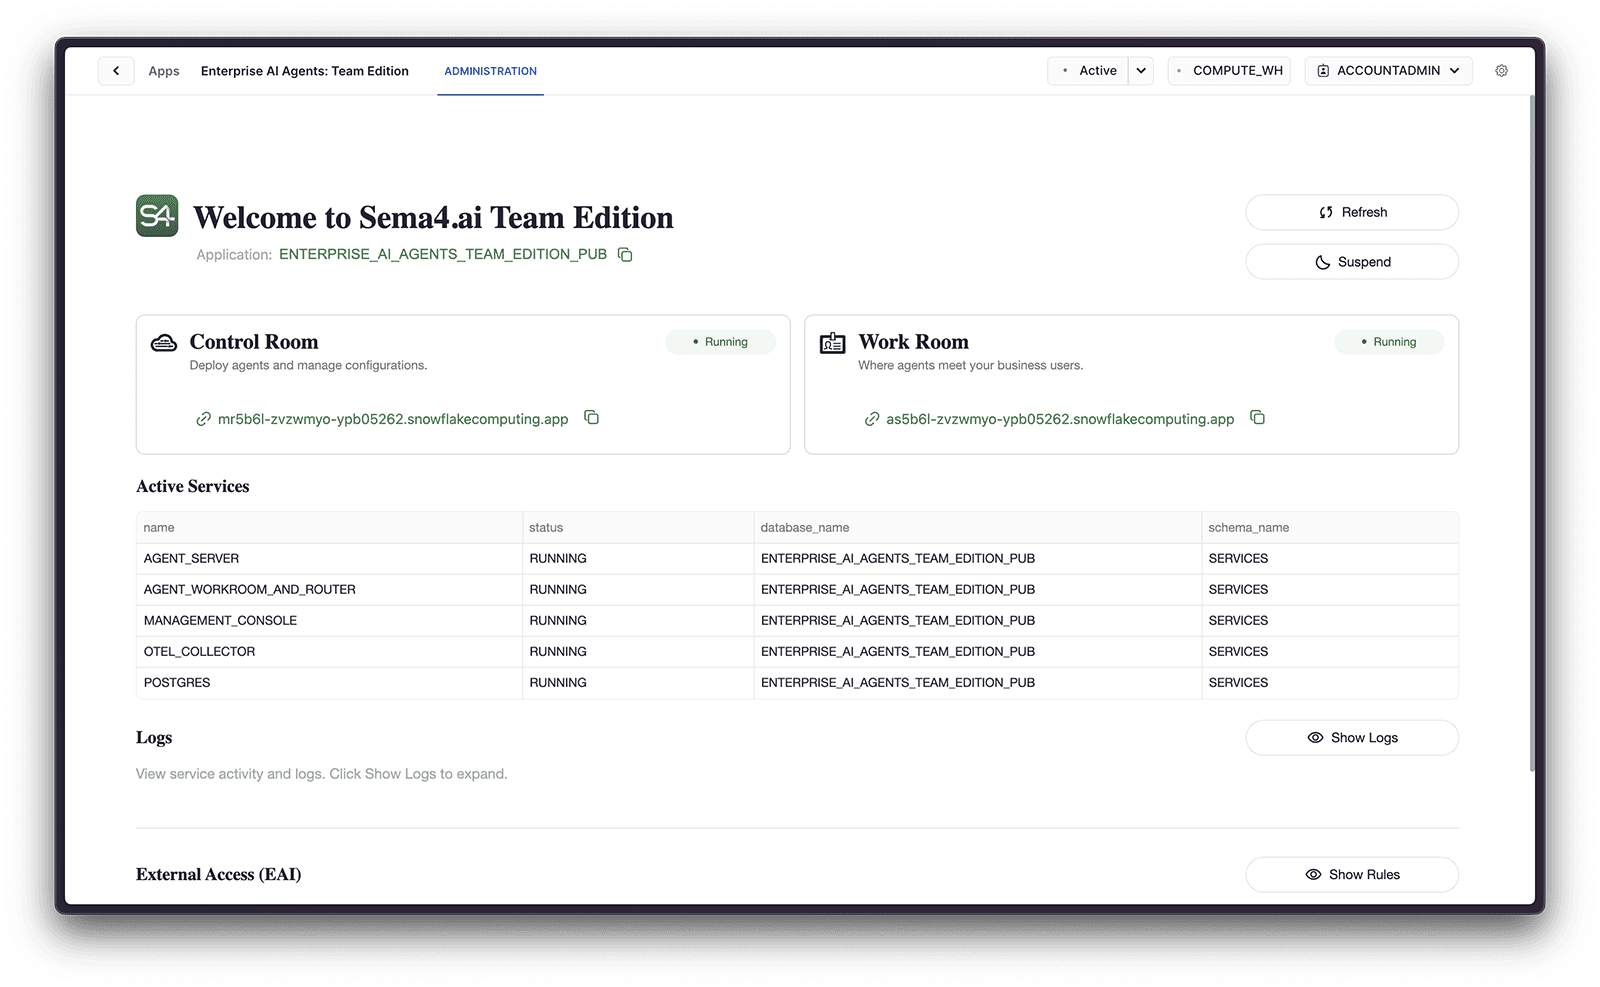
When the app is launched, the Admin view will be shown. This is a Streamlit application that allows you to manage the application, including starting and stopping the service, viewing logs and performing other administrative tasks.
User management
User's access to the application is managed using Snowflake's built-in identity and access management. Access is provided by granting four levels of application roles to account roles:
SEMA4_APP_ADMIN- allows the role to manage the native application, including starting and stopping the service, managing users and their access, and configuring the application in the Streamlit Admin view.SEMA4_APP_OPERATOR- allows the role to access the Control Room application via the service URL, by logging in with their own Snowflake credentials, where users can publish and deploy agents as well as to maintain configurations such as secrets, OAuth and LLMs. This role also allows publishing agents from Sema4.ai Studio to Snowflake.SEMA4_APP_WORK_ROOM- allows the role to access the Work Room application via the service URL, by logging in with their own Snowflake credentials and using the deployed agents.SEMA4_APP_PUBLIC_API- allows the role to access the public API.
Follow the steps below to manage user access to the application.
Navigate to Access Management
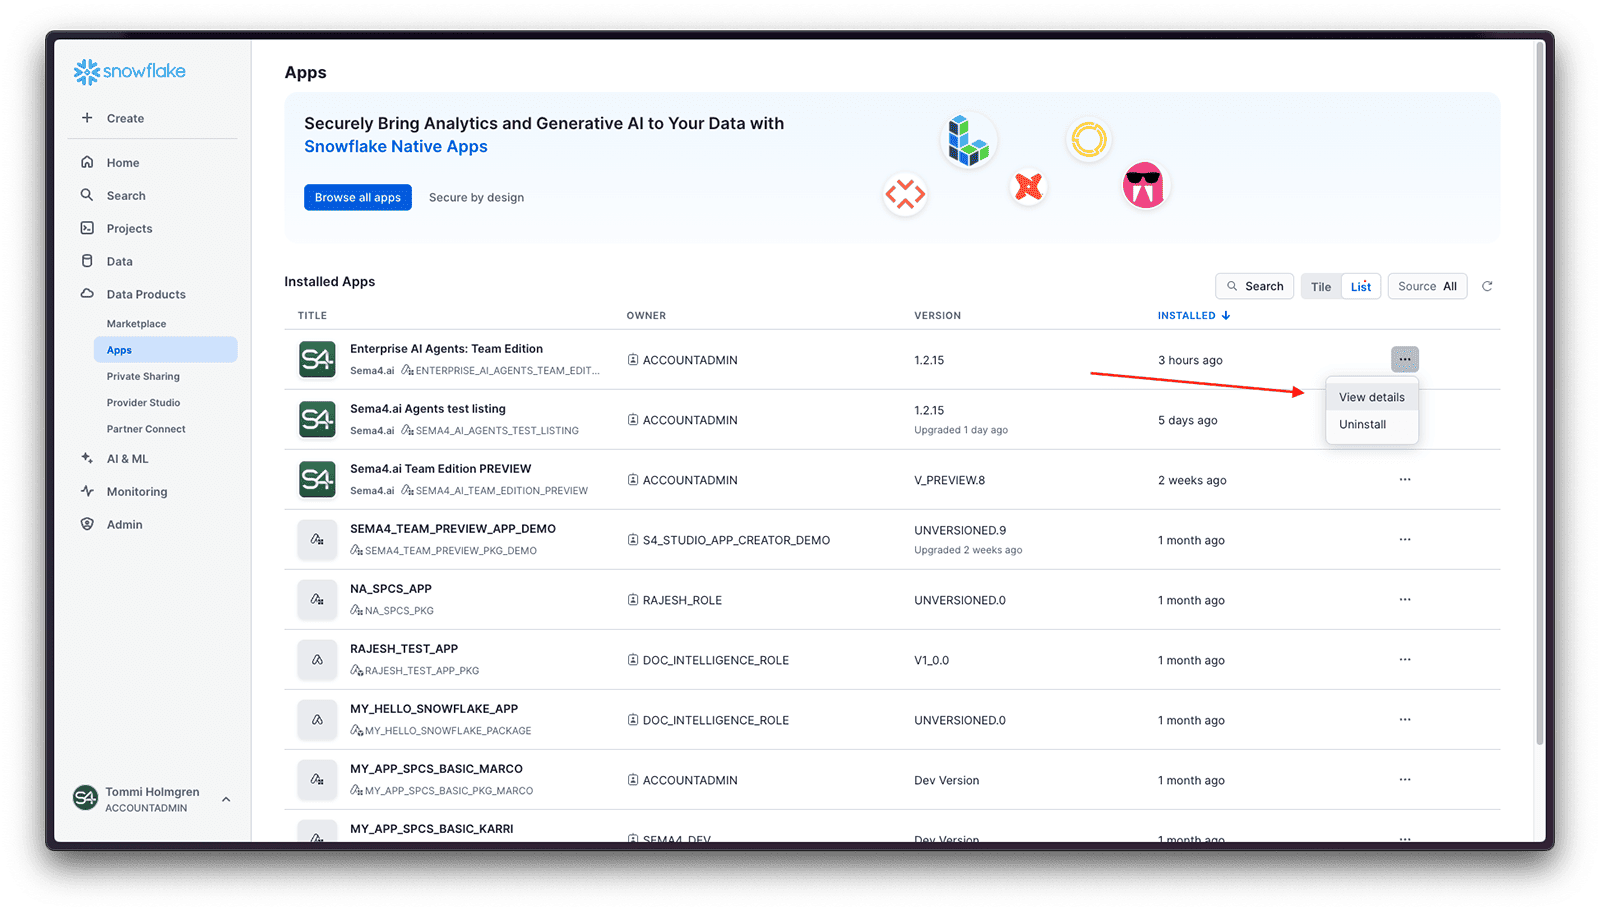
Starting from the Data Products -> Apps page, find the Enterprise AI Agents: Team Edition application and click on ... button to open the context menu, choose View details.
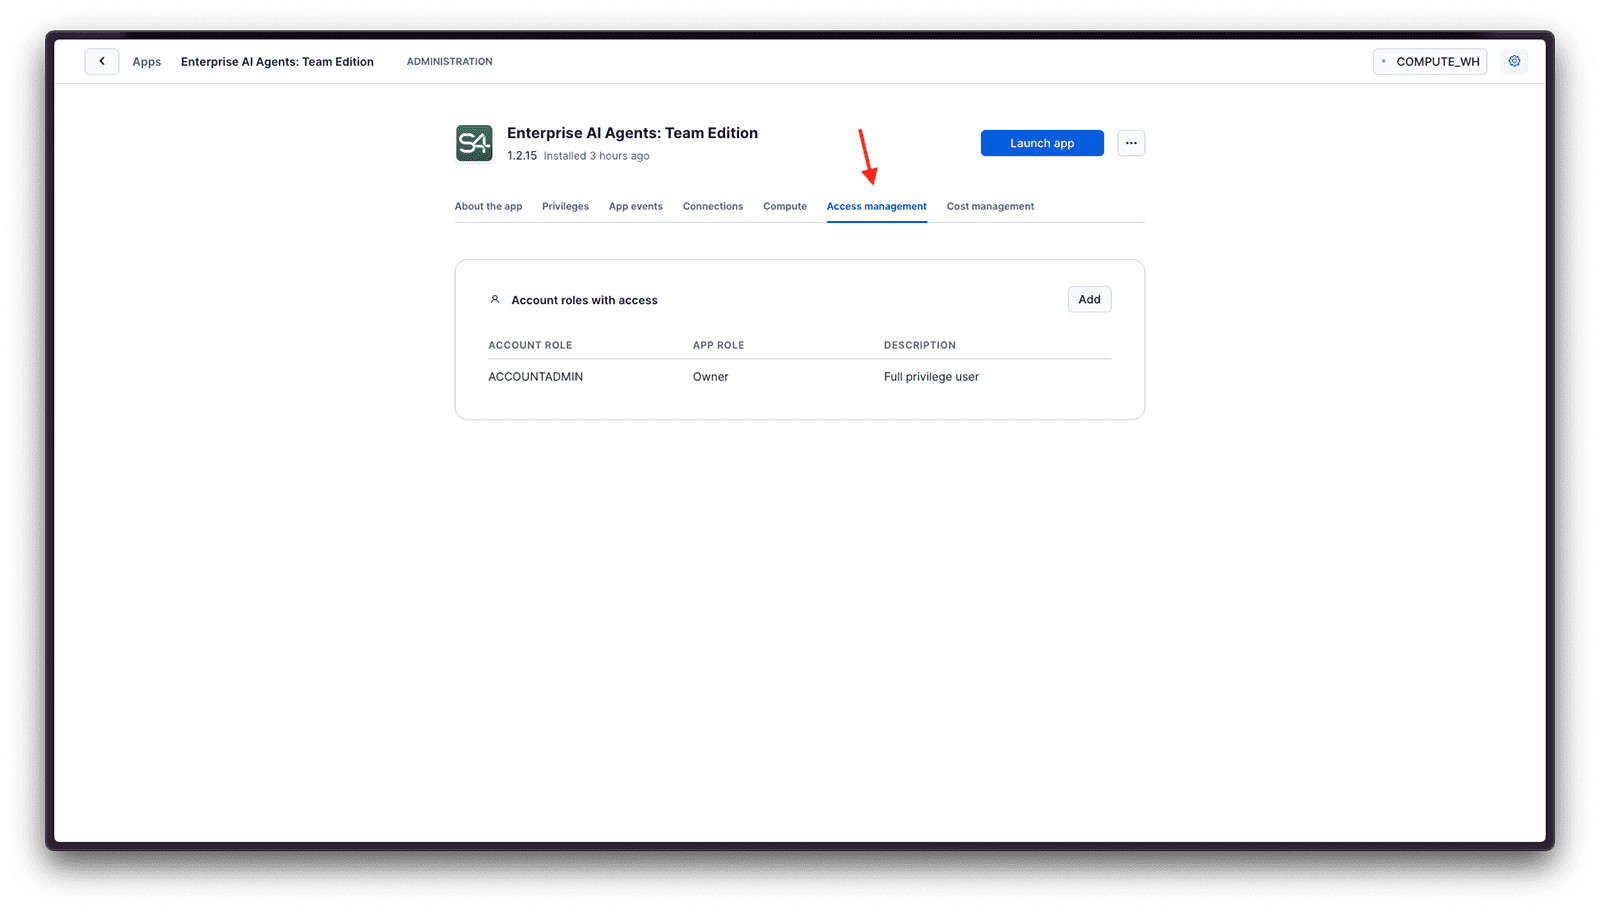
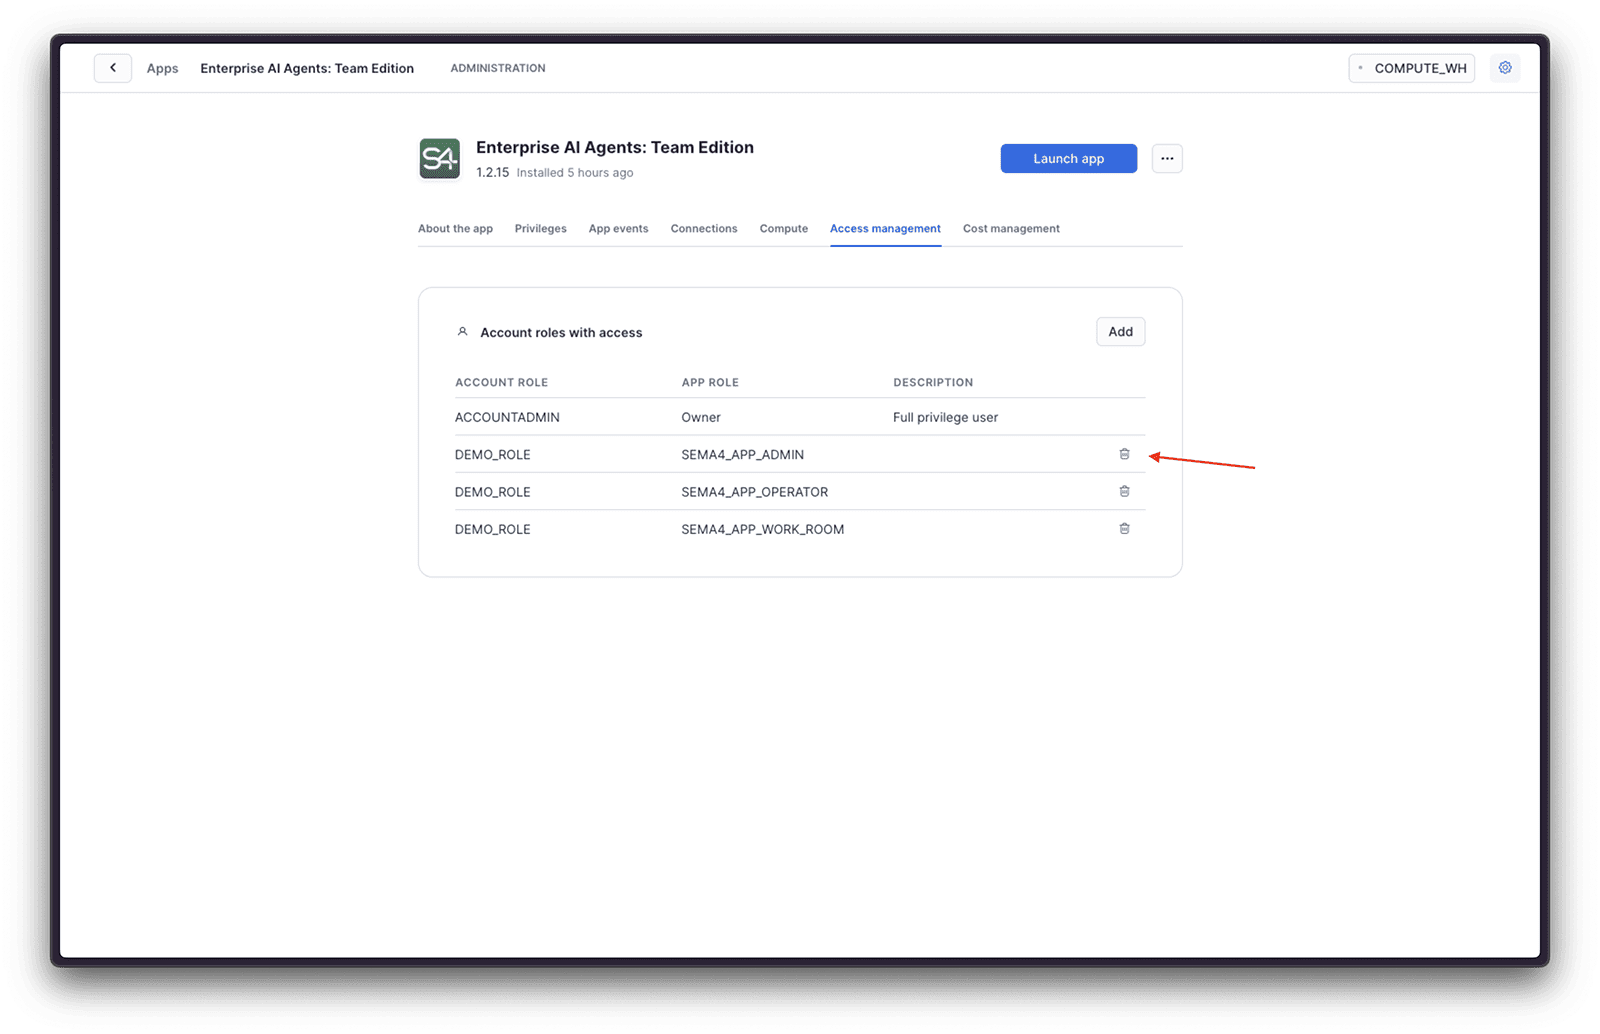
Then click on the Access Management tab.
Add role mappings
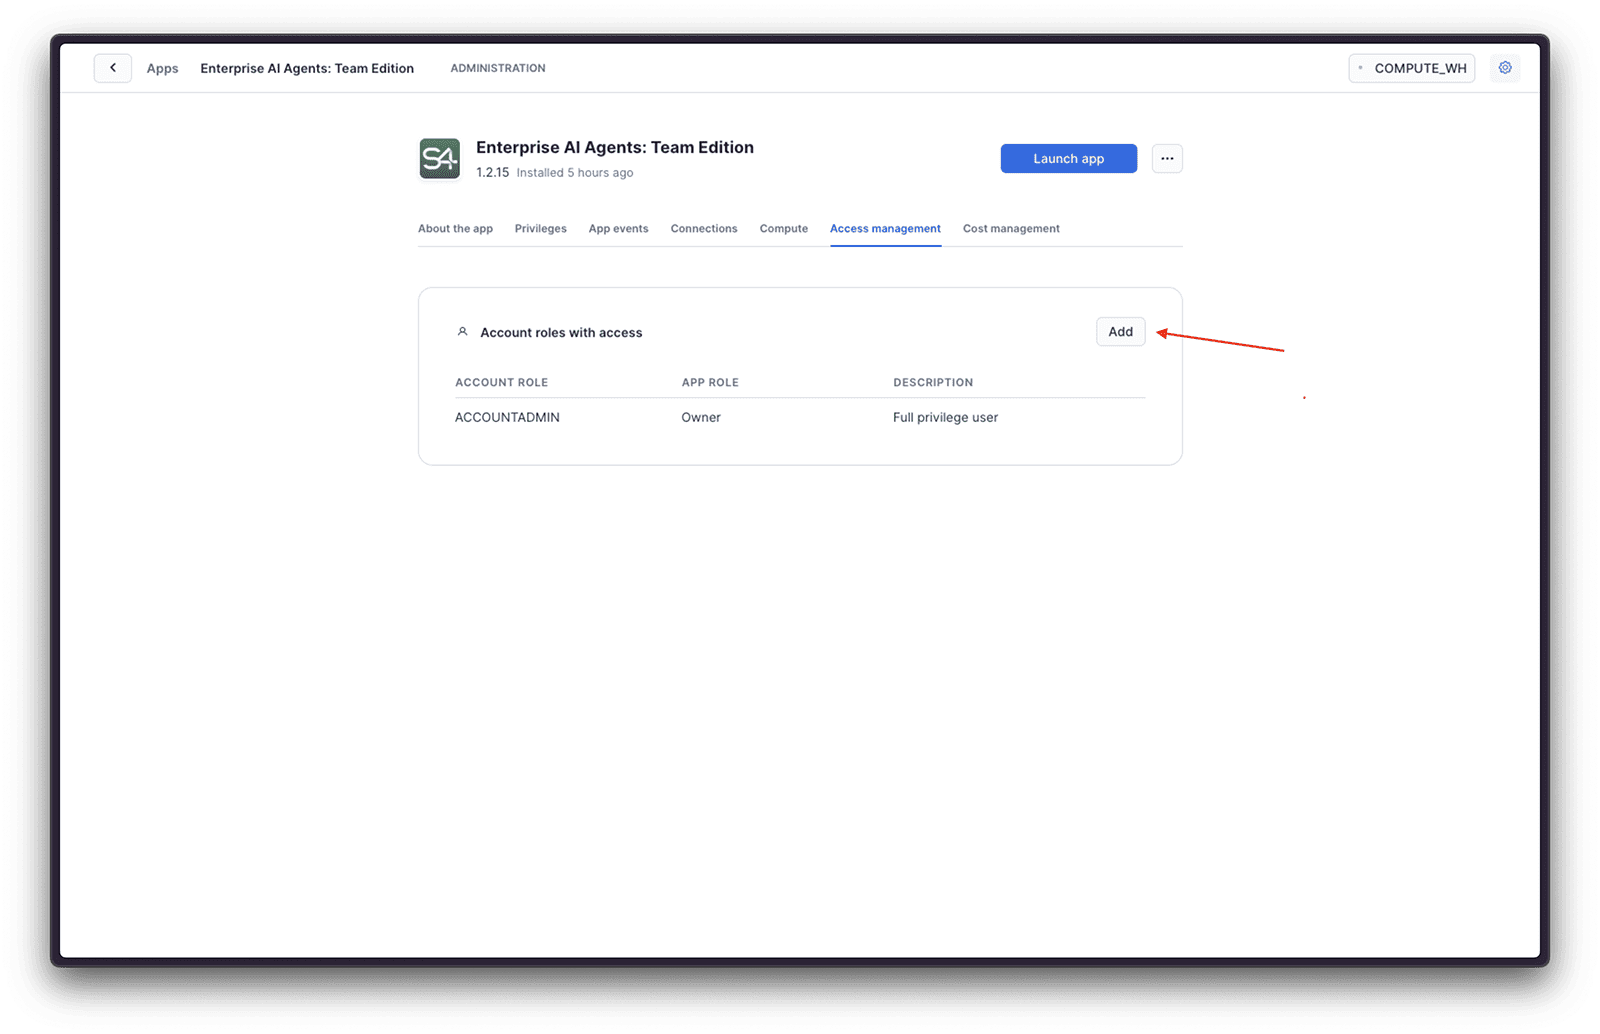
Click Add button to add grants to start adding the roles to the application.
Start by searching for the account role you want to allow access to the application, and choose it from the list.
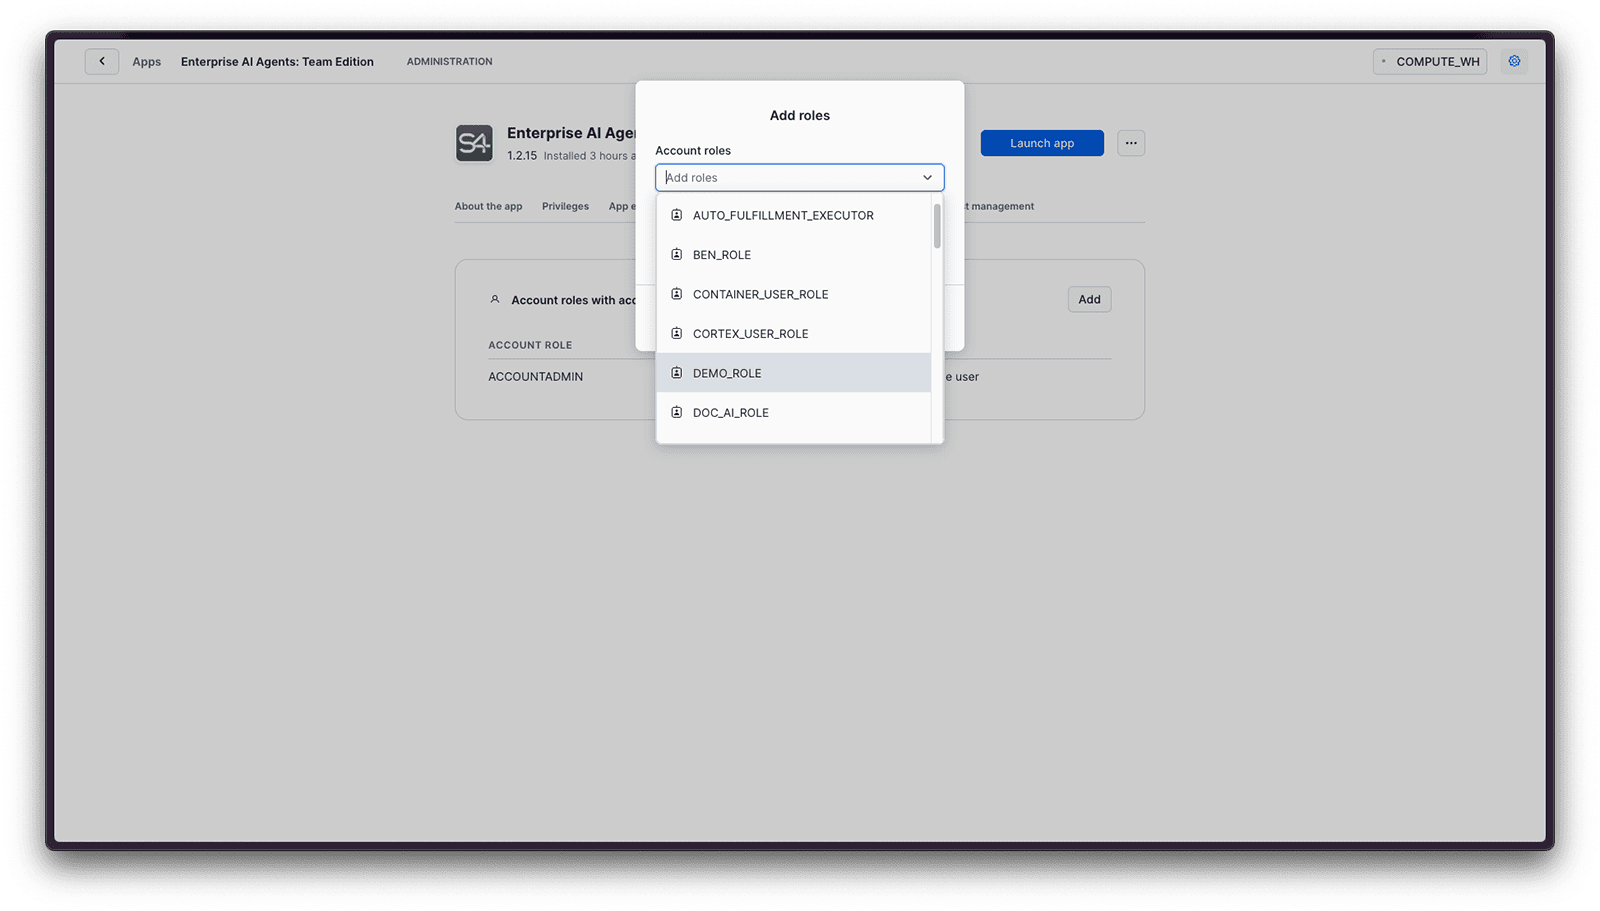
Once selected, it will be added to the list of account roles that have access to the application. Now click the dropdown arrow on the right side of the row to select the application roles you want to grant to the account role.
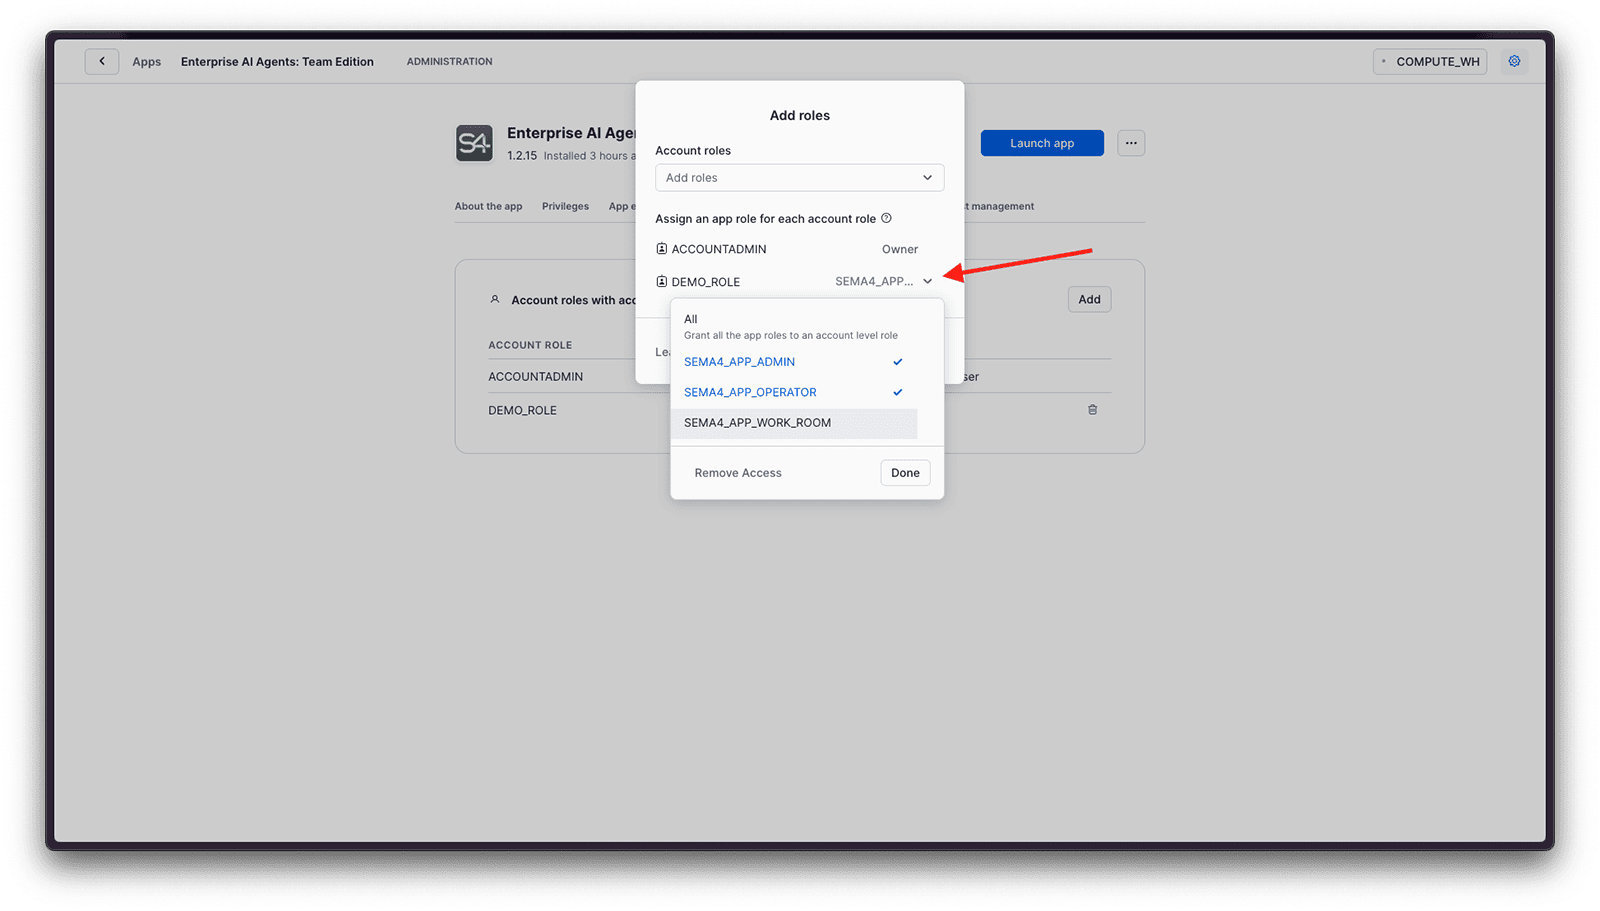
Now check the boxes next to the application roles you want to grant to the account role, and click Done and Close. You will see the account role in the list with the selected application roles!
Update role mappings
In order to update the role mappings, you can always click the Add button again to edit the role mappings.
Remove role mappings
Click the trash can icon next to an individual role mapping to remove it. This affects immediately, and the account role will no longer have access to the application.
Managing external access
External Access Integrations (EAI) are used to grant the application access to the endpoints outside of Snowflake that it needs to use. Your team might, for example, need to use a custom LLM, or make the agent interact with an external API, or work with an enterprise application. Follow the steps below to add new access integration rules.
External Access Integrations are typically configured by administrators. Refer to Snowflake documentation (opens in a new tab) for more details on how to manage external access integrations.
When new agents and actions are created or imported, they typically require new external access integrations to be created in order to work. Pay close attention to this section of the documentation to ensure that the necessary integrations are created.
When Sema4.ai Team Edition application is installed, it is configured with the following network rules to allow it to build the necessary Python environments for the agents:
| Endpoint | Purpose |
|---|---|
cdn.sema4.ai | To fetch the prebuilt action packages when users build agents with additional tools |
pypi.org | Primary repository for python dependencies |
files.pythonhosted.org | Package storage for python dependencies |
conda.anaconda.org | Main repository for conda dependencies |
cdn.anaconda.org | Content delivery for conda dependencies |
demo-services.sema4ai.dev | API services used by the demo agents |
These rules are created within External Access Integrations (EAI) called ENTERPRISE_AI_AGENTS_TEAM_EDITION_S4_3RD_PARTY_EXTERNAL_ACCESS and a network rule ENTERPRISE_AI_AGENTS_TEAM_EDITION_S4_3RD_PARTY_NETWORK_RULE unless you have modified either application or network rule names during installation.
New network rules
You may need to amend the network rules to allow the application to use additional endpoints. This is typically needed when performing the following actions:
- Deploying an agent that uses actions to access new external services
- Configuring a new LLM (other than Cortex AI)
- Configuring a new OAuth provider
- Configuring a new integration such as observability or email sending
Automated rule creation
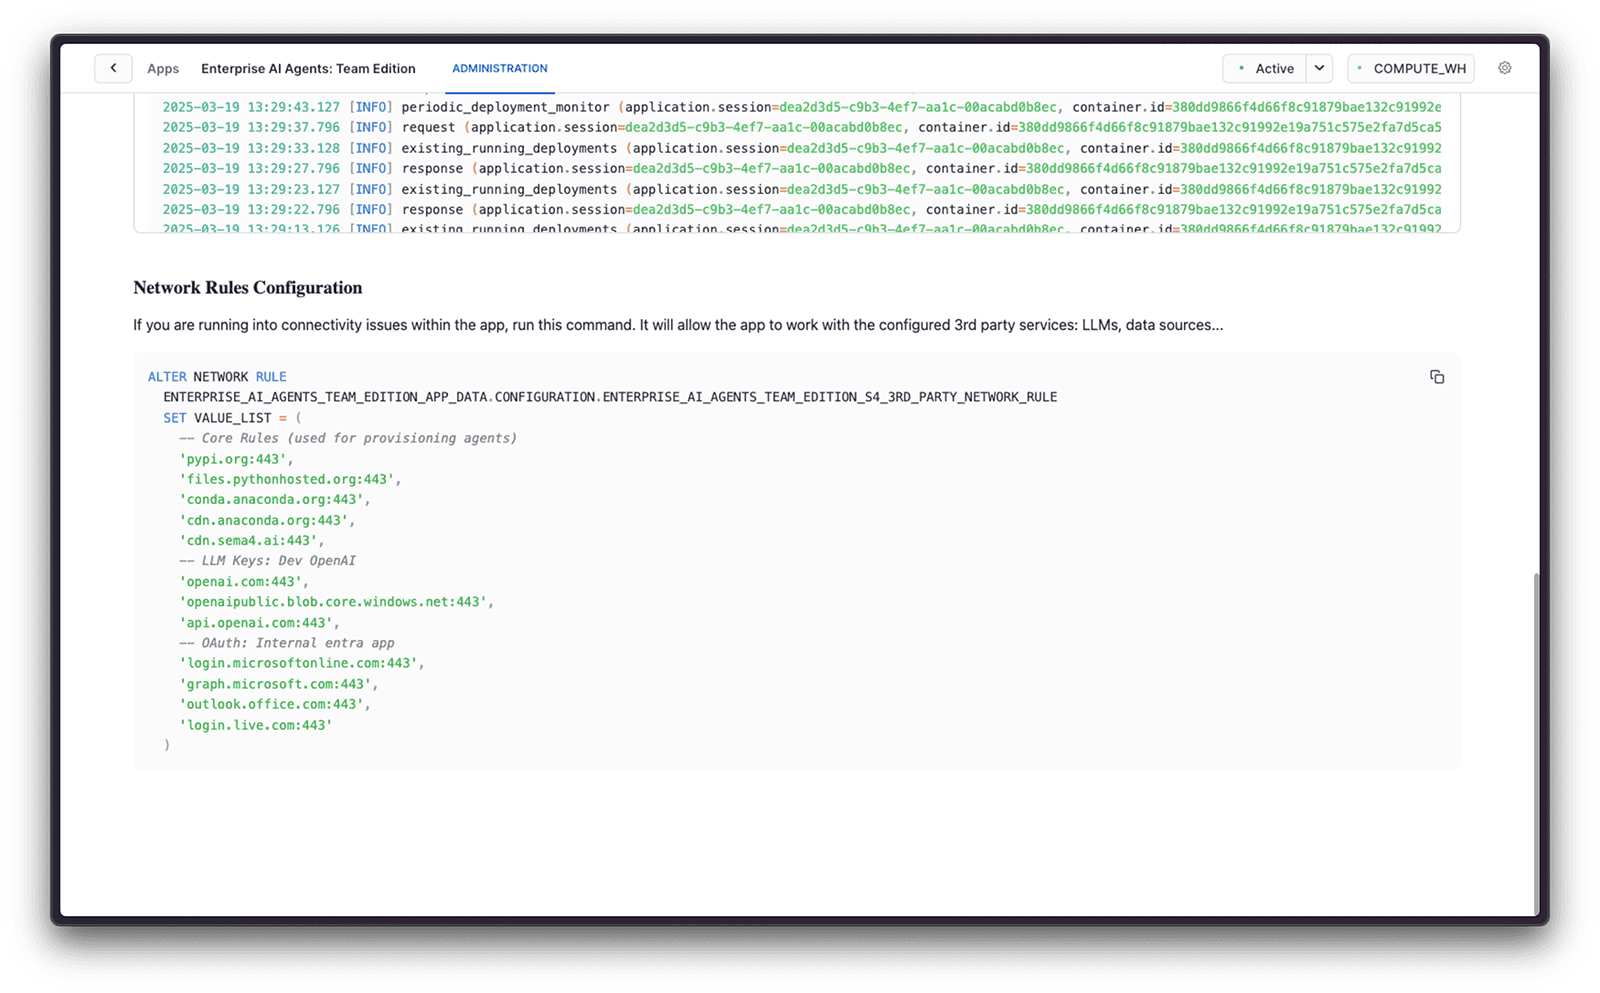
Sema4.ai platform does it's best to automatically generate a list of network rules needed for the application to work. This information is provided in two locations as outlined below. Both of these provide you with the same information, so you can use whichever is more convenient for your use case. The SQL statement given includes ALL the endoints of the network rule, so you can copy and run it (typically as ACCOUNTADMIN or similar role).
The SQL statement will rewrite all the existing network rules - if you have chosen to manage the network rules manually, this list will not have your own additions. In this case you will need to manually add the new endpoints to the existing network rules.
Network rules in the Admin view
The first place is the Network Rules tab in the Admin view, by scrolling all the way down to the bottom of the page. Remember to hit the Refresh button at the top of the page to see the latest information.
Network rules in the Control Room
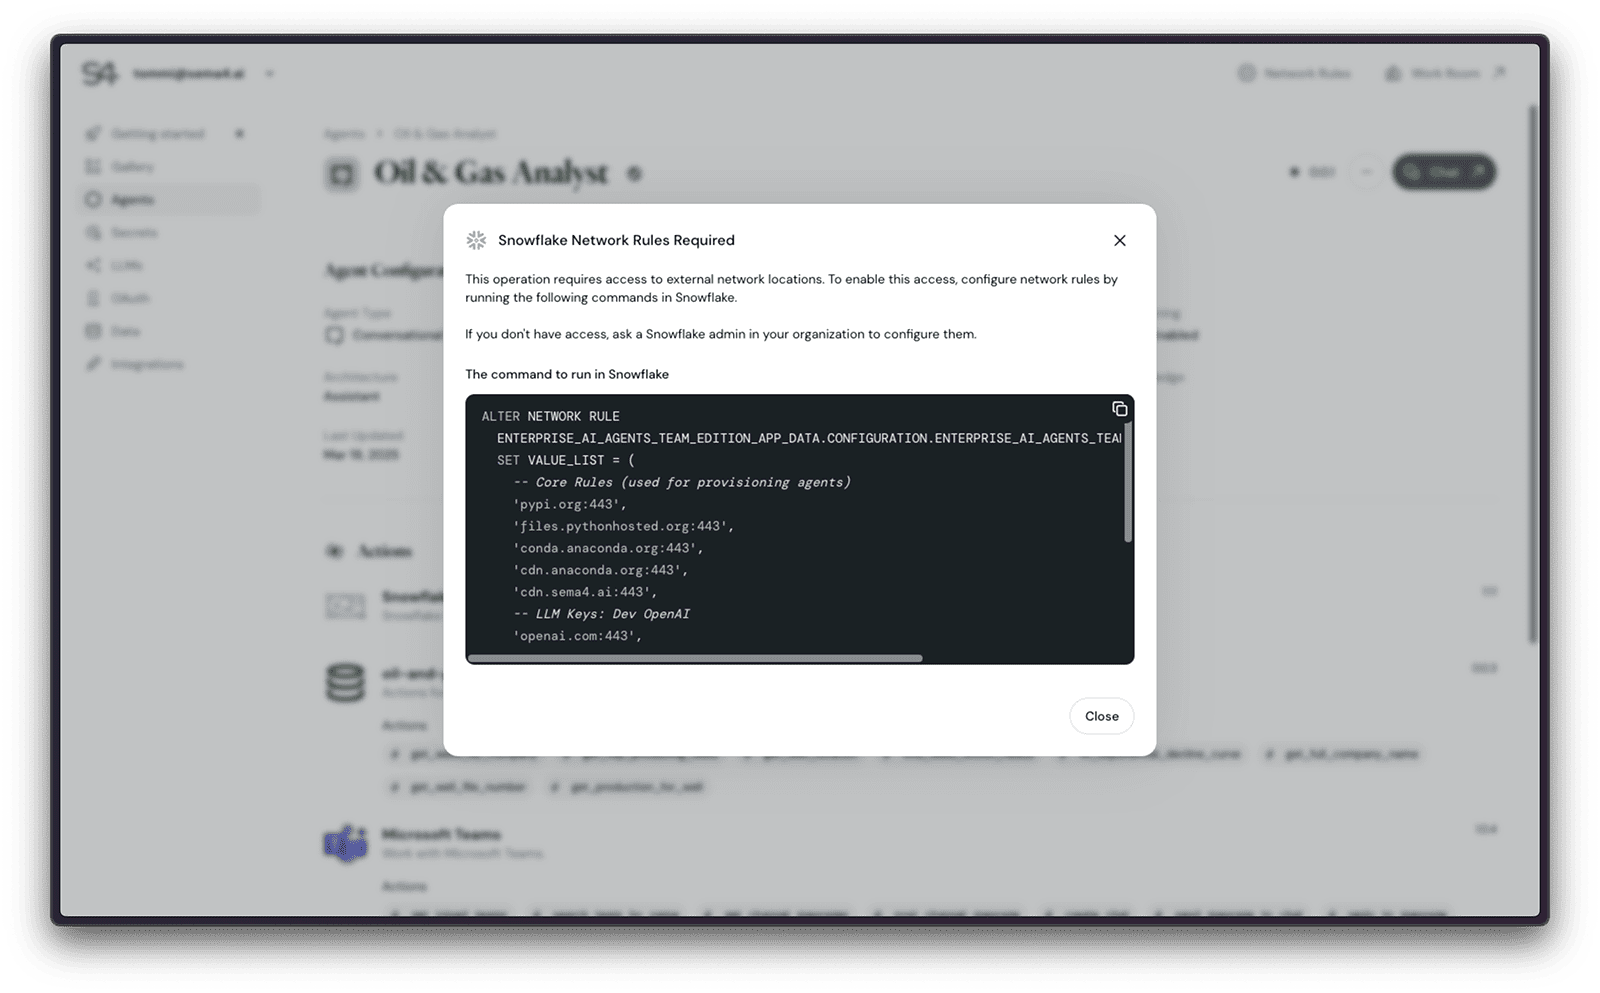
In Control Room we provide the same information through a button at the top right corner of the page.
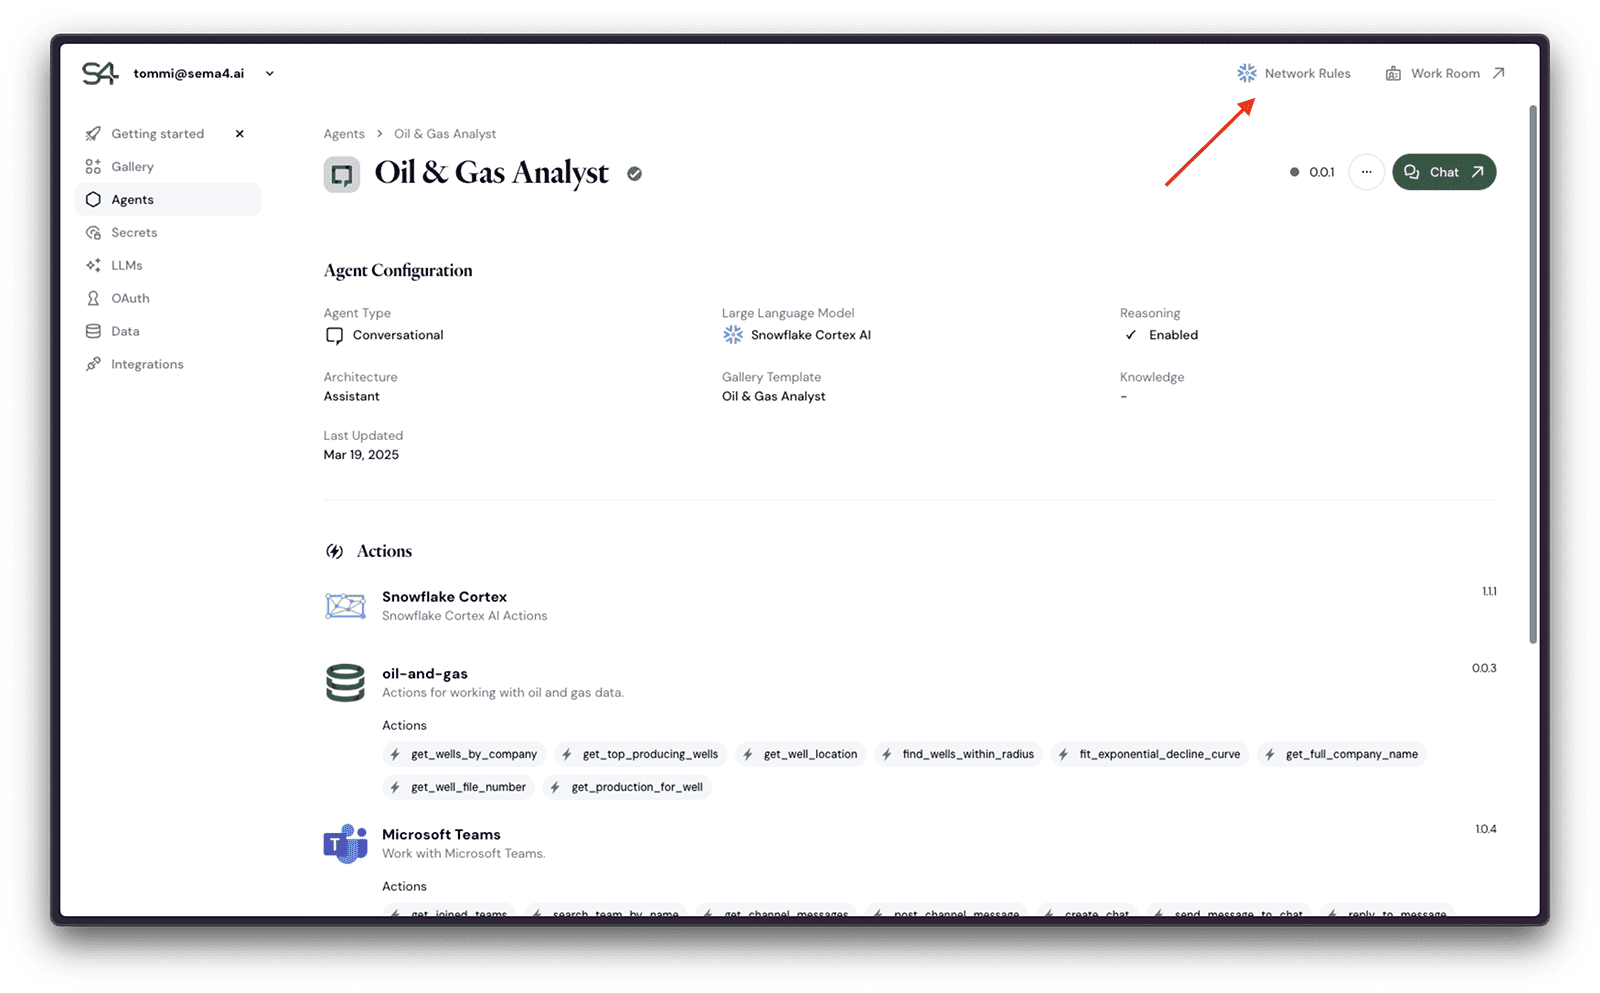
Clicking the button will open a modal with the same information as in the Admin view.
Manually adding network rules
If you need to add new network rules, you can do so by following the steps below.
If you add rules manually, they will not be reflected in our autogenerated SQL statement for network rules. We recommend using the automated approach whenever possible.
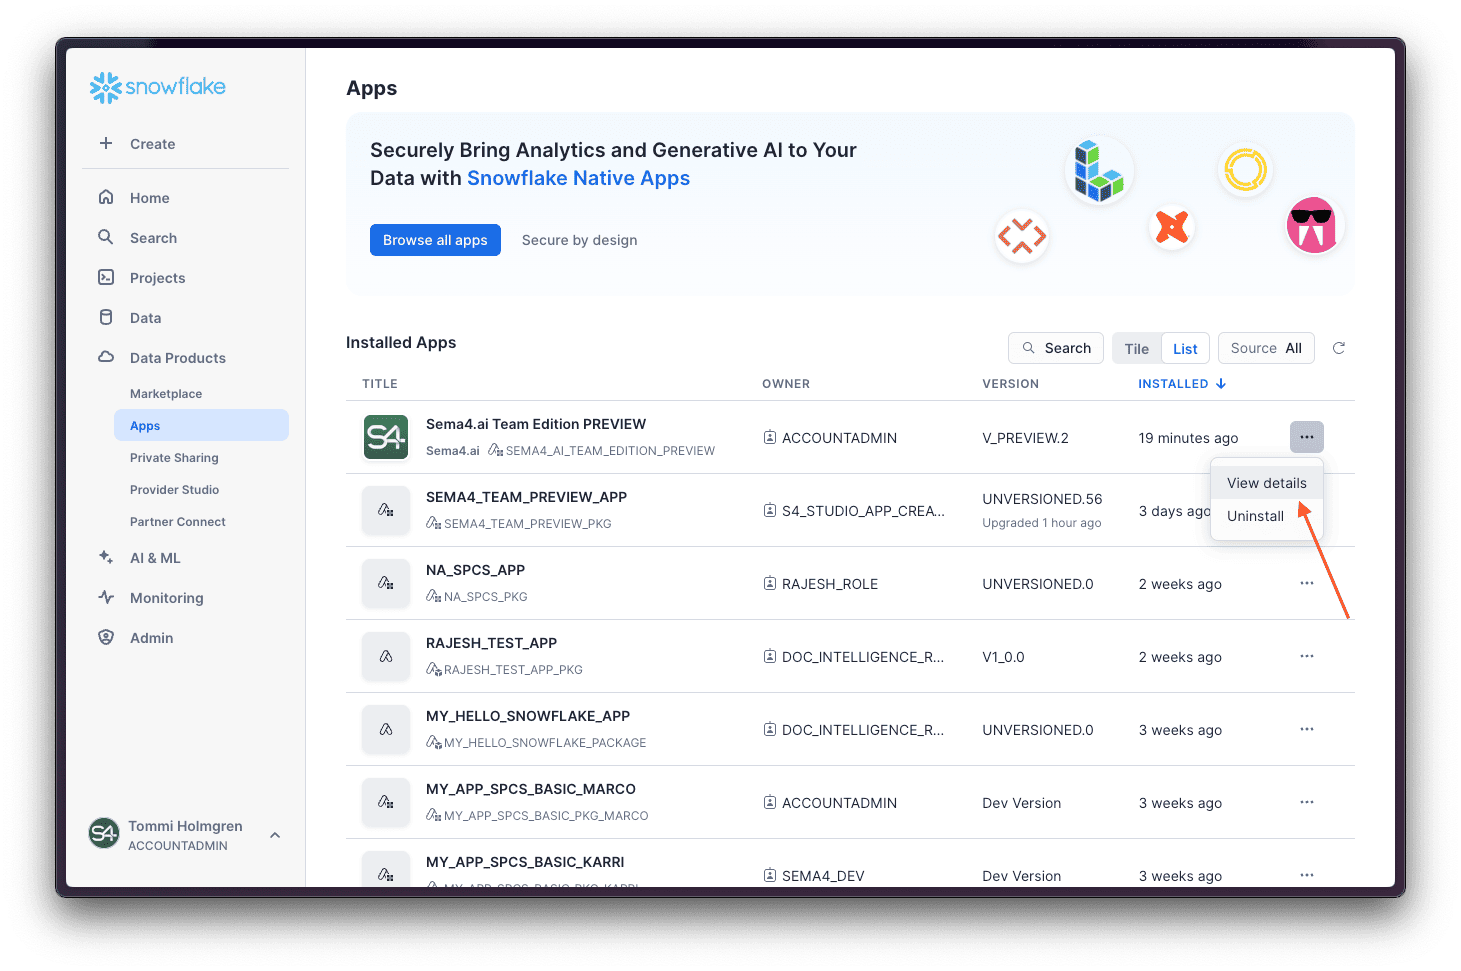
Go to application details
Navigate to the "Data Products" -> "Apps" page, find the Sema4.ai Team Edition application and click on ... button to open the context menu, choose View details.
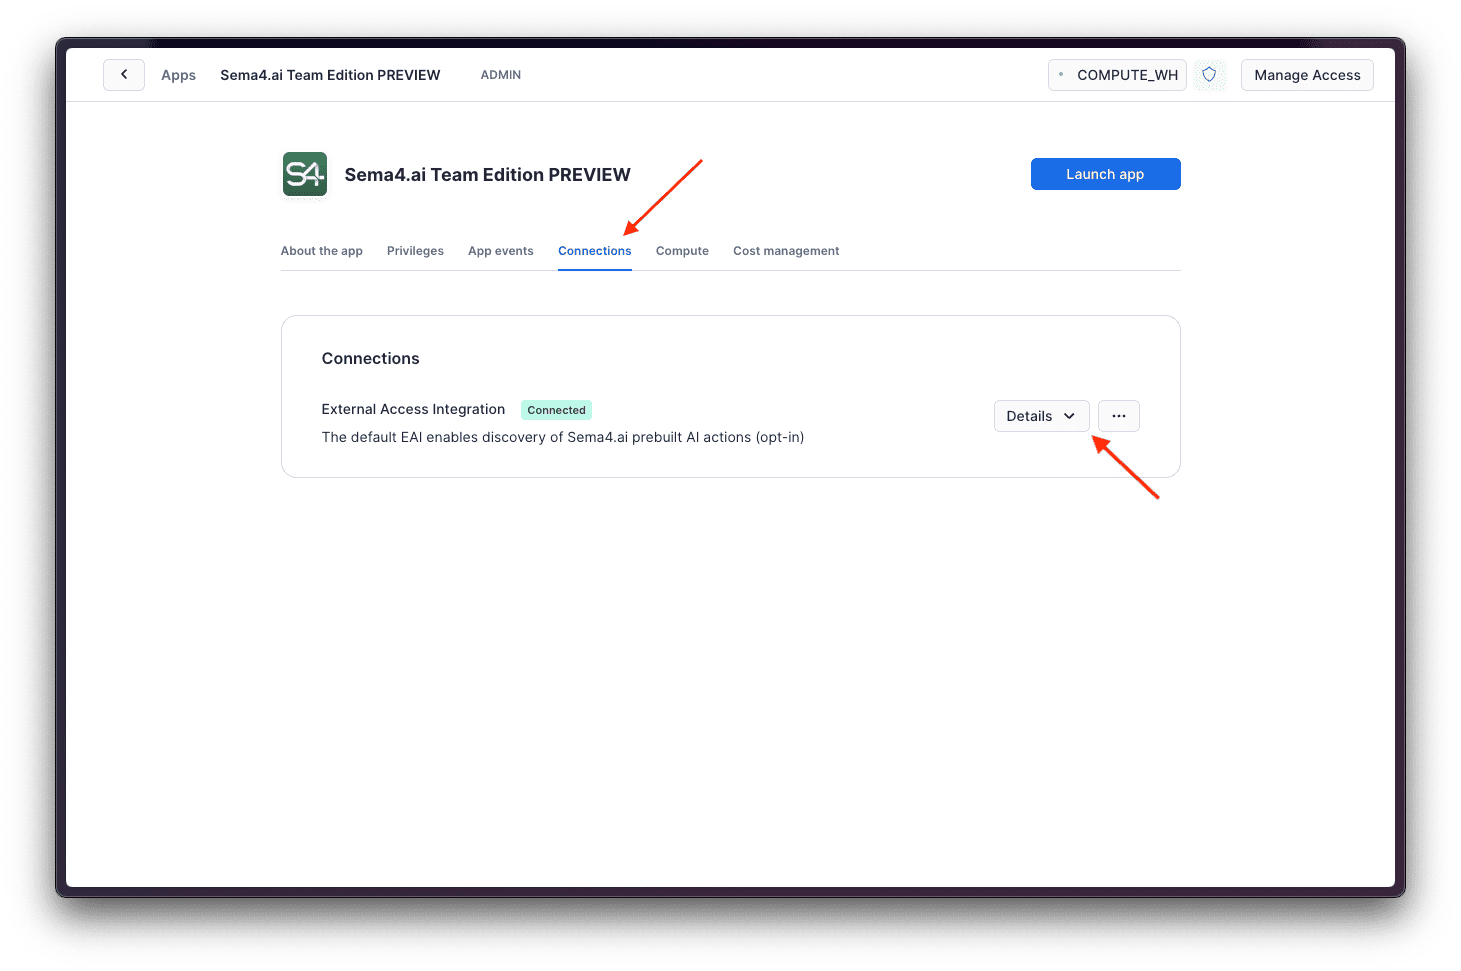
View Connections tab
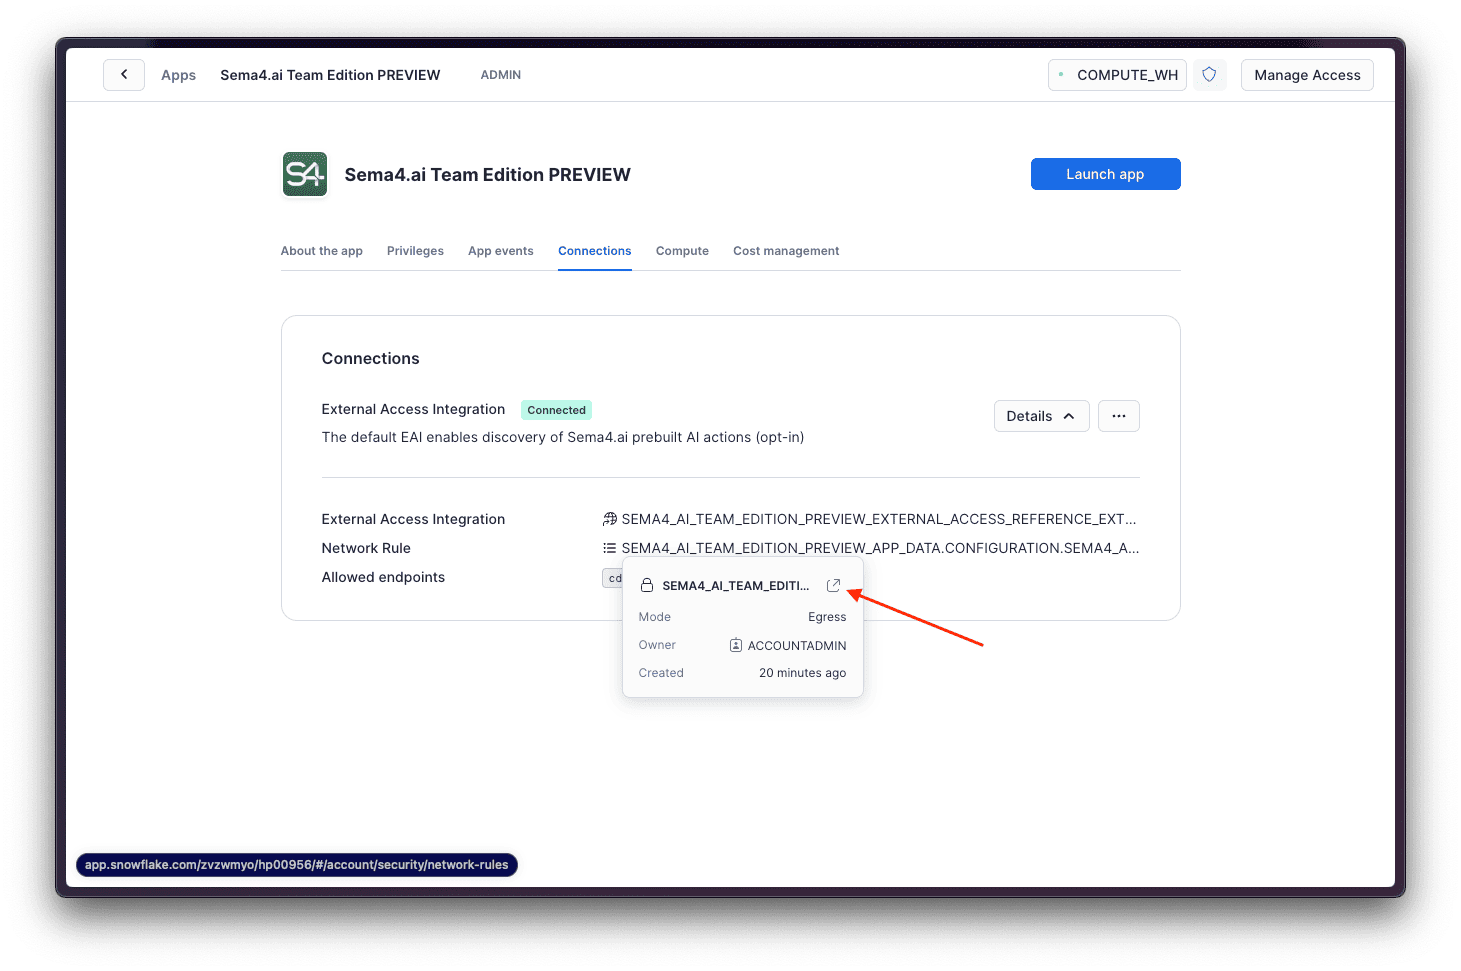
Open the Connections tab and click on Details button to expand the details of the connections.
Open the network rule
Click on the second row called Network Rule to open it's details from the expand button in the top right corner of the contextual menu.
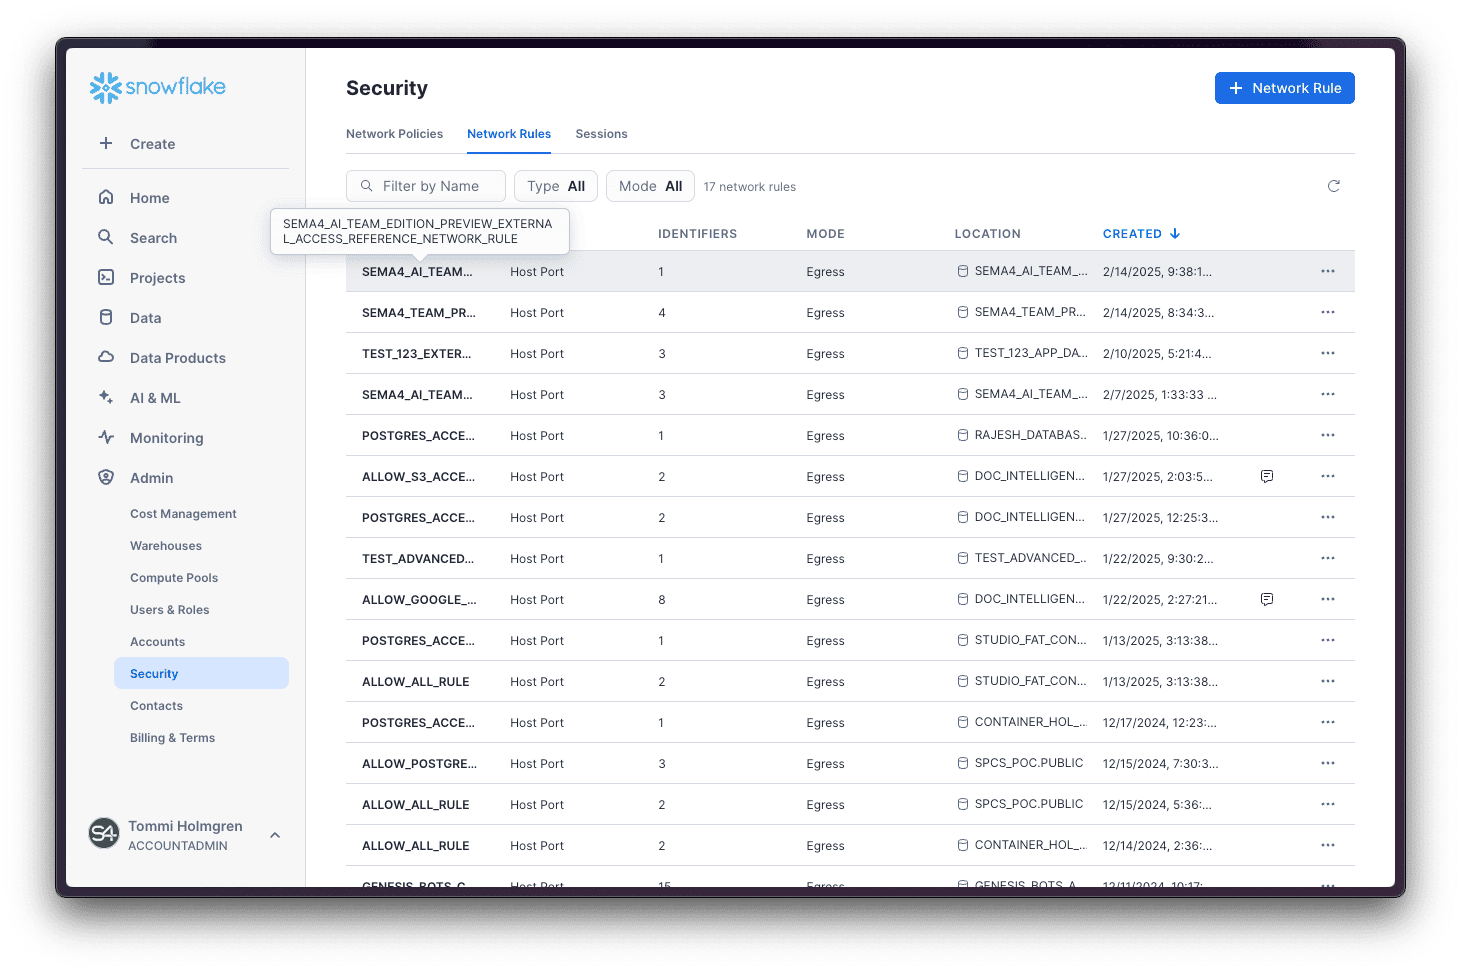
Find the rule from the list
Make sure you are using a role that allows you to manage the connections (like ACCOUNTADMIN), and find the application's rule from the list.
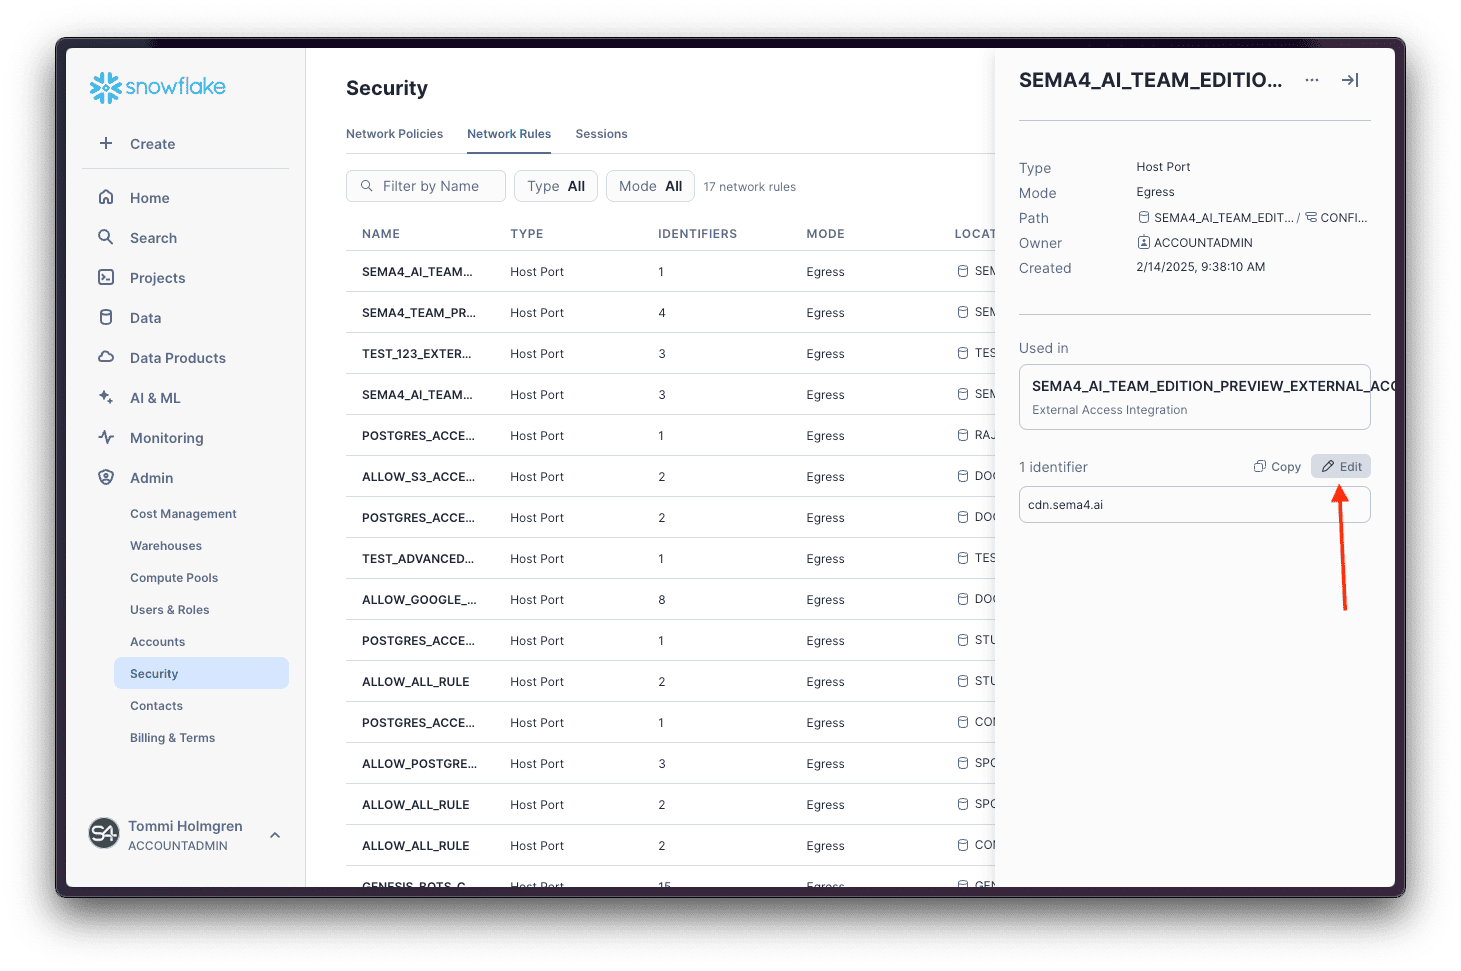
Edit the rule
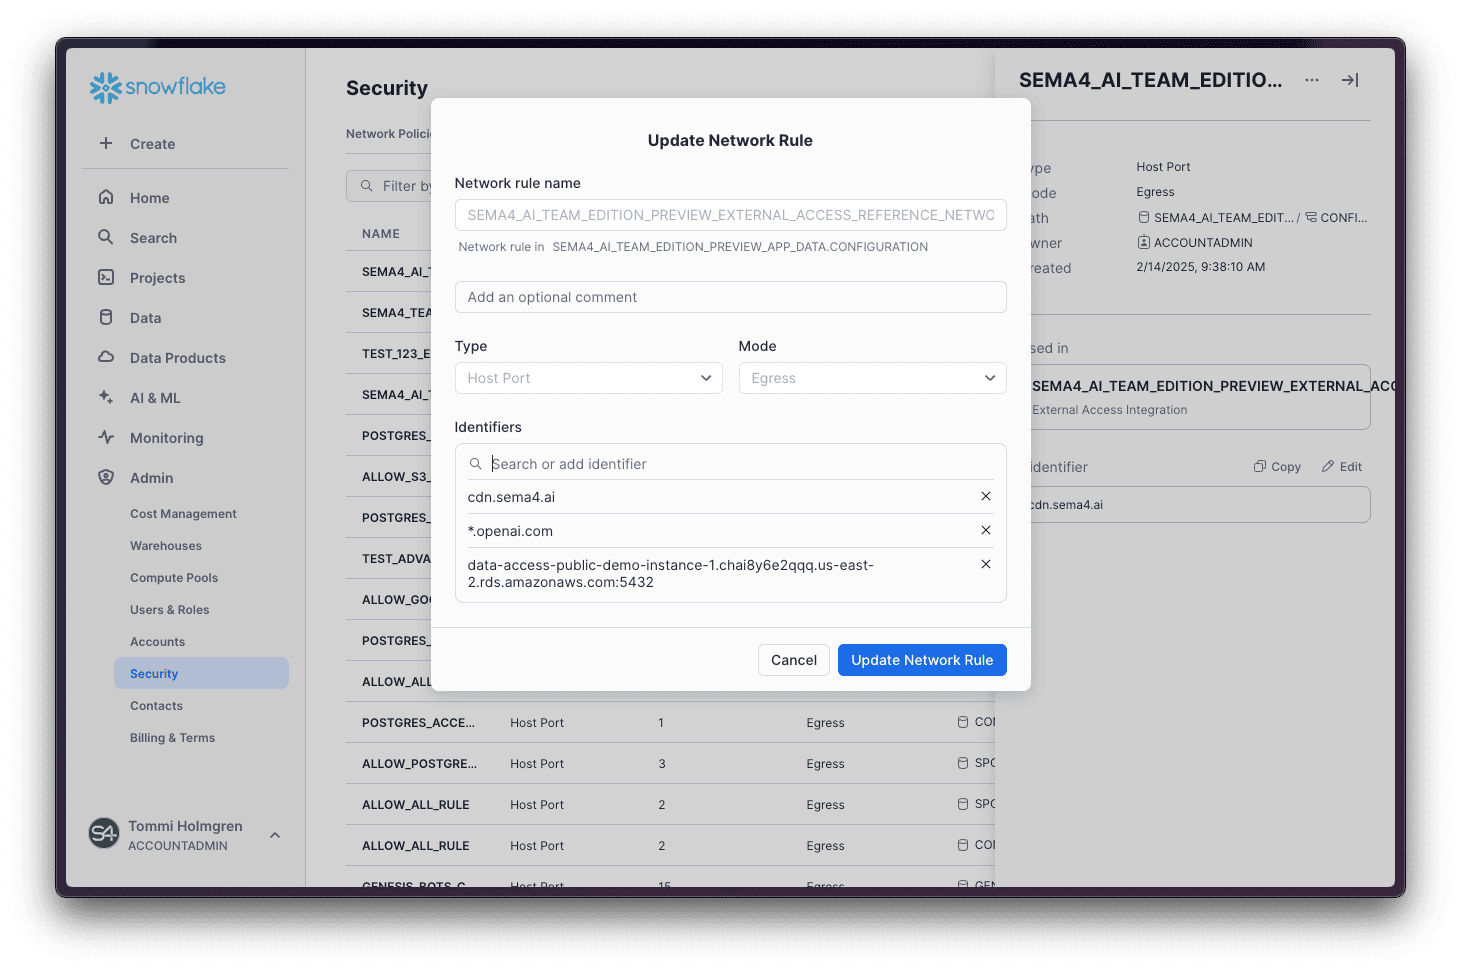
Click on the Edit button to add new integrations. An Update Network Rule screen will be shown.
Type additional rules
In the search box type the host and port combination of your desired rule. For example *.openai.com or data-access-public-demo-instance-1.chai8y6e2qqq.us-east-2.rds.amazonaws.com:5432. Hit Enter to add the rule to the list.
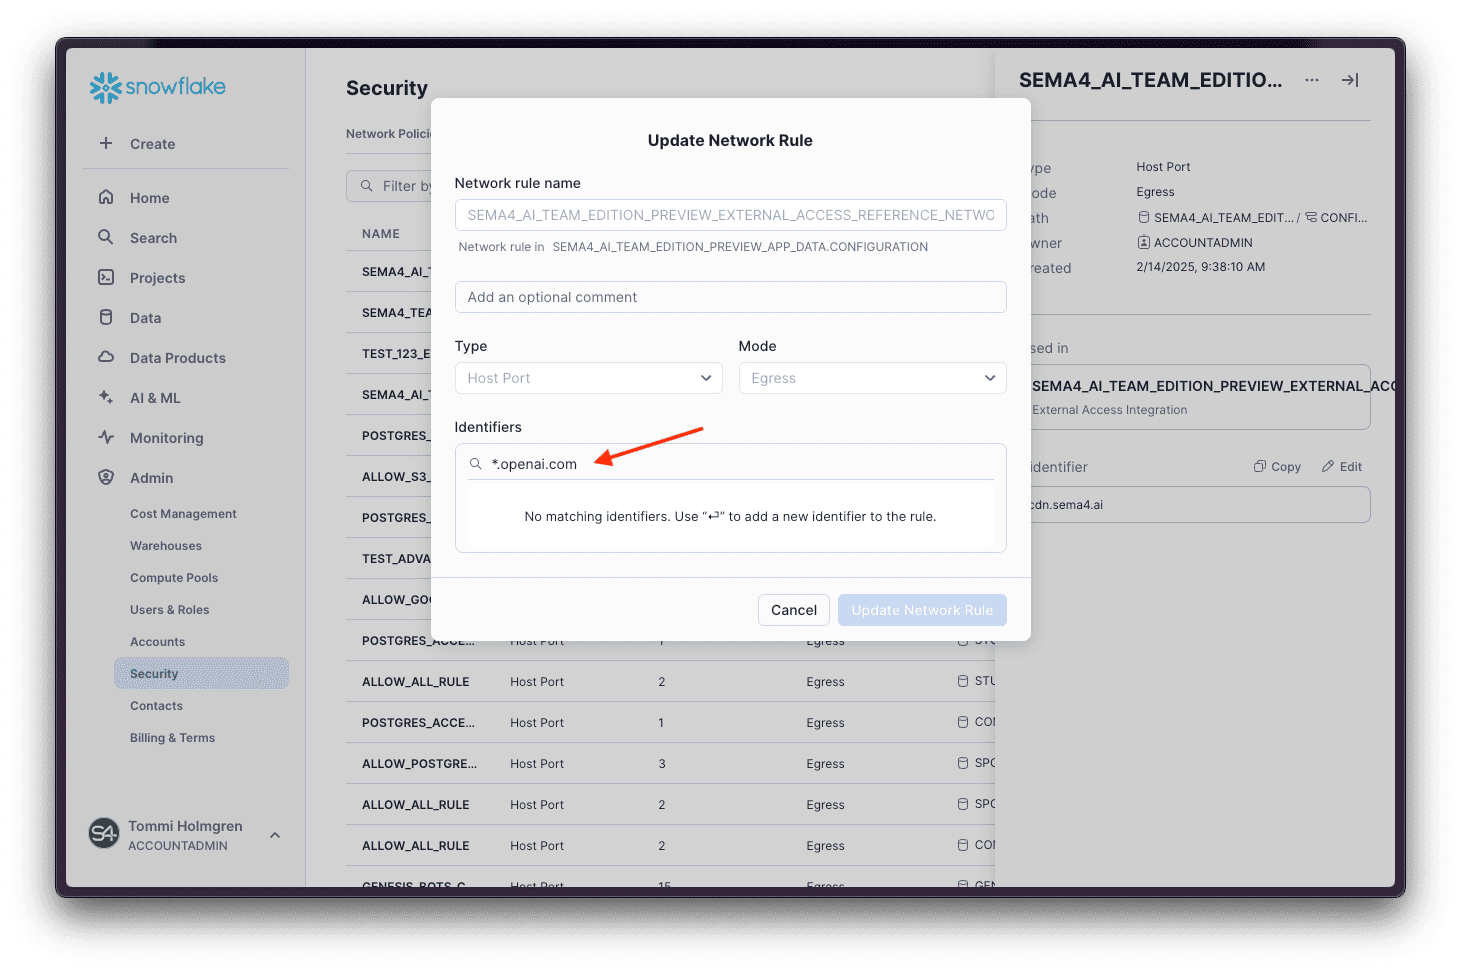
You can use rules like 0.0.0.0:443 to allow all outbound traffic, but use this with caution as it might expose your account to security risks.
Save the rules
Click on the Update Network Rule button to save the rule. You are done!
LLM configurations
The application comes preconfigured to use Cortex AI LLMs, such as Claude 3.5 Sonnet. Cortex AI provided LLMs will be available in Control Room without further configuration as the grant to use them is already in place after the initial installation.
Sema4.ai Team Edition supports also other LLMs, such as OpenAI and Azure OpenAI and AWS Bedrock (Claude). To use these LLMs, you will need to configure the API/access keys in Control Room, and make sure that you grant the application the necessary External Access Integrations.
If you are using a Snowflake account in a region where the LLM is not available natively, you will need to enable cross-region inference. Refer to Snowflake documentation here (opens in a new tab) for more details on how to enable cross-region inference.
Access to Snowflake objects
By default the application does not have access to any of your Snowflake objects, except the ones that are created by the application itself. You will need to grant the application the necessary permissions to access the objects it needs to use. Refer to Snowflake documentation for more details on how to grant the application access to the objects it needs to use.
Remember to update the below statements with the actual Sema4.ai Team Edition application name you have in your Snowflake account. The default name is ENTERPRISE_AI_AGENTS_TEAM_EDITION.
Databases, schemas and tables
For example the GRANT statements below shows how to grant the application access to the PRODUCTION_RESULTS database, and all the schemas and tables within it.
GRANT USAGE ON DATABASE PRODUCTION_RESULTS TO APPLICATION ENTERPRISE_AI_AGENTS_TEAM_EDITION;
GRANT USAGE ON ALL SCHEMAS IN DATABASE PRODUCTION_RESULTS TO APPLICATION ENTERPRISE_AI_AGENTS_TEAM_EDITION;
GRANT SELECT ON ALL TABLES IN SCHEMA PRODUCTION_RESULTS.PUBLIC TO APPLICATION ENTERPRISE_AI_AGENTS_TEAM_EDITION;
Stages
On the other hand, the next example shows how to grant read and write access to a stage:
GRANT READ, WRITE ON STAGE PRODUCTION_RESULTS.PUBLIC.STAGE1 TO APPLICATION ENTERPRISE_AI_AGENTS_TEAM_EDITION;Warehouses
Following example shows how to grant application a usage of a warehouse, needed for performing any queries. Naturally, replace DEFAULT_WH with the name of the warehouse you want to use.
GRANT USAGE ON WAREHOUSE DEFAULT_WH TO APPLICATION ENTERPRISE_AI_AGENTS_TEAM_EDITION;Cortex Search Services
This is how to grant application usage access to a Cortex Search Service.
GRANT USAGE ON CORTEX SEARCH SERVICE CALL_CENTER_DATA.PUBLIC.CALL_LOGS TO APPLICATION ENTERPRISE_AI_AGENTS_TEAM_EDITION;Semantic Views
Following example shows how to grant application usage access to a semantic view:
GRANT SELECT ON ALL SEMANTIC VIEWS IN SCHEMA PRODUCTION_RESULTS.PUBLIC TO APPLICATION ENTERPRISE_AI_AGENTS_TEAM_EDITION;Managing compute pool
The application uses a Snowflake compute pool to run the agents. When adding more agents, you may face a situation where the pool gets overloaded. In this case you will see an alert in Control Room, and the remedy is to increase the node count.
You can manage the compute pool in the Admin view by clicking the Compute Pools tab, finding the one with the application's name and clicking on it to open the details. Then click ... and choose Edit to change the settings.
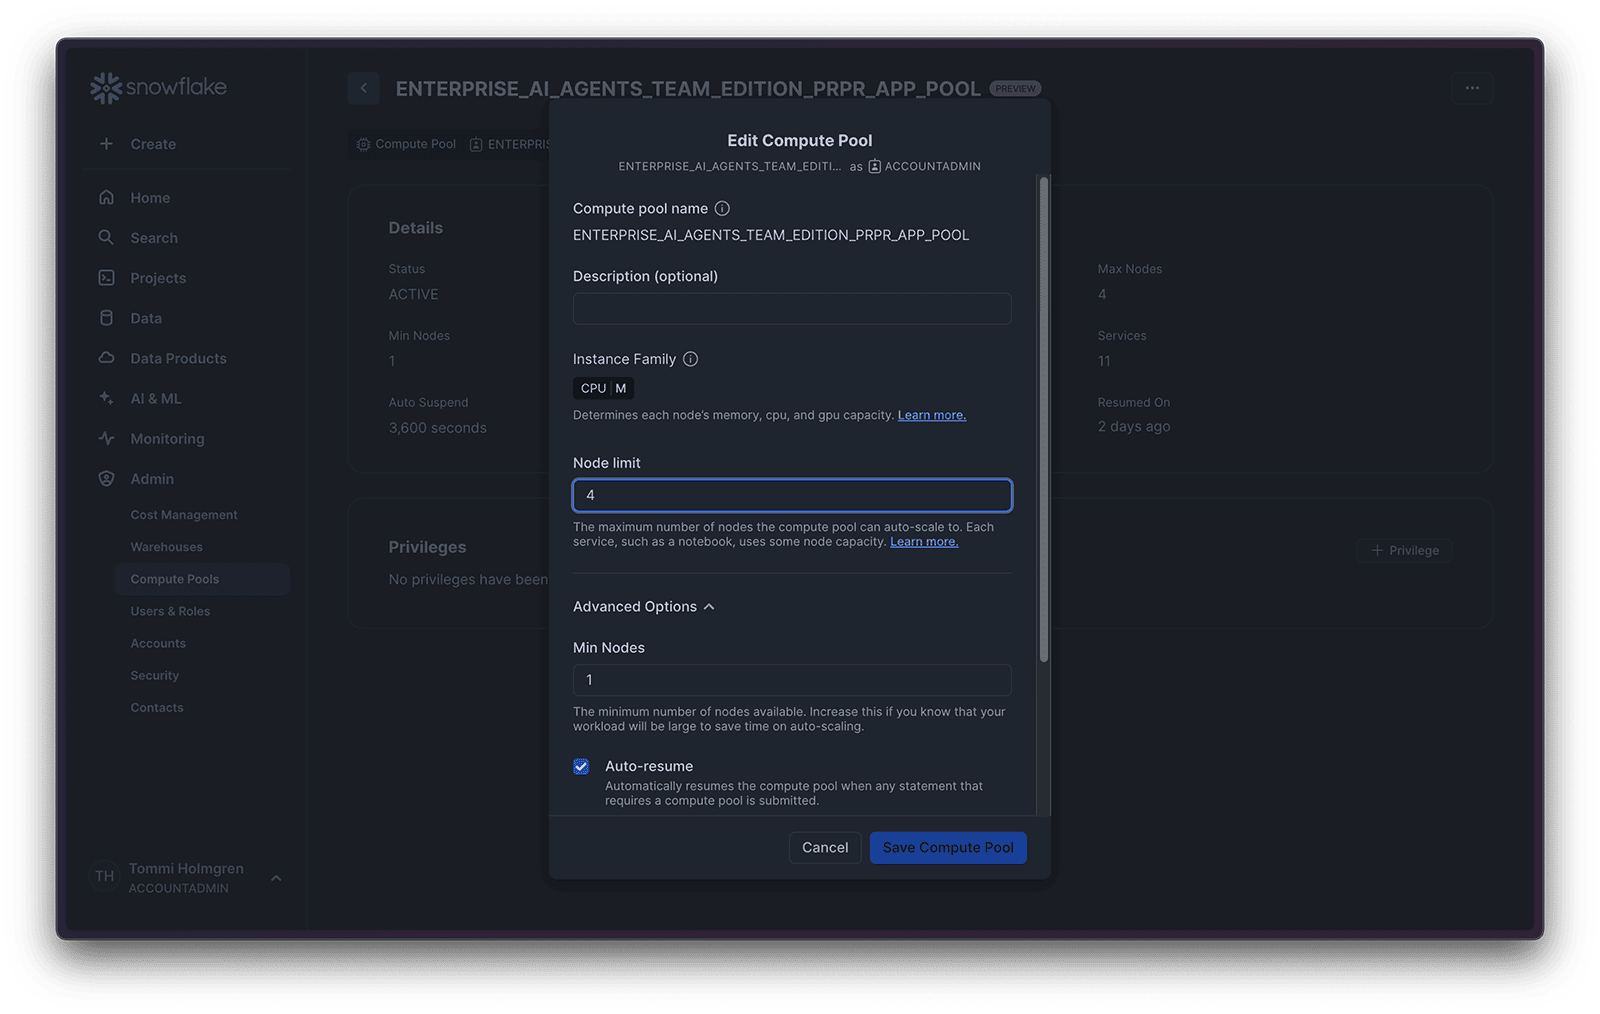
We recommend adding nodes in increments of 2, but will update this section for more precise recommendations once we have more data.
Billing and pricing
Team Edition Native App pricing
After 30 days free trial you will be required to enter a valid payment method to the application in Snowflake UI, and to purchase the application.
Usage of the application is based on number of deployed "active" agents during any given calendar day. The billing day changes midnight UTC. Here are some examples.
- Midnight UTC you have 6 deployed agents, and during the next 24h period you deploy 2 more -> that day you will be billed for 8 agents.
- When deleting an agent deployment during the day, you will not be billed for it the following day.
- If you suspend the Sema4.ai service from the admin UI, no billing happens (starting from the following day).
- If you update an agent to a new version, it doesn't change the billing. However if you delete an agent and deploy it again during the same day, these are considered two different agents and you'll be billed for two units that day.
- Deploying the same agent multiple times (for example with different name and configurations) are considered separate deployments and thus each will billed.
Snowflake resource usage
In addition to the Team Edition Native App pricing, Snowflake will also bill you for the resources used by the application. This includes typically following key resources (not an exhaustive list, consult Snowflake documentation for more details):
Snowpark Container Services (SPCS) Compute Pool
The Native App creates an SPCS Compute Pool with the same name as the application. This compute pool is used to run the services that power agents and Work Room. The compute pool is billed based on the number of nodes in the compute pool and the amount of time the nodes are used. App installer creates a M sized compute pool with minimum 1 and maximum 4 nodes.
Amount of node needed is directly proportional to the number of agents running and their capabilities, which is manifested in how many services are ran in the compute pool.
Snowflake Warehouse
The Native App creates a warehouse with the size XSmall, and set's it's autosuspend to 1 minute. When agents are running and perform queries to your data, the warehouse is used.
Snowflake Cortex AI
Agents rely on Cortex AI LLMs and services like Cortex Search and Cortex Analyst. When these are used, Snowflake will bill you for the resources used. The volume of usage is directly proportional to the number of agents running and the amount of work they perform.
Admin tips
This section provides some tips and best practices for the Admin of the Sema4.ai Team Edition preview.
Suspend and resume to save costs
Suspending the service when it is not in use is a good idea for several reasons:
-
Cost Savings: By suspending the service, you can save on compute costs associated with running the application. This is particularly useful if the application is not needed 24/7 and can be paused during off-hours or periods of low activity.
-
Resource Management: Suspending the service frees up resources within your Snowflake account, allowing you to allocate them to other tasks or applications that may need them more urgently.
-
Security: When the service is suspended, it reduces the attack surface, as the application is not actively running and thus not exposed to potential security threats.
-
Maintenance: Suspending the service can be useful during maintenance windows. It ensures that no users are accessing the application while updates or changes are being made, reducing the risk of data corruption or other issues.
To suspend the service, navigate to the Admin view and click the Suspend button. To resume the service, simply click the Resume button. This allows you to easily manage the application's availability based on your team's needs and usage patterns.
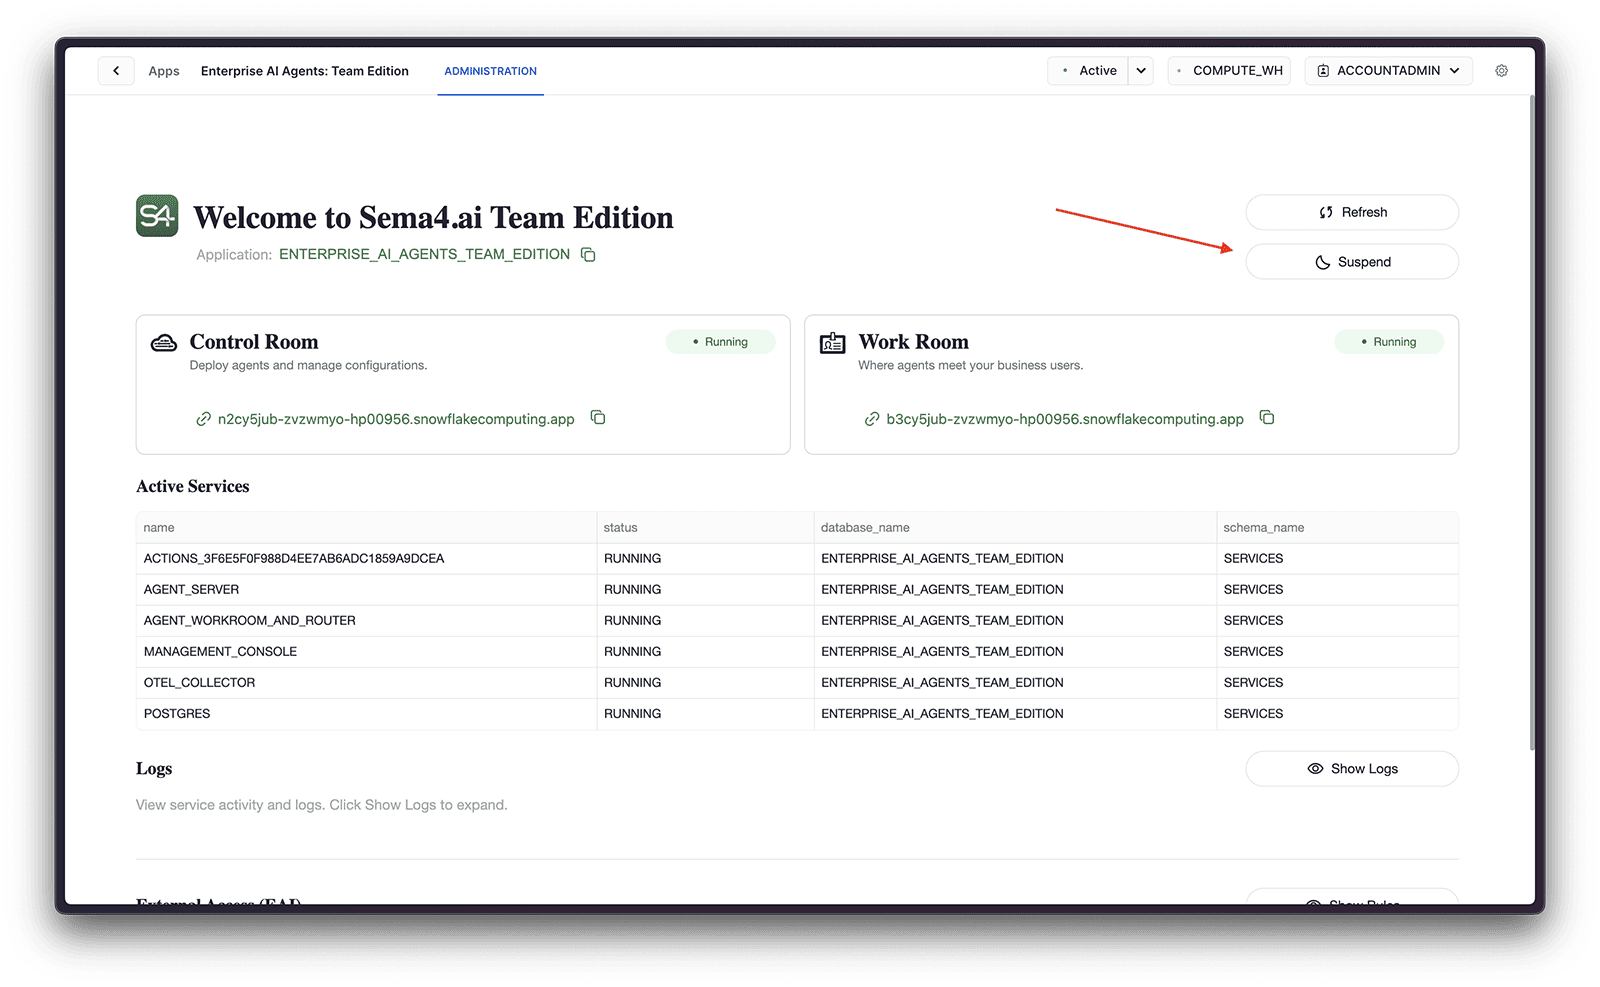
Once the service is suspended, the associated compute pool is automatically suspended as well (by default the auto-suspend is set to 60 minutes). When the service is resumed, the compute pool is automatically resumed as well. Use Snowsight Admin -> Compute Pools to view the status of the compute pool and suspend it manually if needed, or to manage the autosuspend and resume settings.
Manual suspend and resume
You can also suspend and resume services programmatically by calling stored procedures. This is useful for automation and scheduling.
Remember to update the below statements with the actual Sema4.ai Team Edition application name you have in your Snowflake account. The default name is ENTERPRISE_AI_AGENTS_TEAM_EDITION.
To suspend all services manually:
CALL ENTERPRISE_AI_AGENTS_TEAM_EDITION.maintenance.suspend_all_services();To resume all services manually:
CALL ENTERPRISE_AI_AGENTS_TEAM_EDITION.maintenance.resume_all_services();Both procedures return a message indicating how many services were affected (e.g., "Suspended 5 services" or "Resumed 5 services").
Scheduling suspend and resume
You can create Snowflake tasks to automatically suspend and resume services on a schedule. This is particularly useful for cost optimization during non-business hours.
The following example creates two tasks: one to suspend services at 6 PM (18:00) UTC on weekdays, and another to resume them at 8 AM UTC on weekdays.
Remember to update the database, schema, warehouse name and application name to match your configuration.
-- Create a task to suspend services at 6 PM UTC on weekdays
CREATE OR REPLACE TASK <database>.<schema>.suspend_services_task
  WAREHOUSE = <warehouse>
  SCHEDULE = 'USING CRON 0 18 * * 1-5 UTC'
AS
  CALL ENTERPRISE_AI_AGENTS_TEAM_EDITION.maintenance.suspend_all_services();

-- Create a task to resume services at 8 AM UTC on weekdays
CREATE OR REPLACE TASK <database>.<schema>.resume_services_task
  WAREHOUSE = <warehouse>
  SCHEDULE = 'USING CRON 0 8 * * 1-5 UTC'
AS
  CALL ENTERPRISE_AI_AGENTS_TEAM_EDITION.maintenance.resume_all_services();

-- Enable the tasks
ALTER TASK <database>.<schema>.suspend_services_task RESUME;
ALTER TASK <database>.<schema>.resume_services_task RESUME;
The CRON expression format is minute hour day-of-month month day-of-week. In the example above, 0 18 * * 1-5 means "at minute 0 of hour 18 (6 PM) on every day-of-month, every month, for days Monday through Friday (1-5)". Adjust the schedule to match your team's working hours and timezone.
Application updates
We provide frequent updates to the application, which are automatically applied to your installation without any action required from you.
Troubleshooting & help
The application uses standard Snowflake logging and observability. As an administrator, you can find the logs for each service within the Team Edition Native App in Snowsight -> Monitoring -> Services & Jobs.
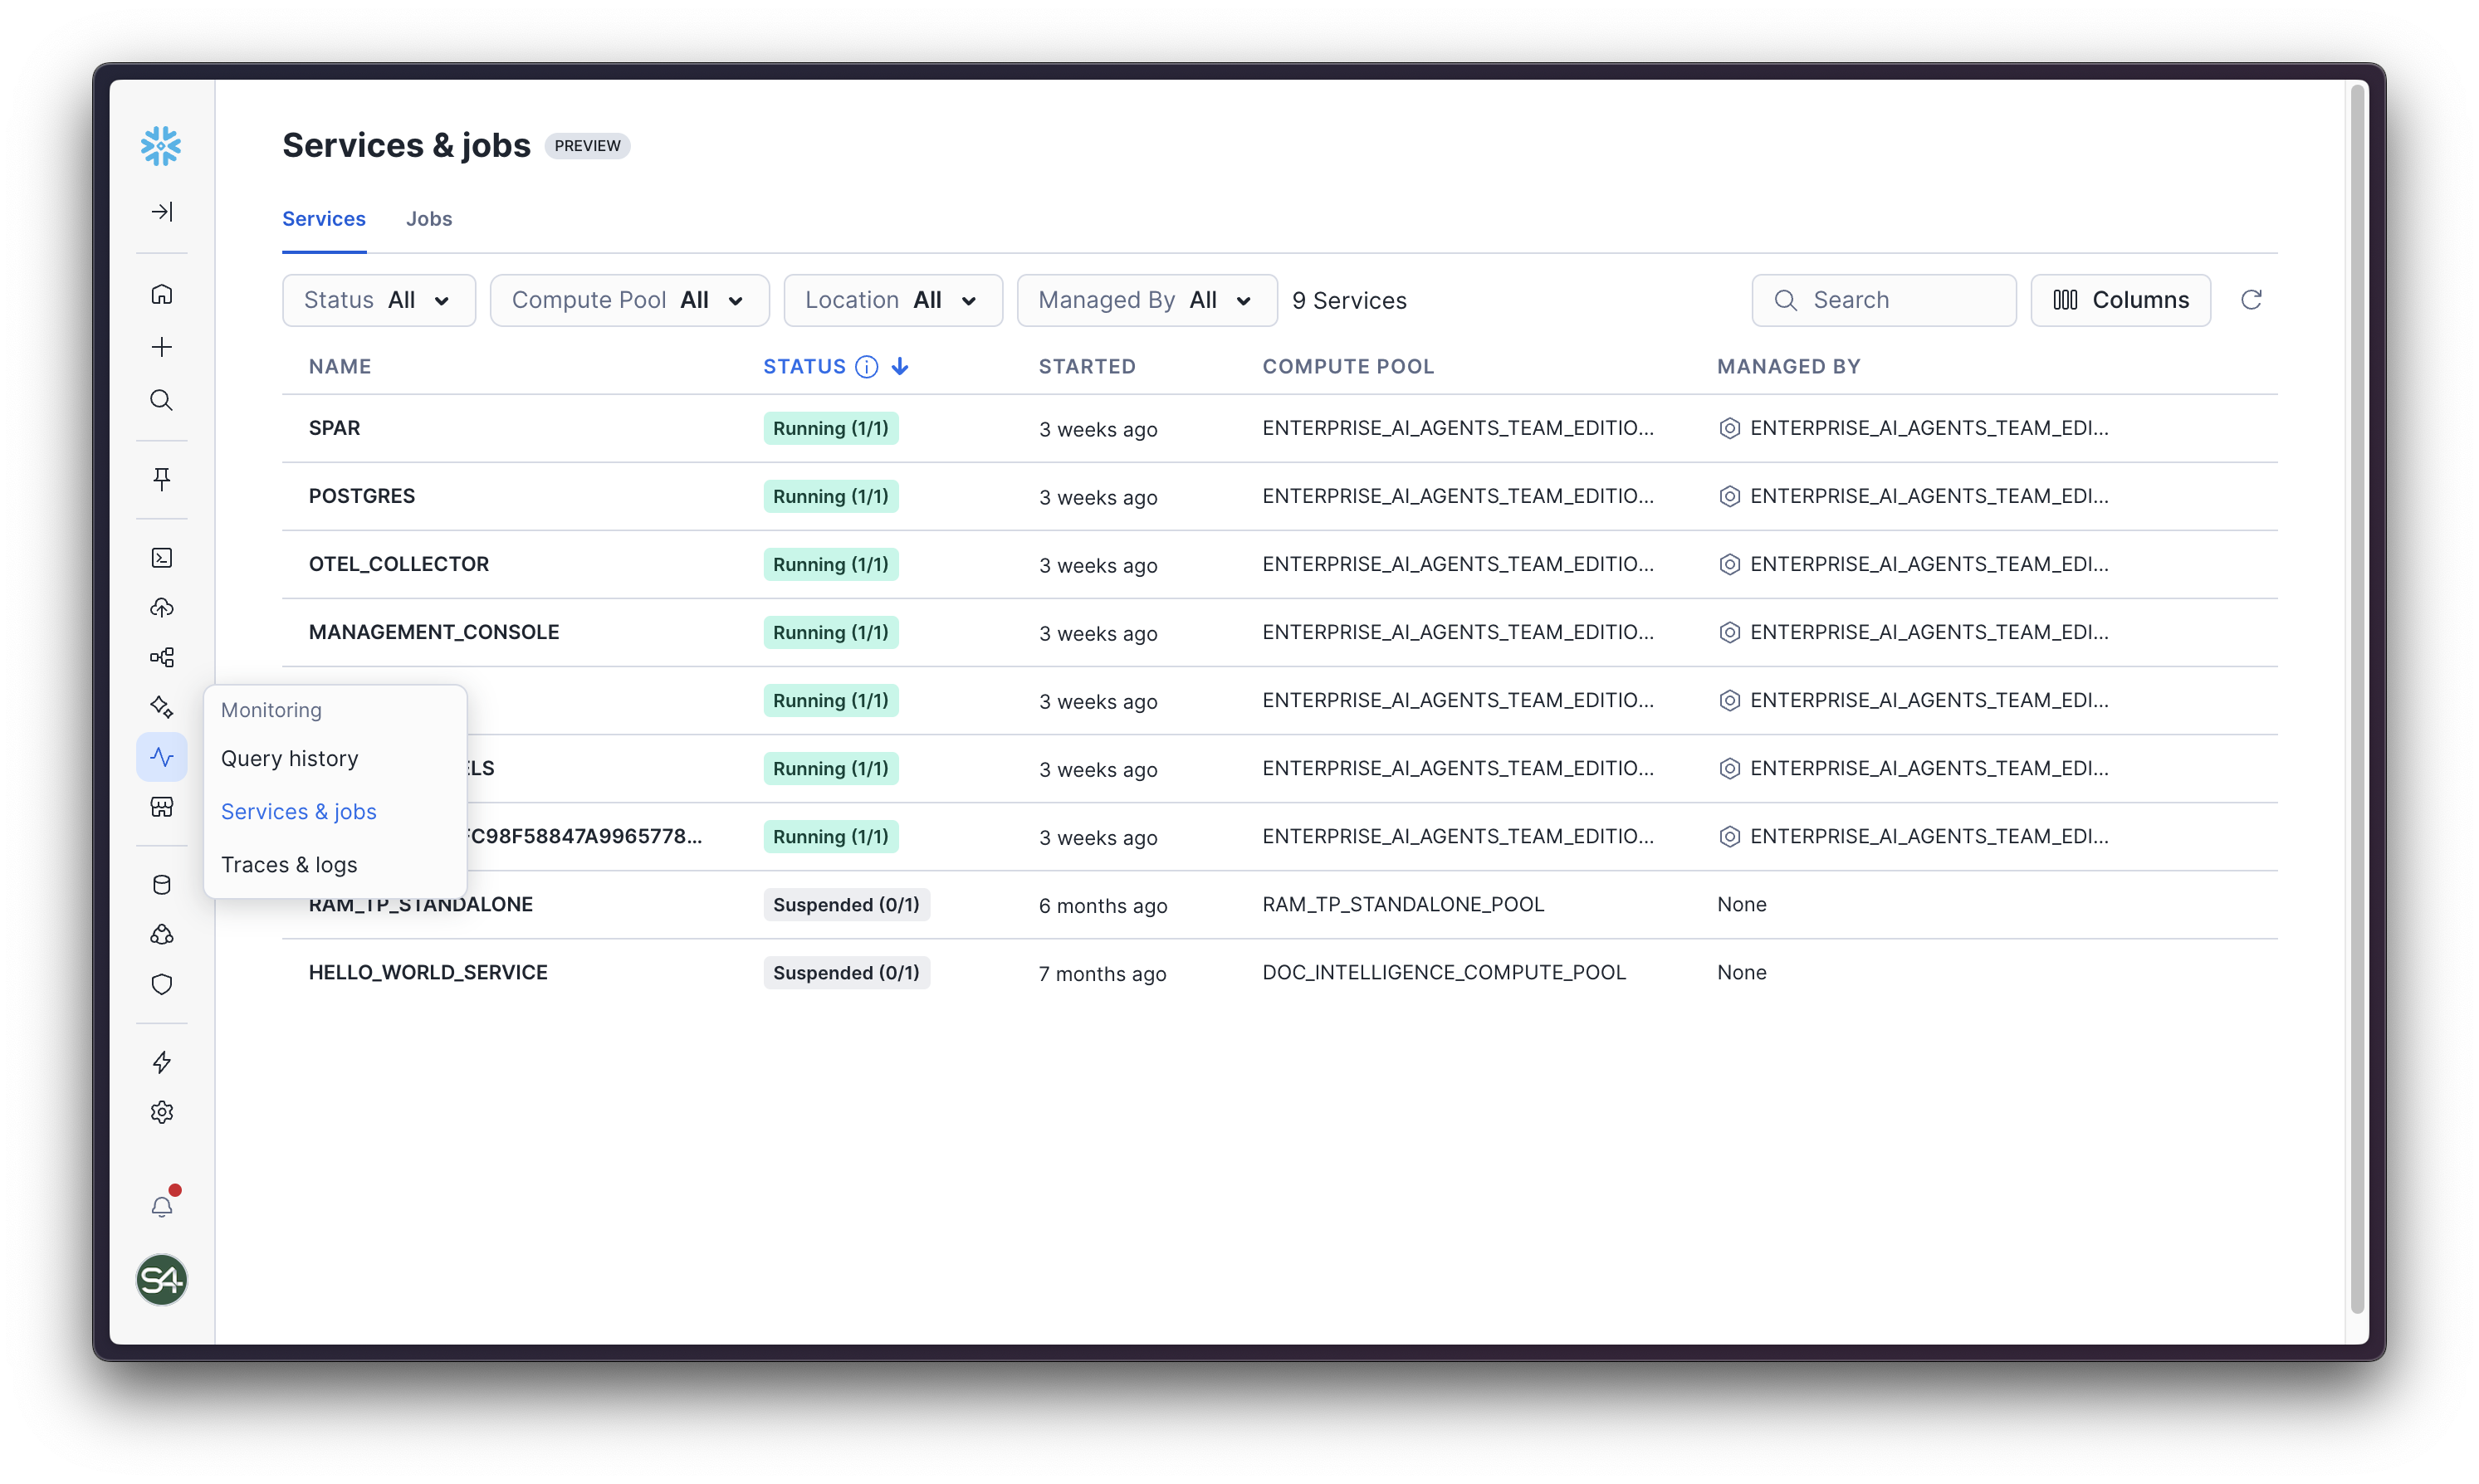
In short, these are the key services you might want to check in case of issues:
| Service | Description |
|---|---|
| SPAR | Sema4.ai Portable Agent Runtime is the service that runs the agents and Work Room. |
| MANAGEMENT_CONSOLE | This is the service that runs Control Room, and responsible for example agent publish and deployment. |
| AGENT_CHANNELS | This service manages agent connectivity to Slack. |
| ACTIONS_XXXXX | Each agent will have it's own service to run actions for it. Action logs are found here. |
| DATA_SERVER | This is the service that runs the data server for the application, responsible for connecting to various data sources. |
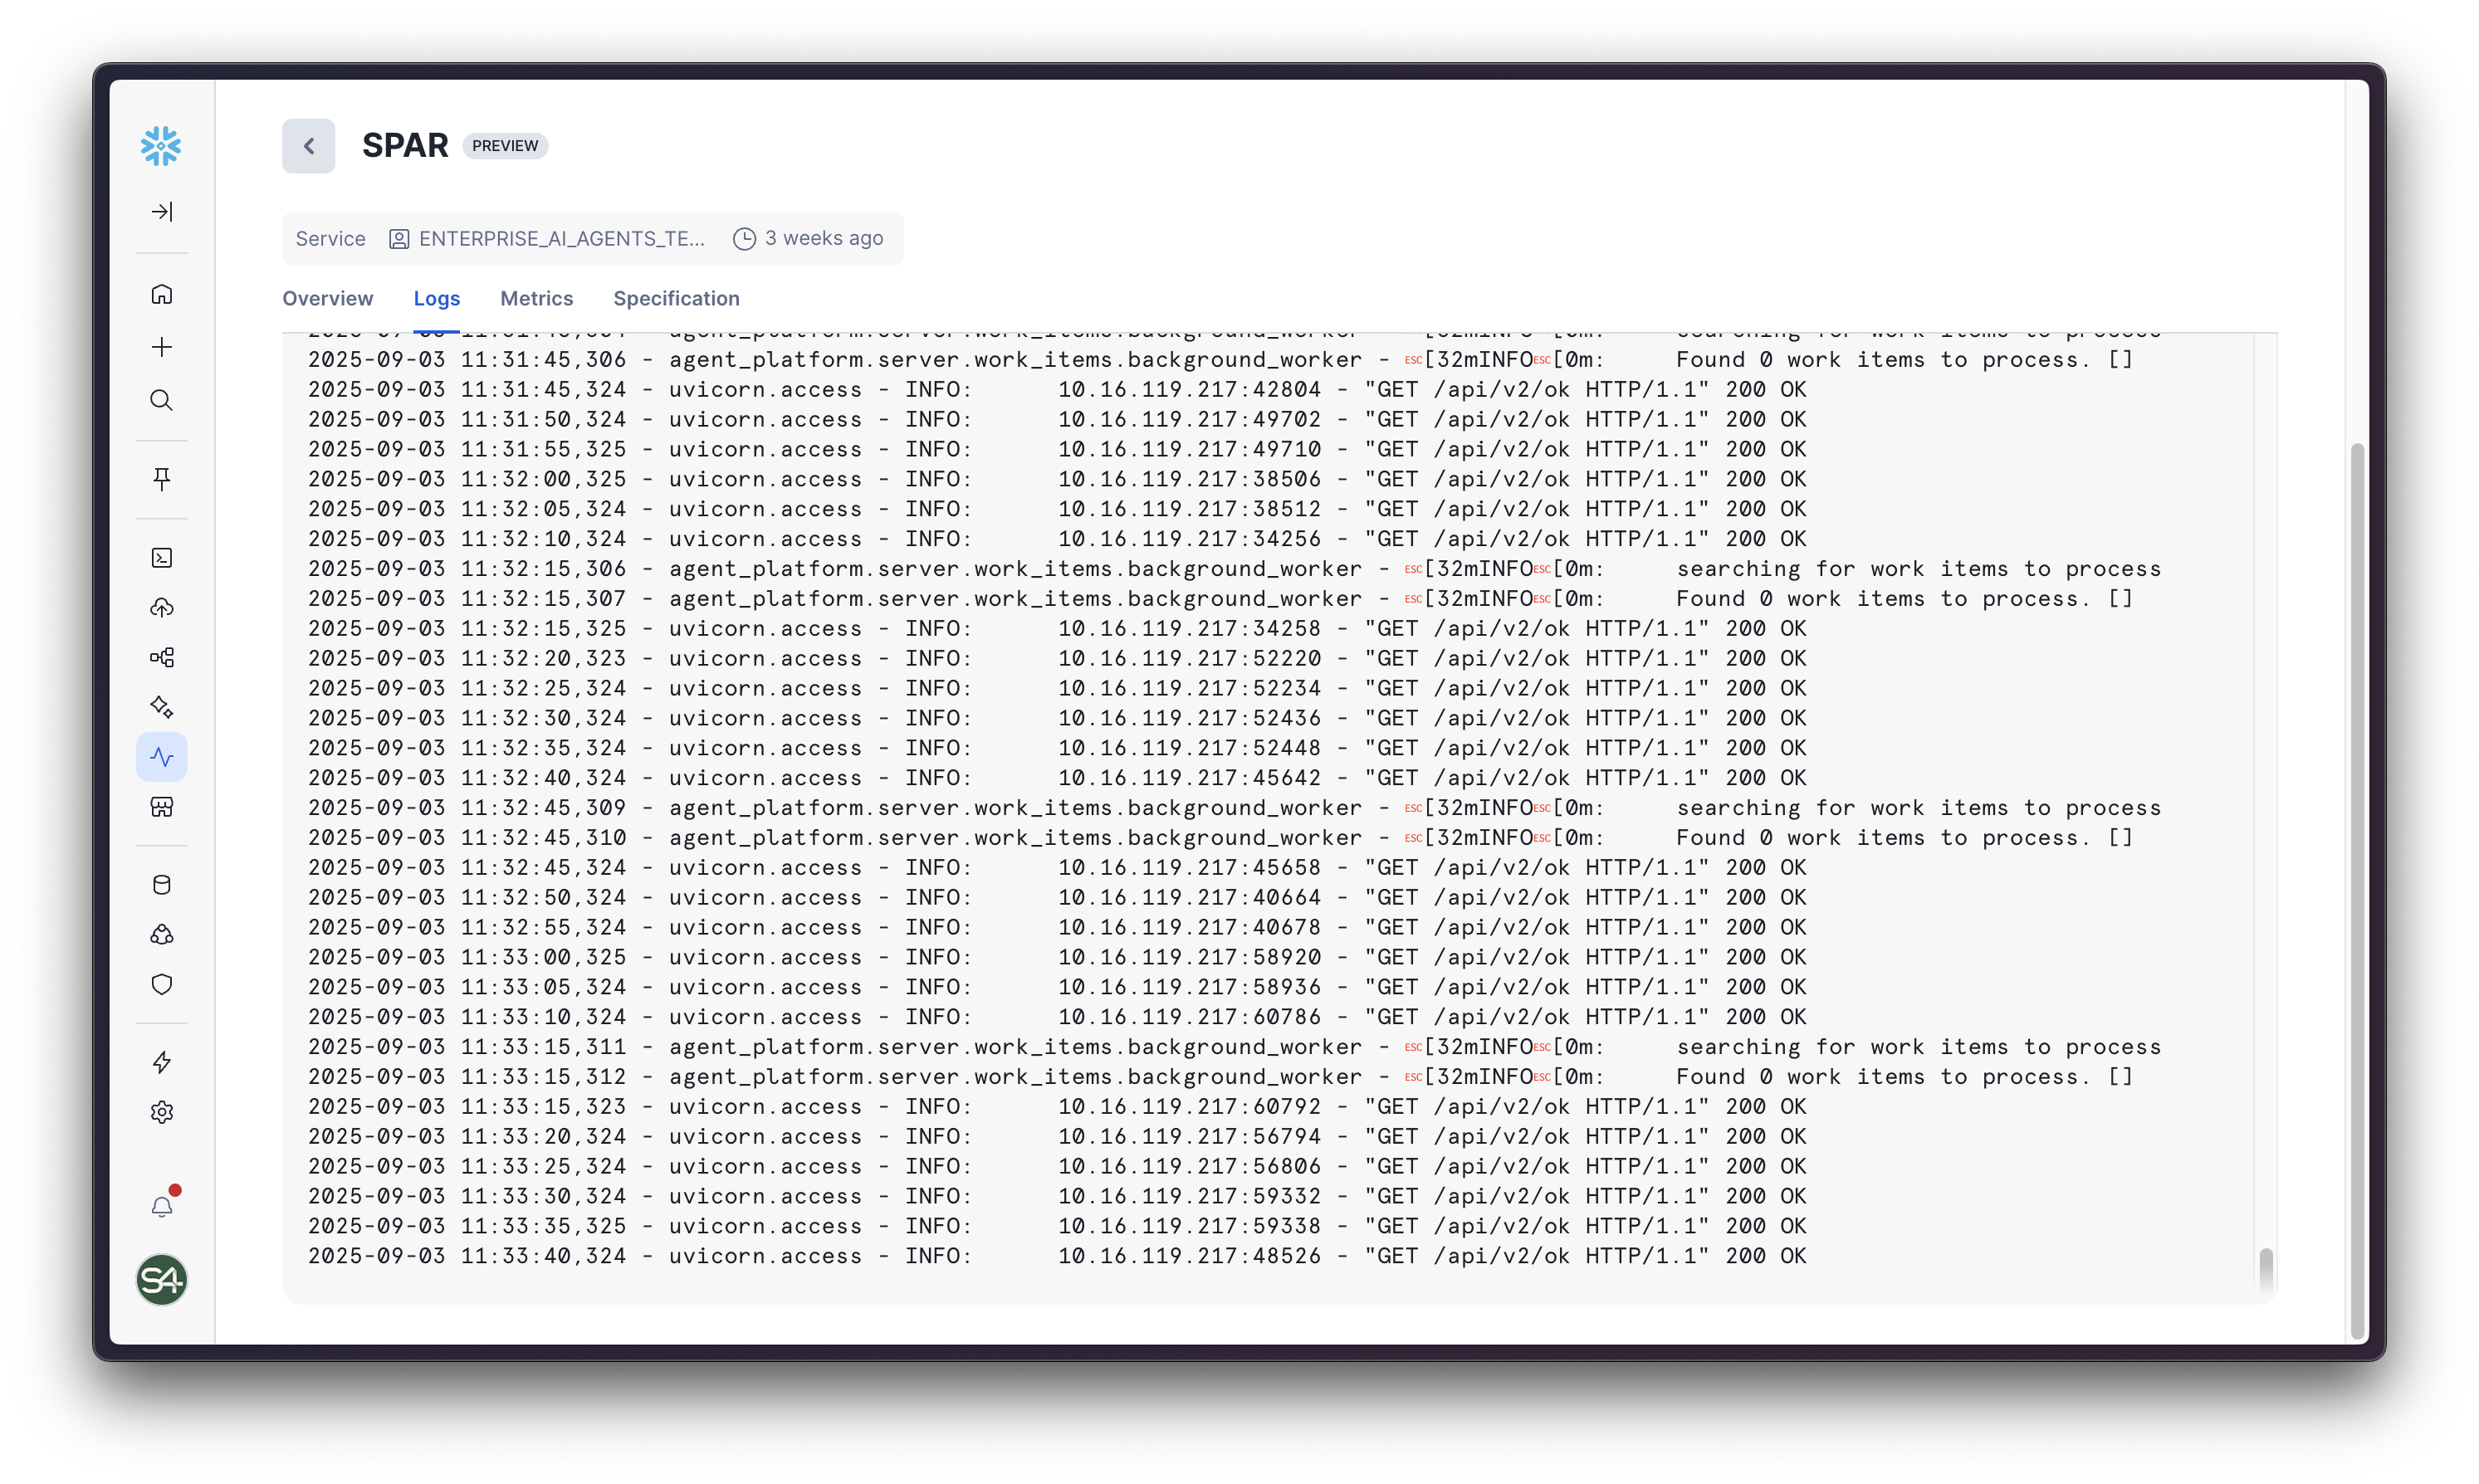
Pick any service, and navigate to the Logs tab to view the logs (last 1000 rows are shown by default).
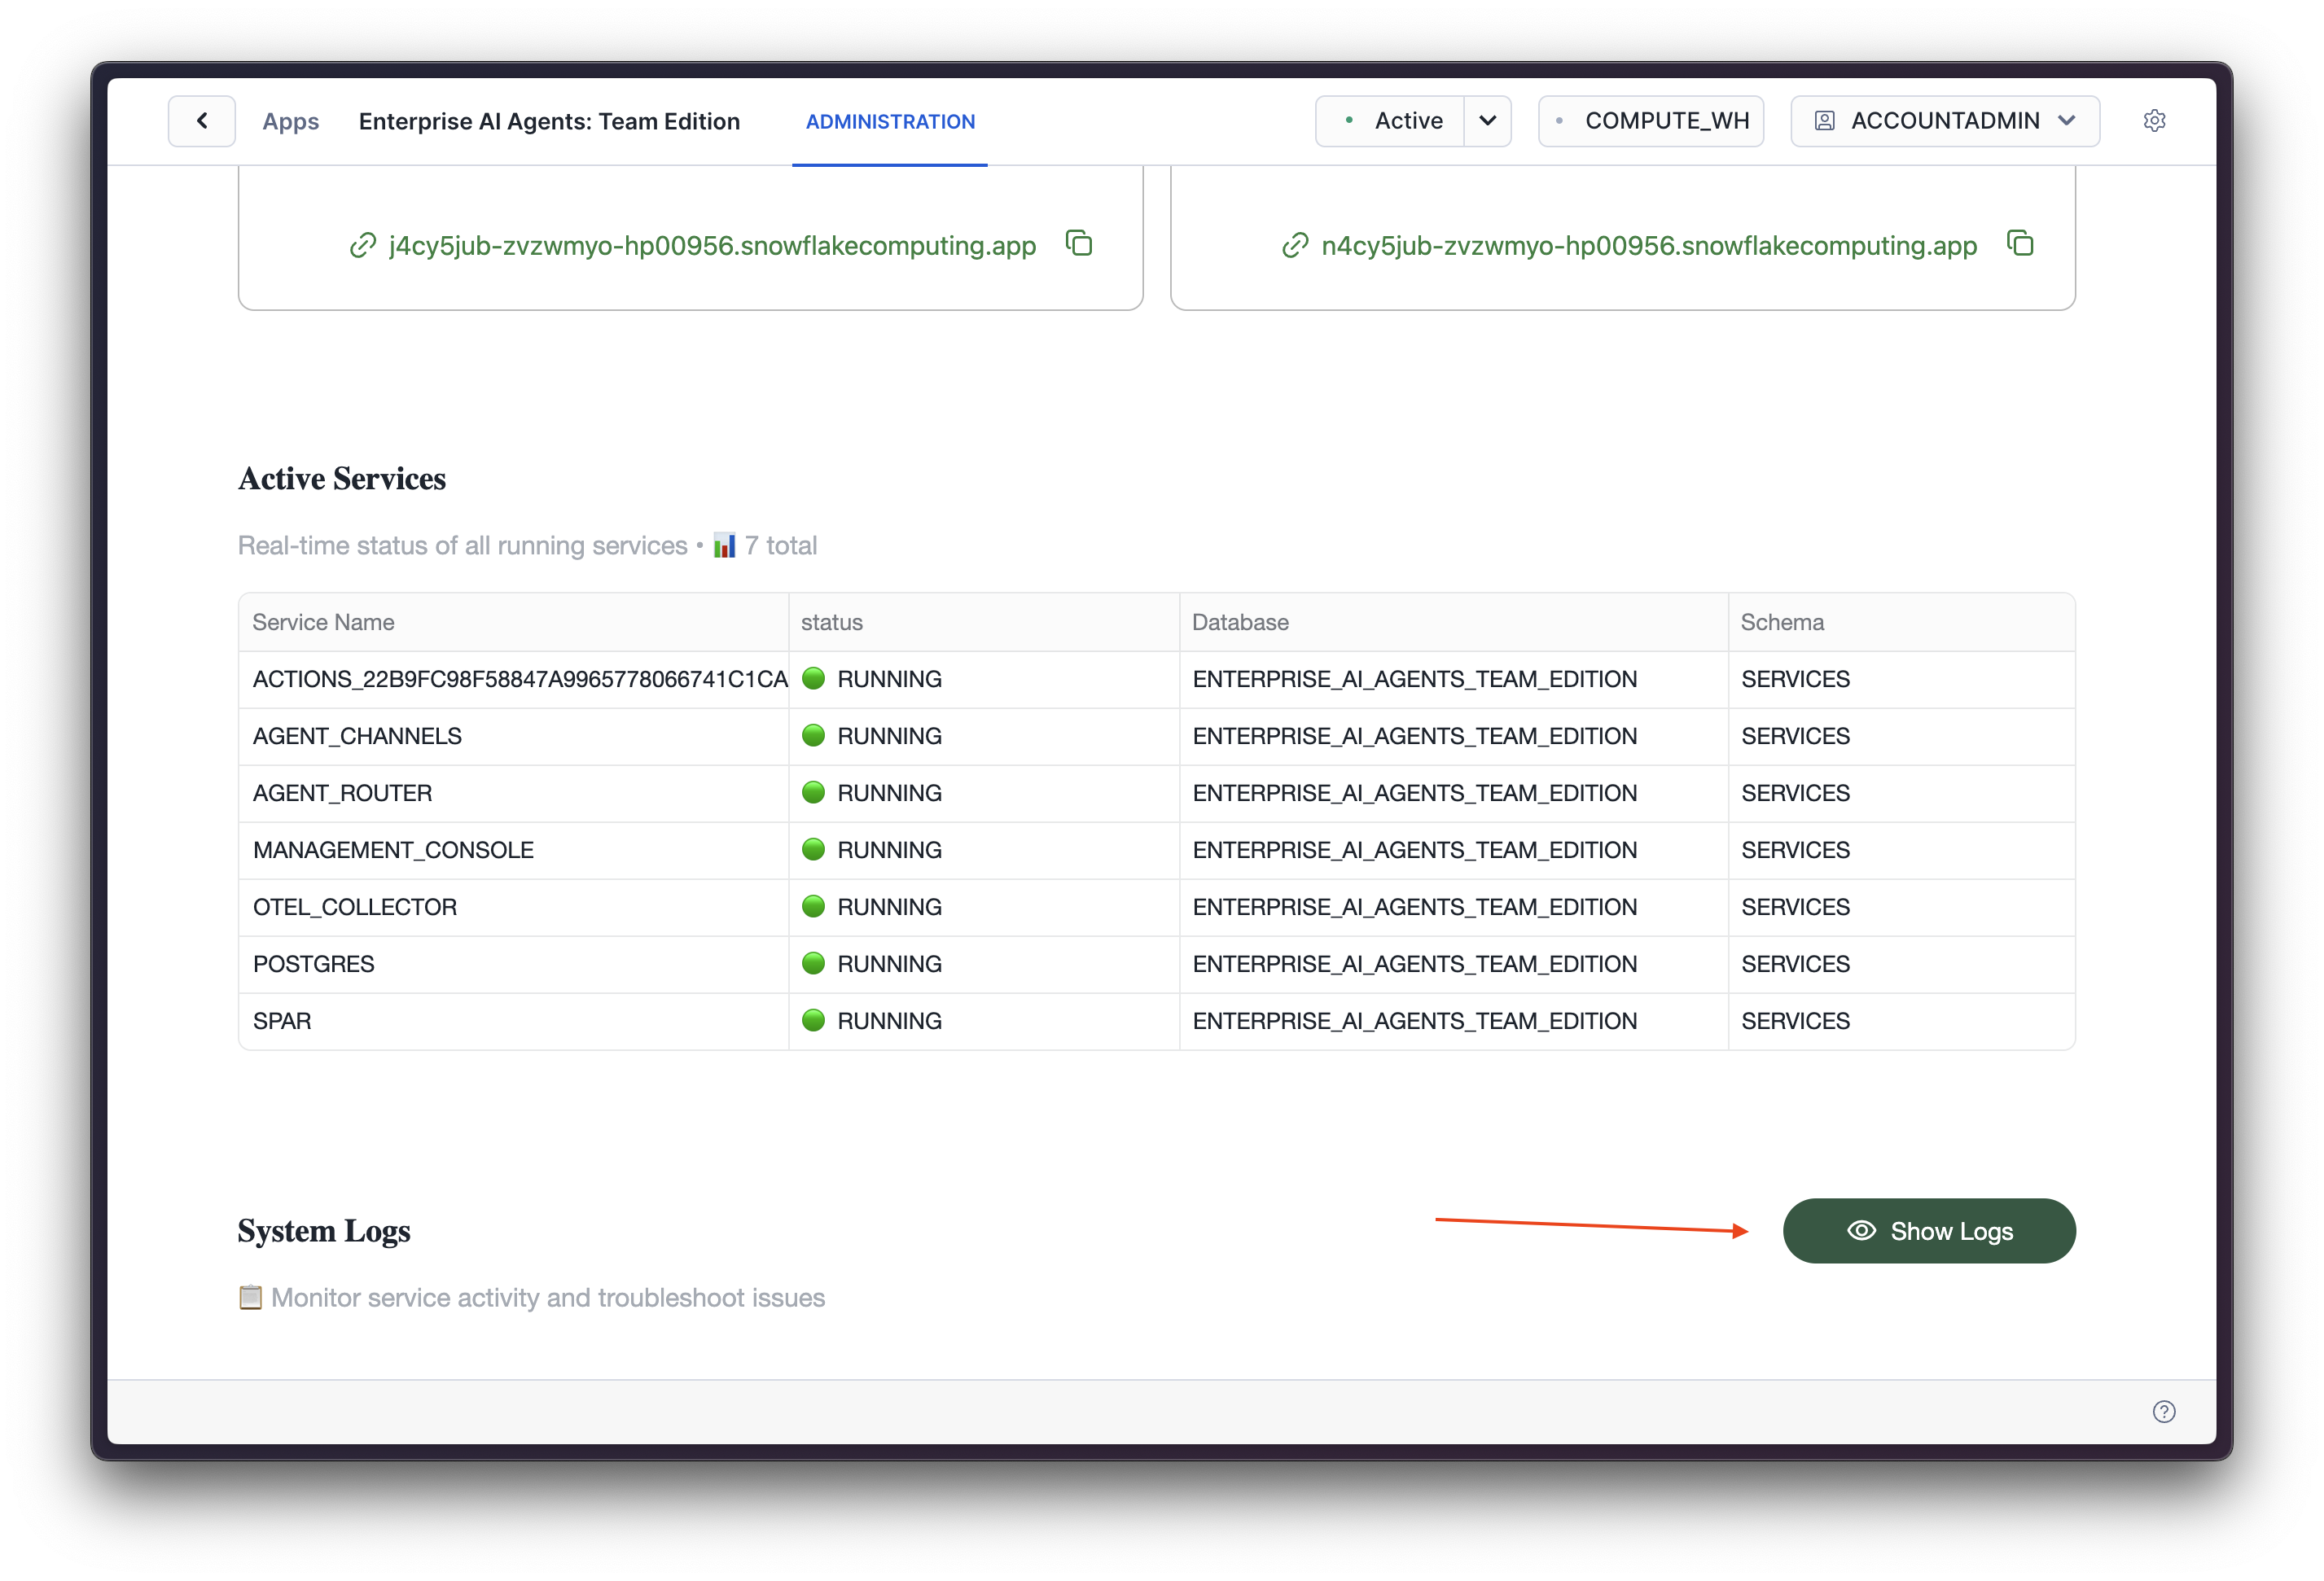
To report an issue, please first navigate to the application's Admin view (Streamlit), and click on the Show Logs button to load the log viewer.
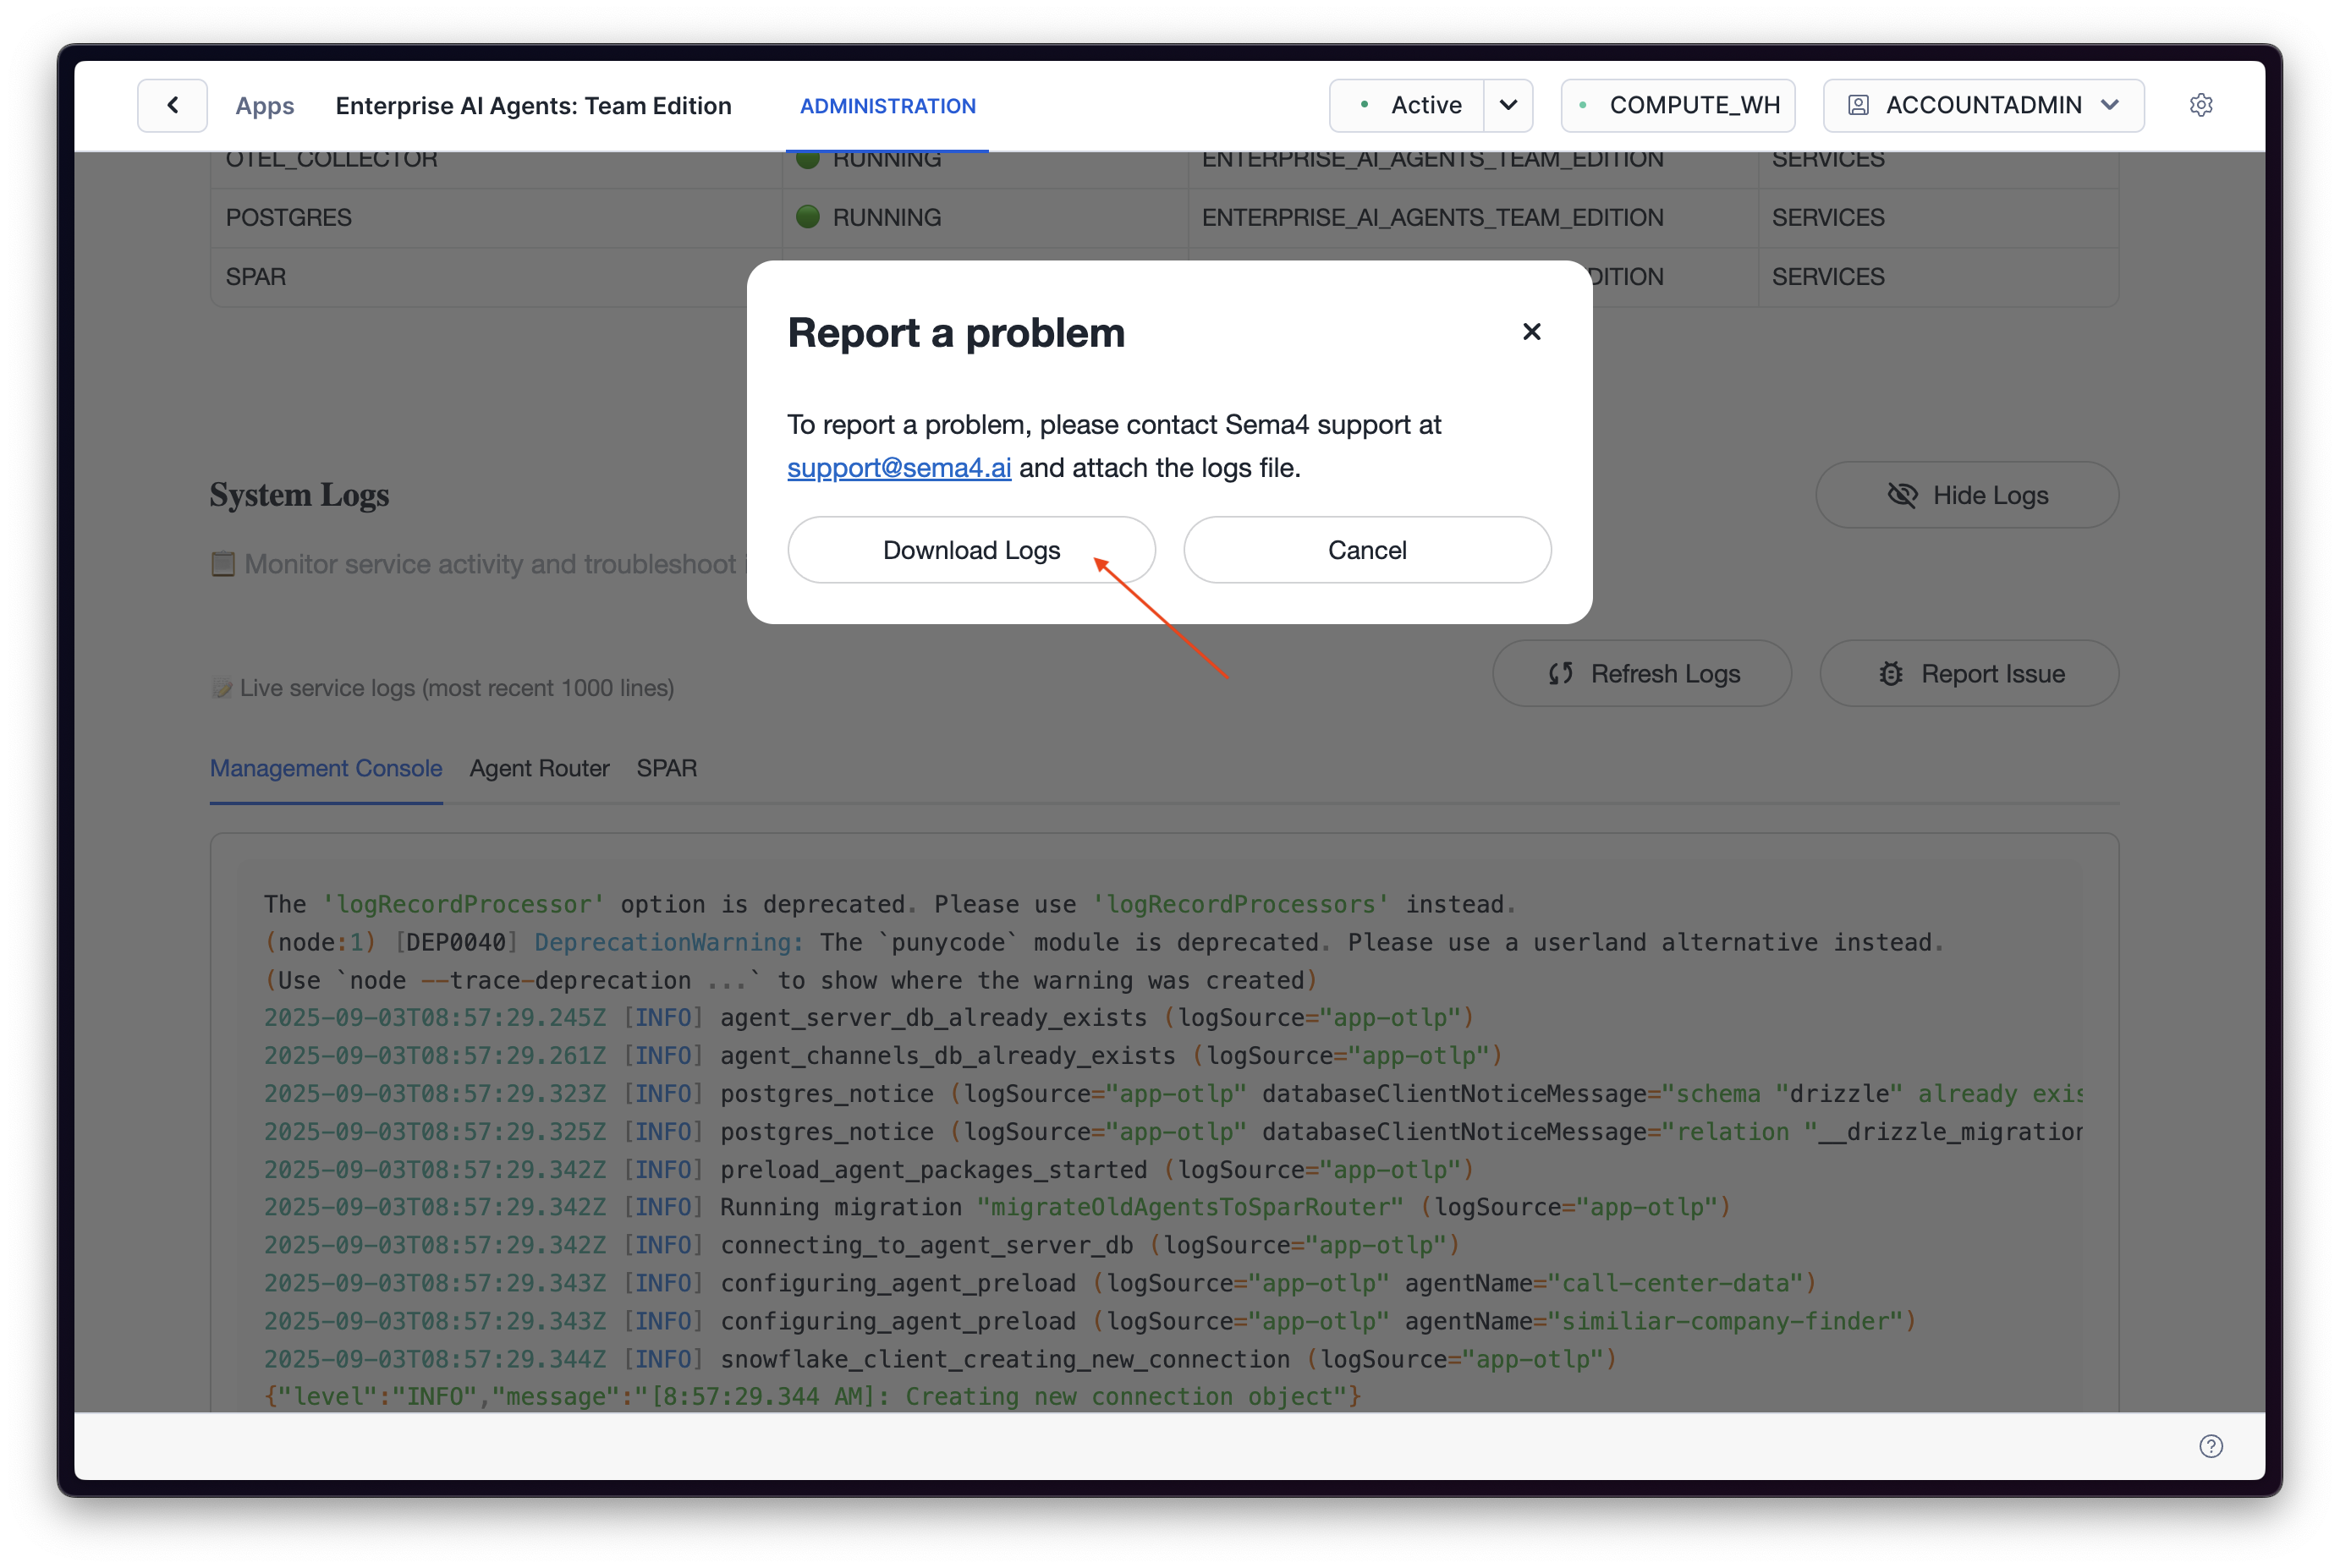
Then click the Report Issue button which will open a dialog that allows your to download a snapshot of the logs. Please send this to our support team at support@sema4.ai with a short description of the issue.
Backups
Sema4.ai Team Edition maintains its state by storing all user/agent discussion data in a central database. This database uses a block storage volume on Snowflake to persist its state between restarts and upgrades. This volume is automatically backed up, via snapshots, once per day. Snapshots are retained for up to 30 days before they're purged.
Manual Backup
Manual backups can be made at more frequent intervals by executing the following Snowflake SQL:
CALL sema4_ai_team_edition.backup.snapshot_postgres();Where sema4_ai_team_edition is the name of the installed application database.
Listing Backups
You can list the current backups / snapshots by executing the following SQL:
CALL sema4_ai_team_edition.backup.list_snapshots();Where sema4_ai_team_edition is the name of the installed application database.
You'll receive a list of currently available snapshots. For example:
| NAME | STATE | CREATED_ON |
|---|---|---|
postgres-auto-2025-11-26-05-39-43 | CREATED | 2025-11-26 05:39:43.713 -0800 |
postgres-auto-2025-11-27-06-52-16 | CREATED | 2025-11-27 06:52:16.731 -0800 |
Restoring Backups
You can restore backups by executing an exposed application procedure. First make sure that you have the correct snapshot to restore to by listing backups. Once located, copy the NAME.
Assuming the name is something like postgres-auto-2025-11-27-06-52-16, execute the following SQL:
CALL sema4_ai_team_edition.backup.restore_postgres('postgres-auto-2025-11-27-06-52-16');This procedure call will take some time to run - potentially several minutes. It first suspends all running services, before performing a restore of the provided snapshot over the database's block volume. Once the restore has completed, the procedure resumes all services before returning.
Uninstalling
Uninstall application through the "Uninstall" button in the Data Products -> Apps view in Snowsight. This will remove the application and all resources from your account. If there are anything you might want to preserve, please make backups or copies before uninstalling.