Developing actions with Data Access
Sema4.ai Actions with Data Access enable your agents to query enterprise data sources efficiently and securely. This guide will walk you through creating your first Data Actions.
Understanding Data Actions
Data Access leverages the Actions framework to provide a way to query enterprise data sources - just the same way as you would write actions for interacting enterprise applications. Actions are Python functions that can be used by agents to retrieve data. There are two types of actions, shown with their respective decorators:
@action- interacting with enterprise applications and systems, like sending an email, creating a ticket in ServiceNow or calling a web API.@query- querying data from, or writing data to, one or more data sources. These are the named queries.
With Data Access, the complete action package looks like this:
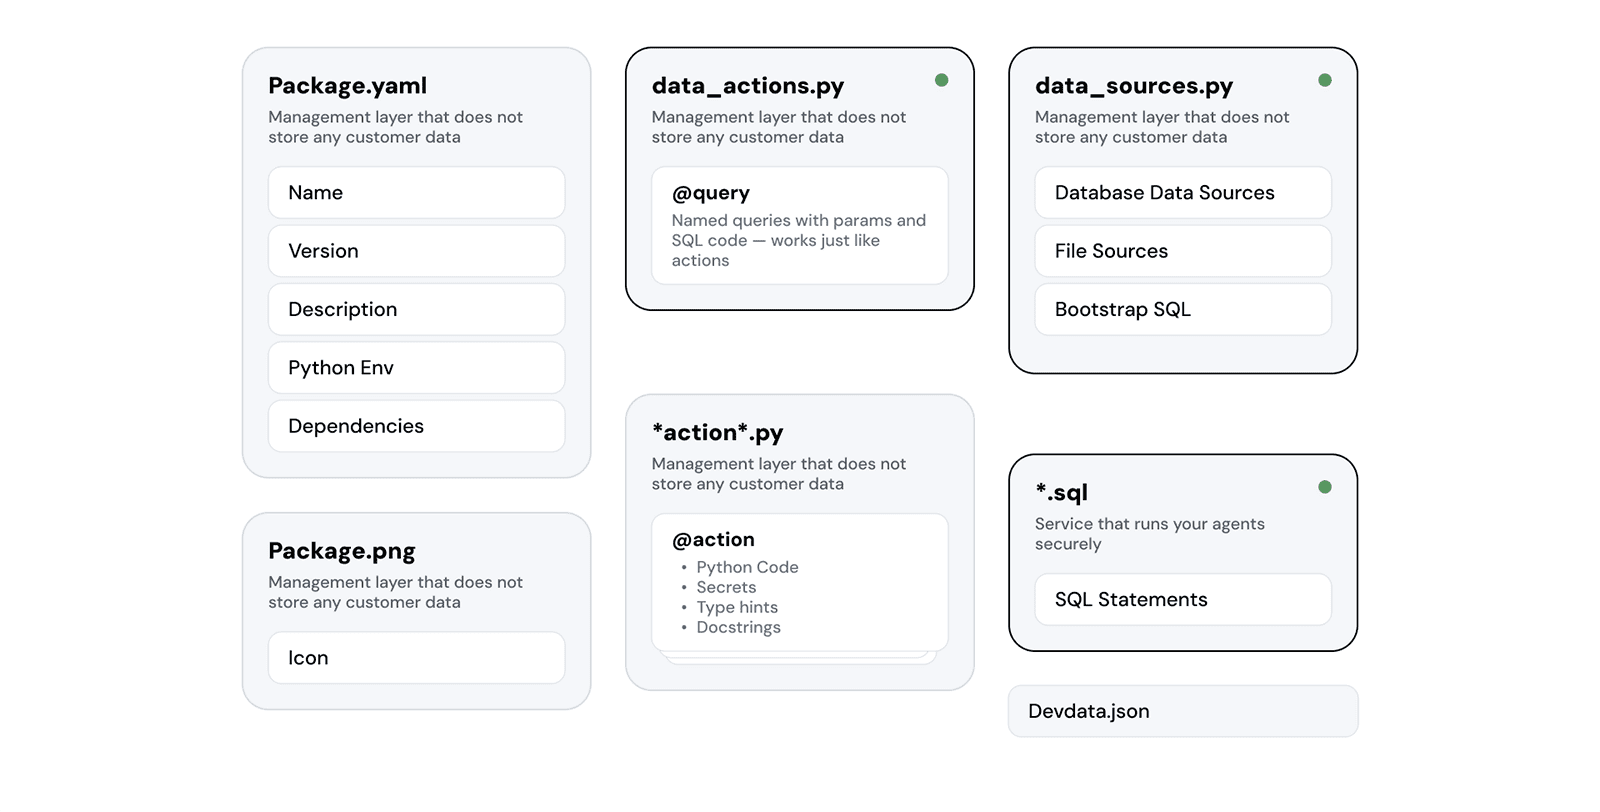
Review the basics of the Actions framework and the development workflow here.
The additional elements that you'll use in your Data Actions are:
data_actions.py- contains the Python functions with@querydecorators that declare your named queries that reliably connect the agent to your data sources.data_sources.py- contains the definitions of your data sources for the action package.*.sql- any number of SQL scripts you can use as a development time asset, or invode on Data Server start to bootstrap the data access.
Development workflow
When working with data access, our recommended workflow is described below. Make sure that you have all the necessary tools installed first. This tutorial uses screenshots from Cursor (opens in a new tab) IDE, but the steps are identical for VS Code (opens in a new tab).
Create a new Action project
Open your Cursor or VS Code in an empty folder. For example in terminal:
mkdir my-data-package
cd my-data-package
cursor .
Then create a new Action project using the Data Access template.
Using the Command Palette (Cmd/Ctrl + Shift + P) open the Command Palette. Then start typing "Create ..." and you should see option Sema4.ai: Create Action Package.
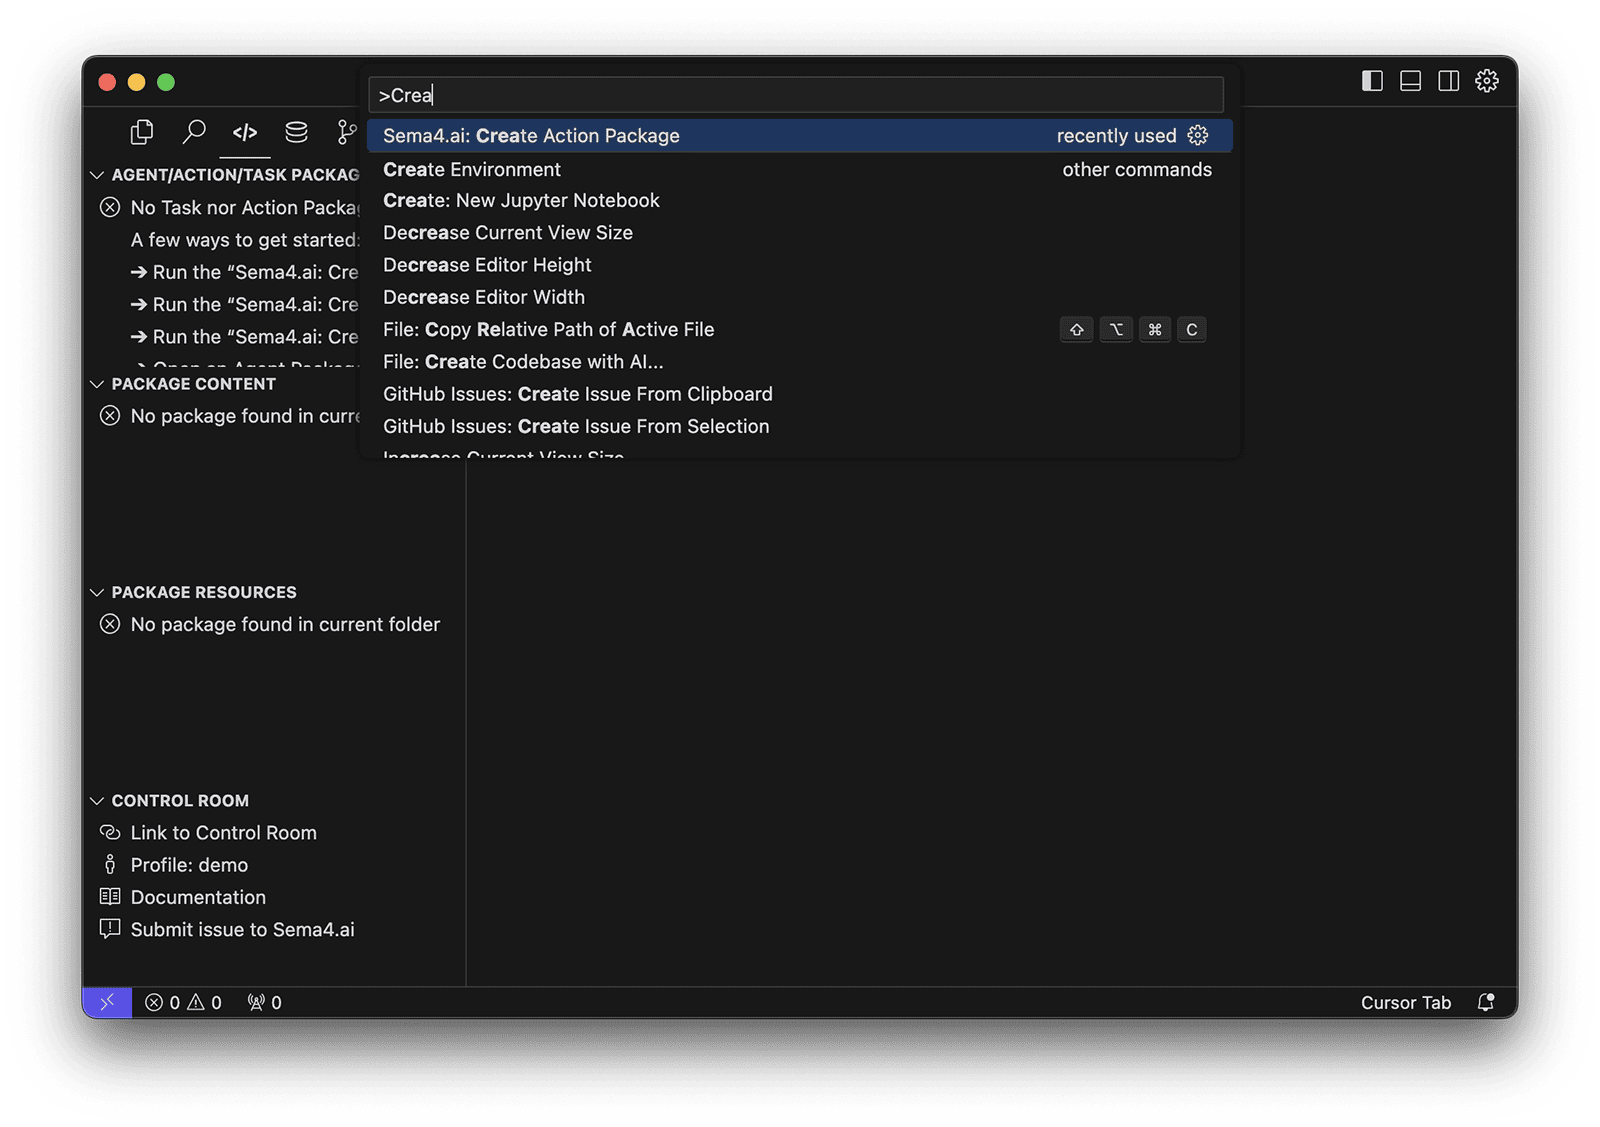
Wait until all the components are downloaded, you'll first choose the location (if you opened an empty folder, choose current folder) and the name of the project, for example my-data-actions. Then when prompted choose the Data Access/Query template, and the location (if you opened an empty folder, choose current folder).

This will create a new template project with everything in place to start working on some data actions.
The first time you create a Data Access action project, it'll take some minutes to download, prepare and start all components and environments.
Connect data sources
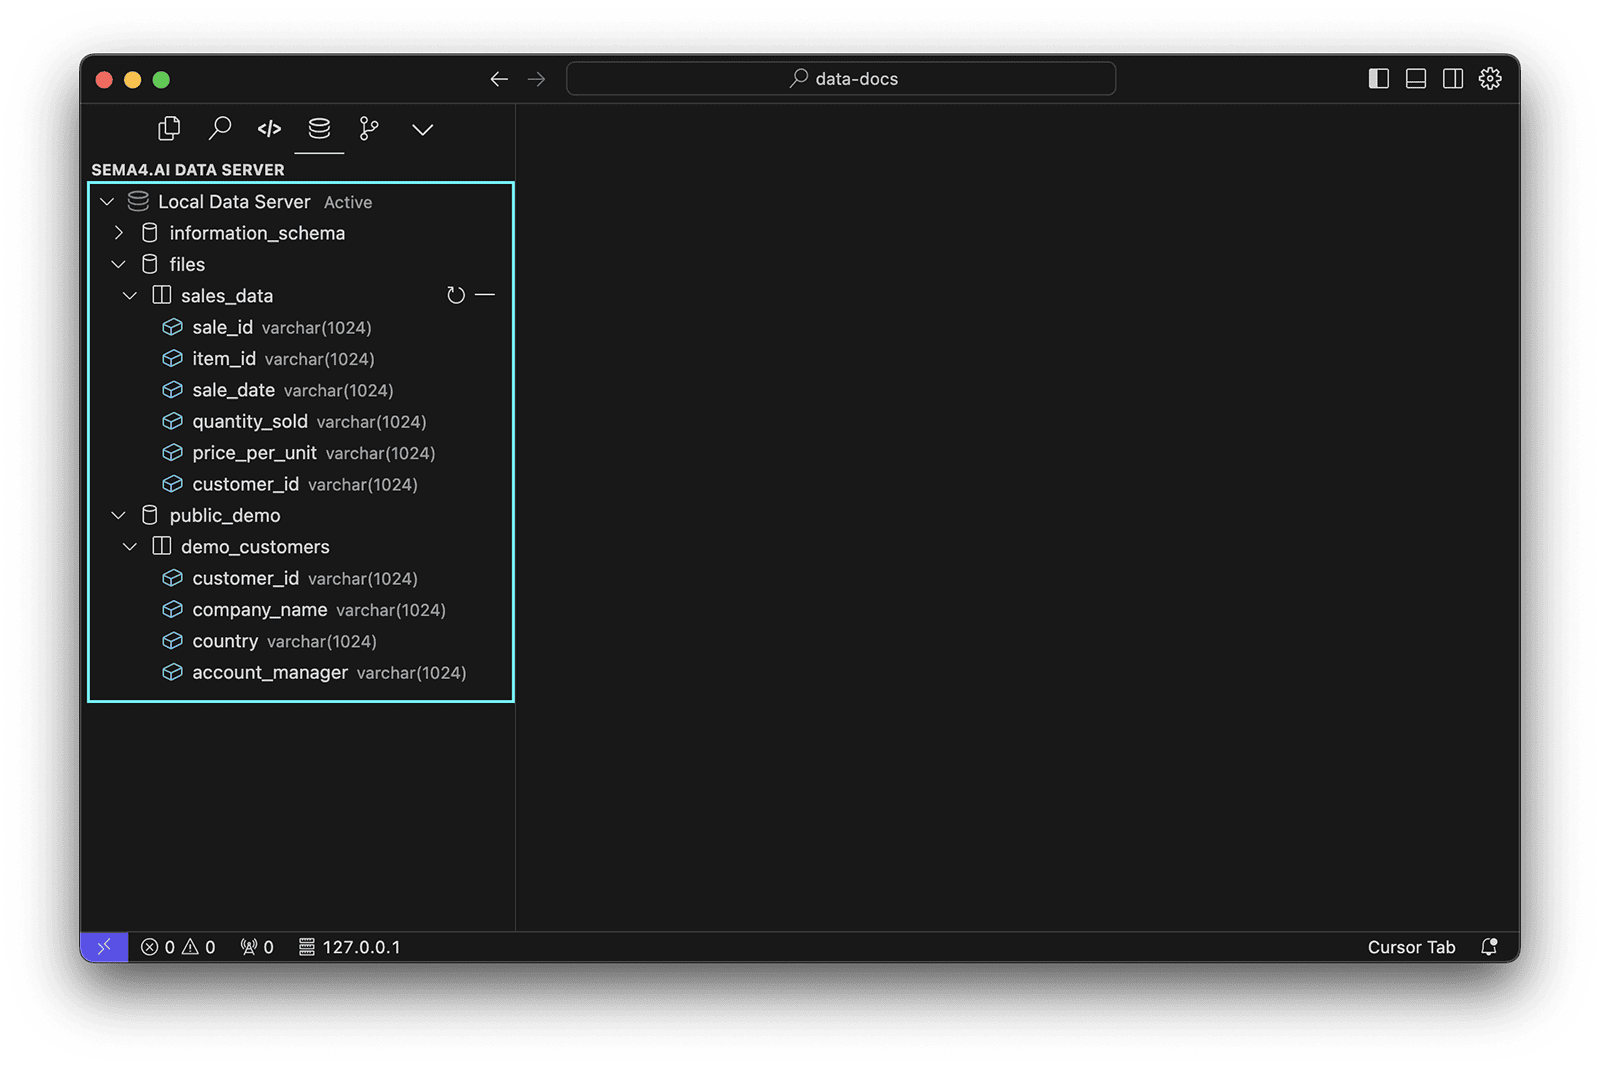
Next up, you'll need to connect your data sources. Sema4.ai Data Access extension shows you the current data sources, as well as the system tables under information_schema of your Data Server.
Data Explorer shows you all the data sources, files and models configured on your local Data Server. This is NOT the same as what your agents will have access to. The action package defines the data sources that will be available to your agents in it's data_sources.py file.
From the Data Sources explorer, you can:
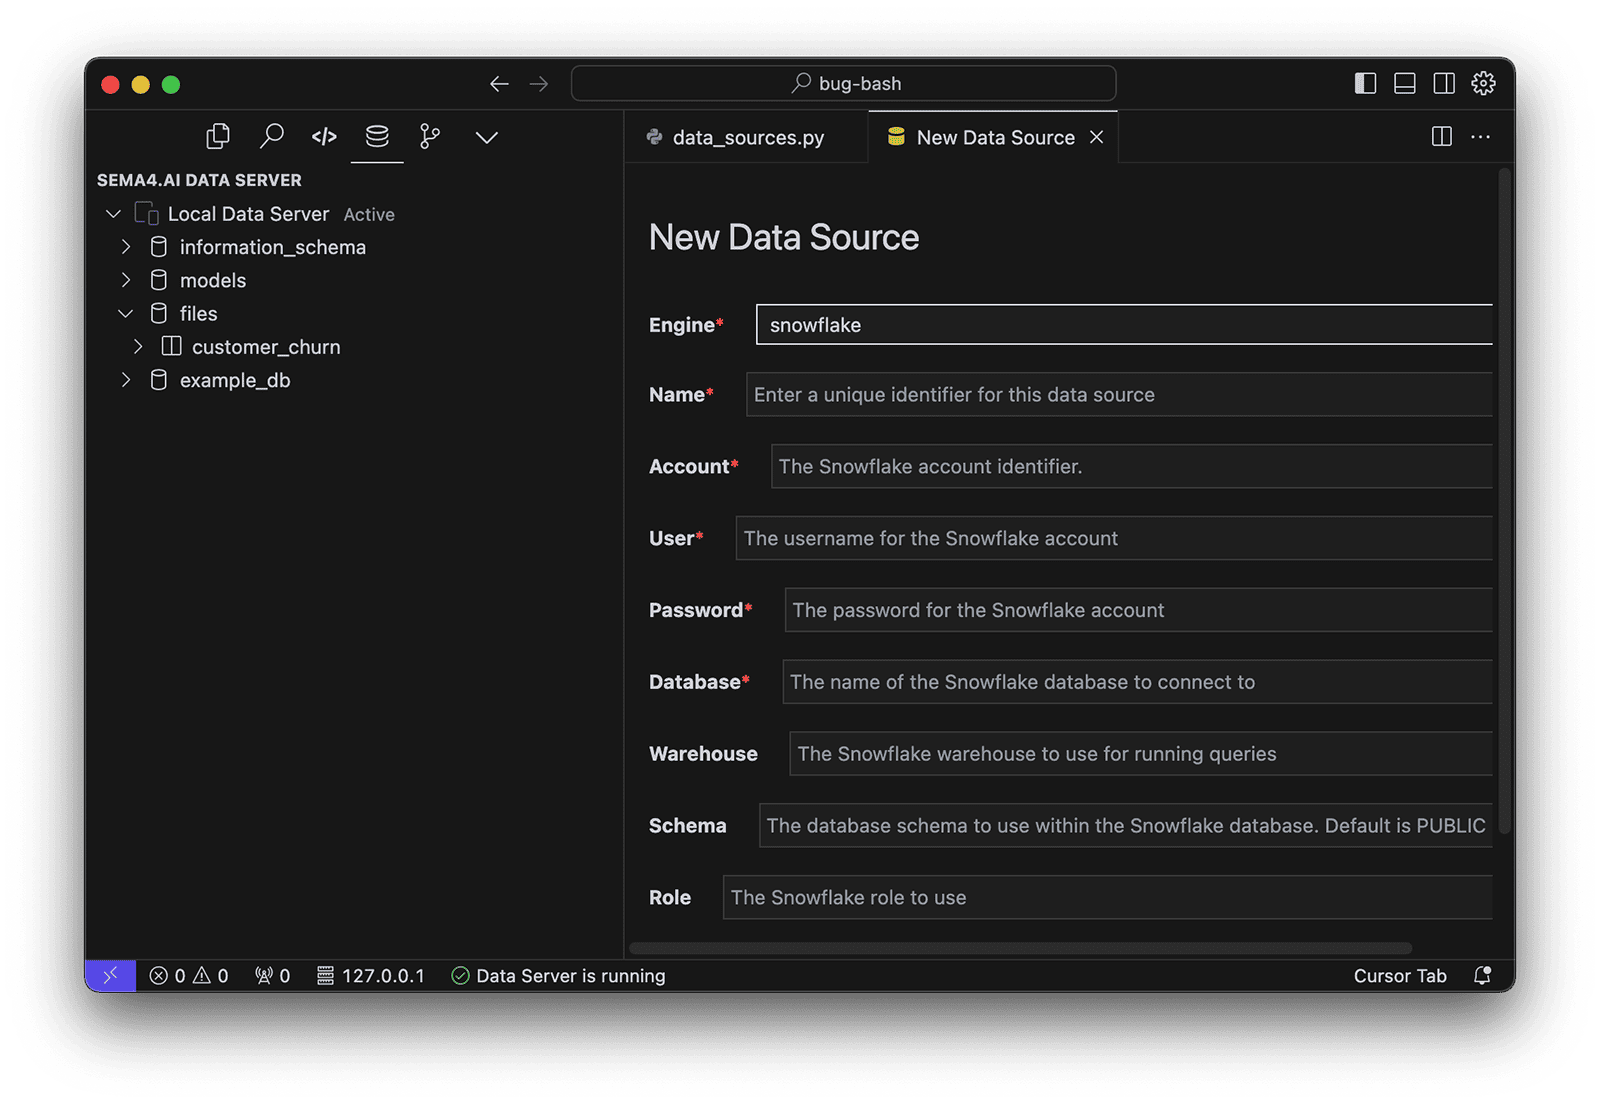
- add new data sources (contextual
+button next to the Data Server name) - add new files (contextual upload button next to the files folder)
- remove existing ones (right-click on the data source and choose
Drop) - refresh the list of data sources (contextual
Refreshbutton next to each data source) - copy the name of the data source or field (right-click on the data source and choose
Copy Name)
Data sources defined in the template project
Template contains two data sources: a file and a PostgreSQL database (read-only access credentials provided for testing).
Sema4.ai SDK extension displays the data sources that are included in the action package in the Activity panel (typically on the left side).
The data sources that the action package has access to are defined in the data_sources.py file. In this case the file data source is defined as:
FileSalesDataSource = Annotated[
    DataSource,
    DataSourceSpec(
        created_table="sales_data",
        file="files/sales_data.csv",  # Path relative to the data package root
        engine="files",  # Using the files engine
        description="Historic sales data from 2023-2024.",
    ),
]
The file that is referenced in the file field must be present in the files folder of the action package.
On the other hand, the PostgreSQL data source is defined as:
PostgresCustomersDataSource = Annotated[
    DataSource,
    DataSourceSpec(
        name="public_demo",
        engine="postgres",
        description="Contains DEMO customer information", # This will be visible for other configuring the connection
    )
]
As you can see, the data source definition contains the name of the data source, the engine, and a description. The name and description will be visible to the agent when configuring the connection. The connection details are only given at the time of creating the connection - and not stored in the action package for the security reasons.
If your Data Server does not contain the necessary sources to run the queries, you will be prompted to add or configure the data sources before the queries can be run. It's done easiest from the buttons next to the data source names in the SDK extension!
Each data source that you wish your agent to have access to, must be defined in the data_sources.py file, and each of the definitions is a separate object. Ie. you can not put two data sources into the same object.
Adding more data sources
Adding more data sources during the development is best done to the Data Server, so that they persist accross your active Actions projects.
You can add a new data source by:
- Command Palette
CMD + Shift + Pand chooseSema4.ai: Add New Data Source. - From a
+button next to the Data Server name in the Data Access extension.
Note that the connected data sources will NOT be automatically added to data_sources.py and thus your action project. Only when creating a new Named Query (as you will learn later), the data source will be added to your actions project.
Supported data sources
Data Server supports the following data sources:
Databases:
- PostgreSQL
- Snowflake
- Redshift
- MySQL
- Microsoft SQL Server
- Oracle
- TimescaleDB
- PGVector
- BigQuery
- Databricks
Applications:
- Salesforce
- Slack
- Confluence
When configuring these data sources, your data is NOT copied to the Data Server. It's accessed directly from the source during queries.
Files:
- CSV
*.csv(and*.tsv) - JSON
*.json - Parquet
*.parquet - Excel
*.xlsx(only the first sheet is imported)
The maximum size of a file is 100 MB. Files are hosted within the Data Server as a table.
Write and run SQL queries
Any .sql file in your project folder will become "active" in that you are able to execute the commands right in the editor. Think of these as your development time scratchpad, where you can write and test your SQL queries - quickly seeing their results. Open for example the scratchpad.sql file from the template project and you'll see a couple of the SQL commands relevant to the template.
Here's how you can run them.
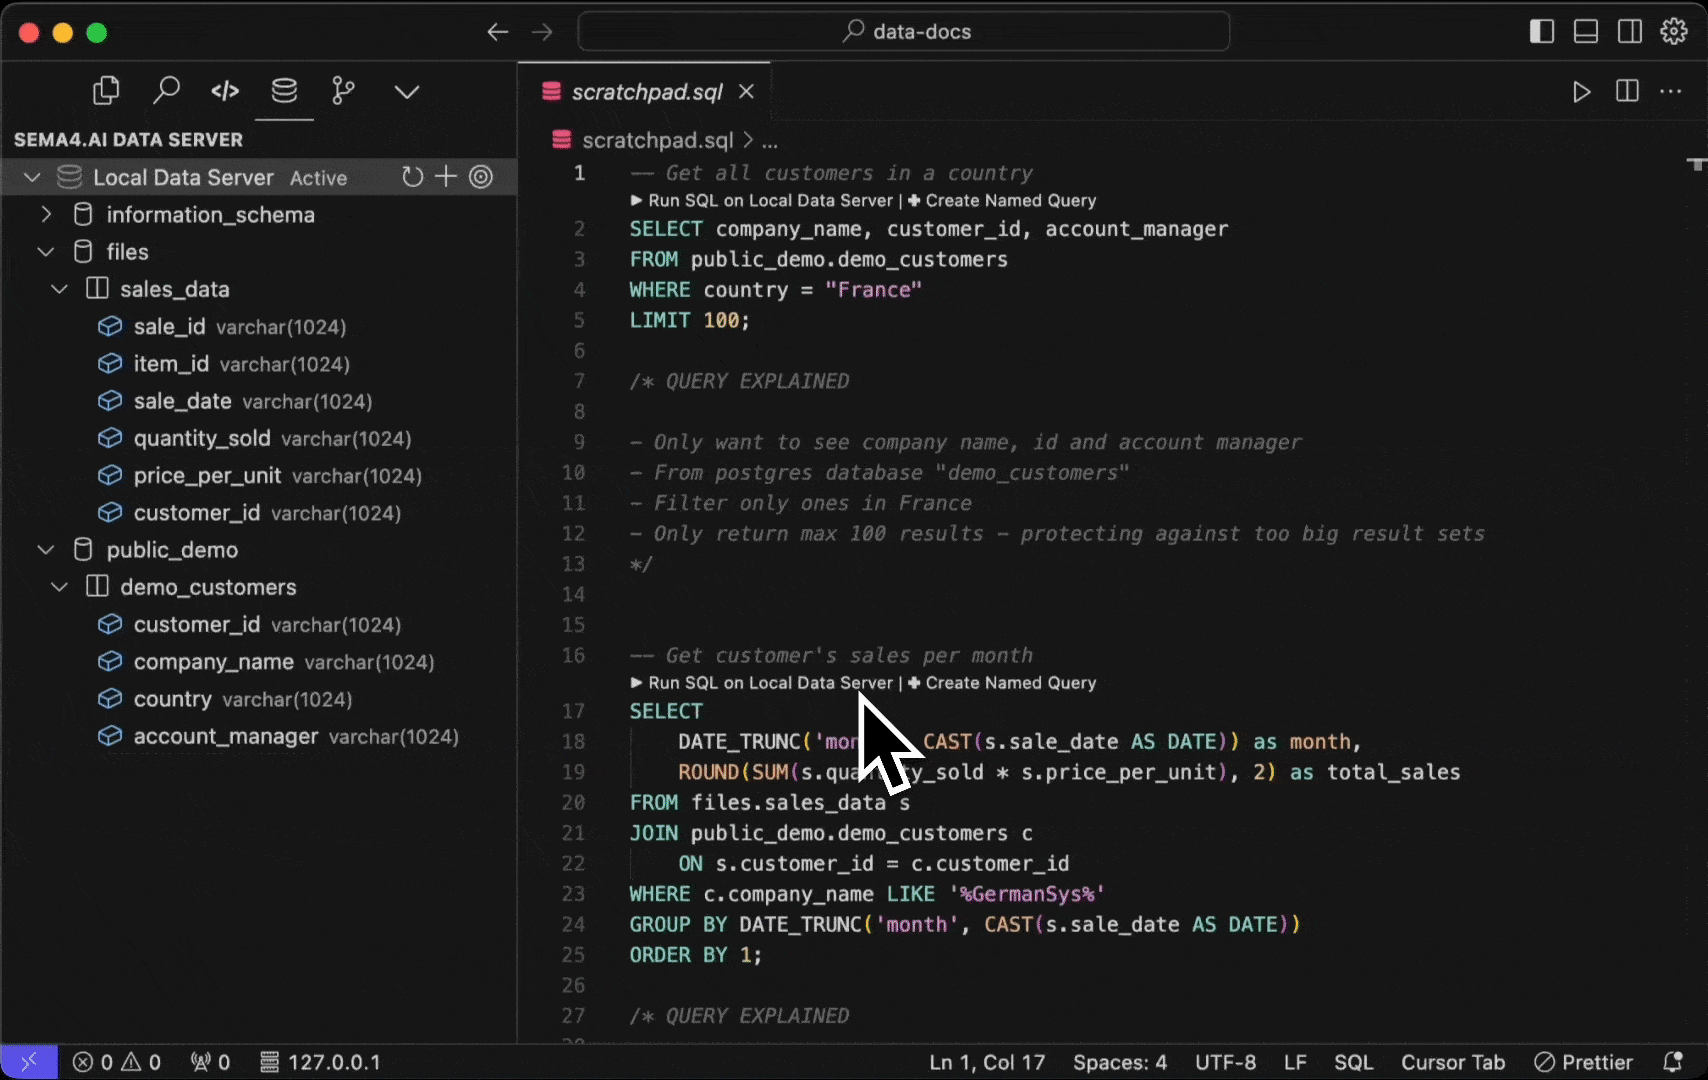
- Select the
Run SQL on Data Servercontextual command above your SQL query. - Use Control + Enter shortcut.
- Command Palette (Cmd/Ctrl + Shift + P) by typing "Run Selected SQL".
In addition, you can run ALL the SQL commands in the file by typing "Run All SQL" in the Command Palette, or with Control + Shift + Enter shortcut.
If you don't see the contextual actions to run the SQL, it means that your Data Server is not running. Start it from top-left corner of the Data Access extension, using the icon.
Create a named query
Named queries are the ones your agents will use to connect to your data sources. They are declared using the @query decorators in the data_actions.py file. They leverage the Sema4.ai Actions (opens in a new tab) and Data (opens in a new tab) Python packages to connect to your data sources and execute the SQL queries and return results to the agent.
Easiest way to create a new named query is to use the provided command above your SQL query. It will analyze your query, give you an opportunity to provide all necessary details. Follow the short video to see how it works.
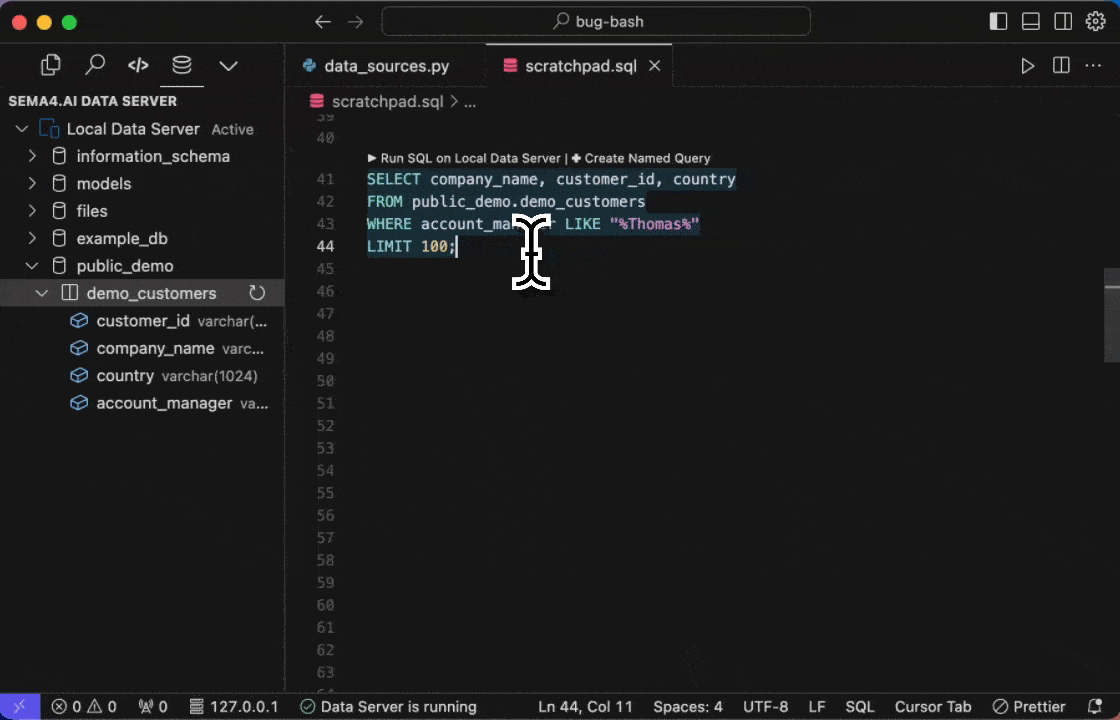
- First give your query a name - it must be valid Python identifier, and not match any existing named queries in the project. For example
get_employees. - Look at the query, and find the conditionals that you want to use as parameters in your query. You see them in yellow. Click it and give it a parameter name. TIP: You can name two parameters with the same name, if you want to use the same value twice.
- Provide a description for each parameter. It's important to be as detailed as possible, as it will help the agent to understand the query better.
- Save!
This will automatically create a new @query in your data_actions.py file that has the parameters you chose. In addition, any new data source not yet in the project will be added to data_sources.pyfile, and finally we create a json file under devdata folder that is used when you test run data actions locally. The parameter values you had in your SQL query automatically become the default values for the parameters.
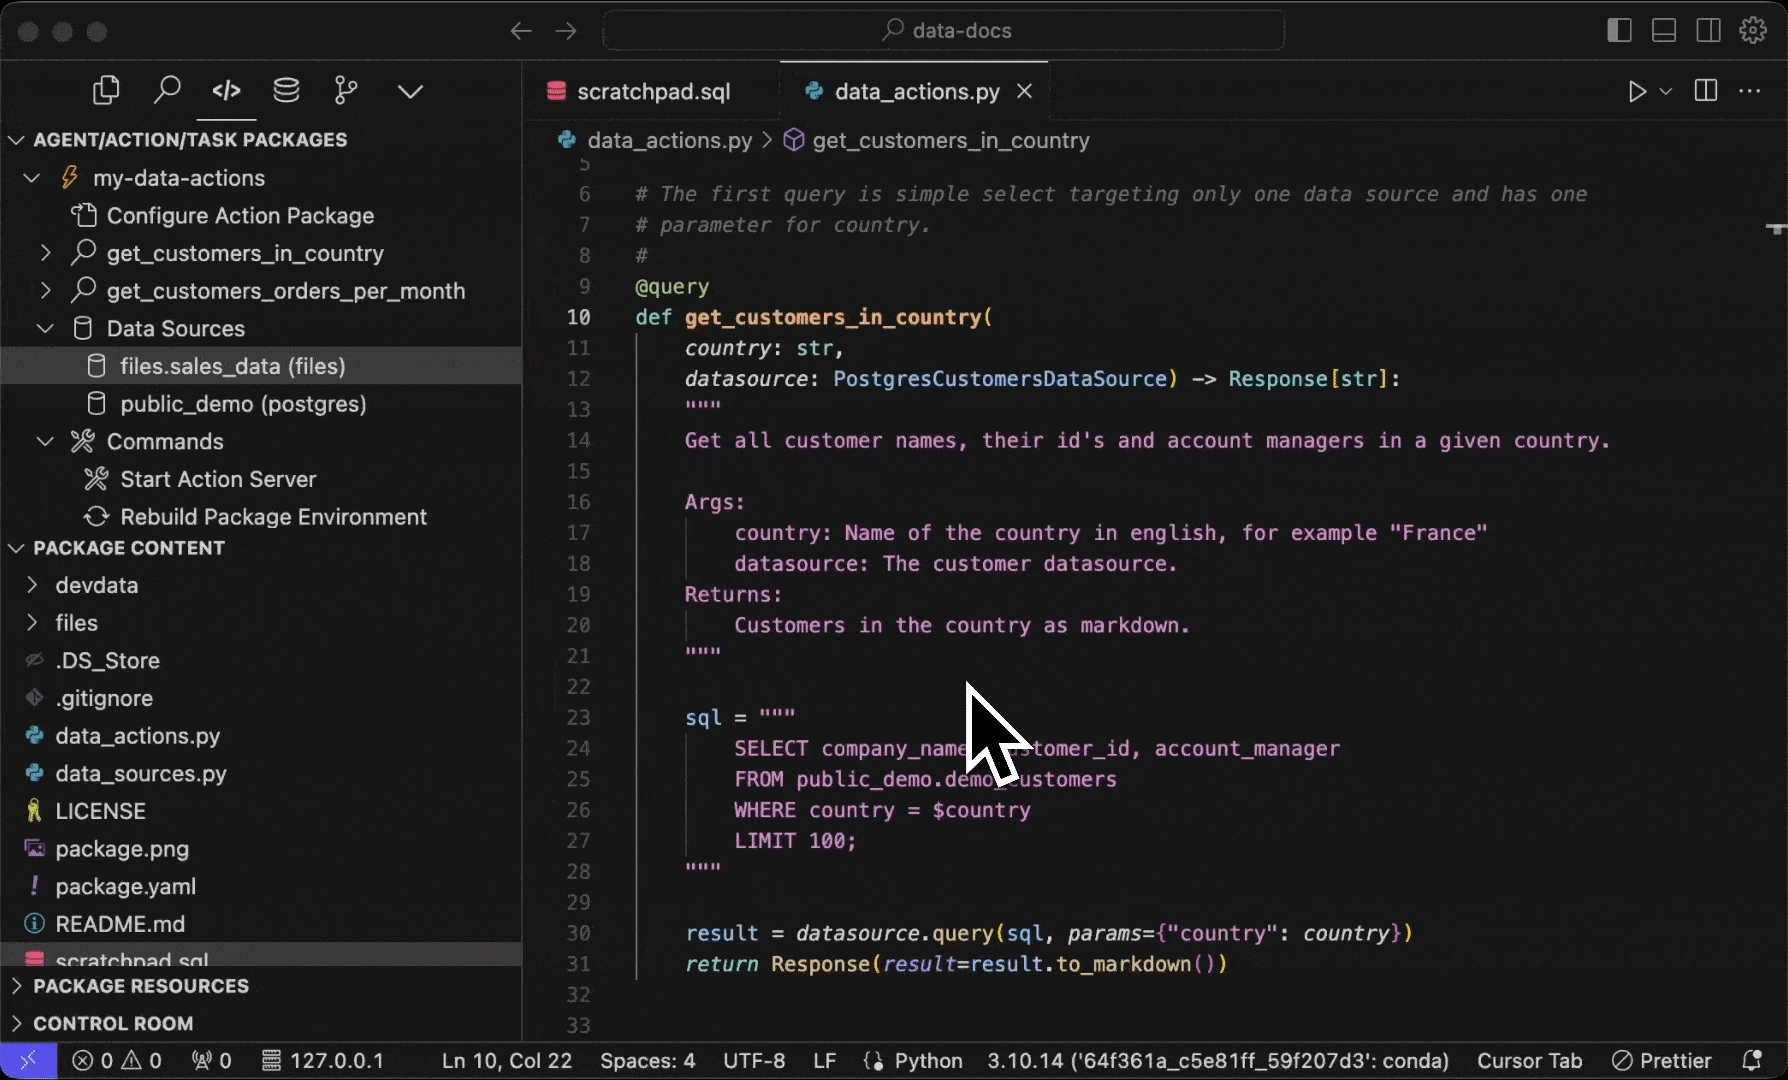
Let's break one definition of a @query from the template project in to its parts. This is the more complex one:
@query
def get_customers_orders_per_month(
    company_name: str,
    datasource: Annotated[DataSource, FileSalesDataSource | PostgresCustomersDataSource]) -> Response[Table]:
    """
... docstring ...@query- The decorator that declares the named query.def get_customers_orders_per_month- Definition of the name of the function that will be used by the agent.company_name: str- First (and only) parameter to the query is calledcompany_nameand is of type string. This way agent can pass the right type of value to the query.datasource: Annotated[DataSource, FileSalesDataSource | PostgresCustomersDataSource]- The parameter for the data sources in use in this query. This one declares that both FileSalesDataSource and PostgresCustomersDataSource are used in this query.Response[Table]- Definition of the return type of the query. Response is a specific type defined in thesema4ai-actionspackage, and this query returns aTableobject.
When building named queries, you should always use the Response[Table] return type. This will automatically return a DataFrame to the agent, which is handled outside of the agent's context window thus saving significant amount of tokens. Read why the response type matters here.
Run a named query
To run the named query locally, you can use the Sema4.ai: Run Action (from Action Package) command from the Command Palette (Cmd/Ctrl + Shift + P), choosing the play button next to the query in Sema4.ai SDK extension's Activity panel.
If you have more than one test data entries in your json file, you'll be promoted to choose which input to use. The get_customers_orders_per_month query in the template has three inputs - one positive case that provides a valid result, and two negative cases that provide invalid inputs.
The console output will show you the results of the query - just like the agent would see.
Publish to Studio
Once all your named queries are ready and tested, it's time to ship it! 🚀
To publish to your own Sema4.ai Studio, simply choose the Sema4.ai Publish Action Package to Sema.ai Studio option from the Command Palette (Cmd/Ctrl + Shift + P).
If you want to share the action package to someone else, use the Sema4.ai: Build Action Package (zip) command, which gives you a zip file that you can send around.
Read more about the publish workflow.