Create action from a template
Building custom actions is a powerful way to extend the capabilities of your AI agents.
You can use actions provided by Sema4.ai or build your own. This tutorial takes you through the steps to build your own custom action and run it locally on your computer. Actions don’t need any LLM to function, unlike AI agents do.
Get ready
The Sema4.ai VS Code extension comes with templates that you can use to bootstrap your action project.
- Create a folder on your computer for the action.
- Open the folder in VS Code.
- Confirm that you trust the authors in this folder.
- In VS Code, click the Sema4.ai extension in the Activity bar (usually on the left side).
Make sure you stay within the Sema4.ai extension throughout the rest of this tutorial. - Inspect the Primary Side Bar. For this tutorial, focus on the Agent/Action/Task Packages and Package Content sections.
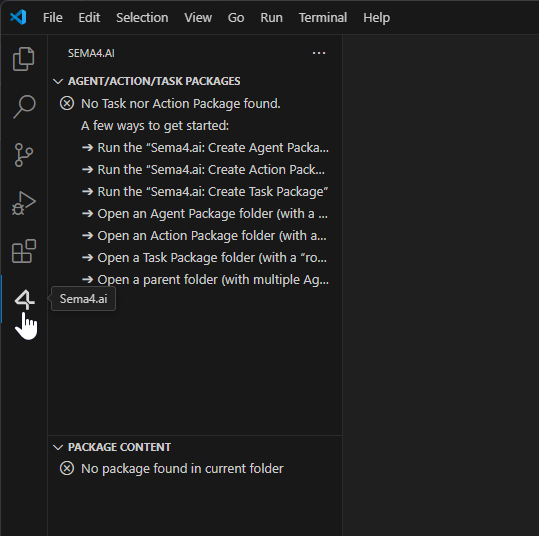
But those sections say there’s no package found… Yes, that’s fine. You’ll see to that by creating a package in a bit!
Create new action from a template
Perform the following steps in the VS Code Command Palette (Ctrl+Shift+P or ⇧+⌘+P):
- Type Create Action Package and confirm the command.
- If asked, confirm downloading of the Action Server executable.
- Select Use workspace folder option to create the package in the current folder.
- Type a name for the action. For example, The first action.
- Select the Basic option.
- You can experiment with the other options once you're comfortable with the fundamentals.
If you get an error message during the action creation, don't panic. If a reboot doesn't help, you can examine the logs from the Command Palette with the following commands:
- Type show logs and select Show Sema4.ai > Output logs.
- Type show logs, select Developer: Show logs..., and then Extension Host.
If you need more help, drop us a line, we'll get back to you shortly.
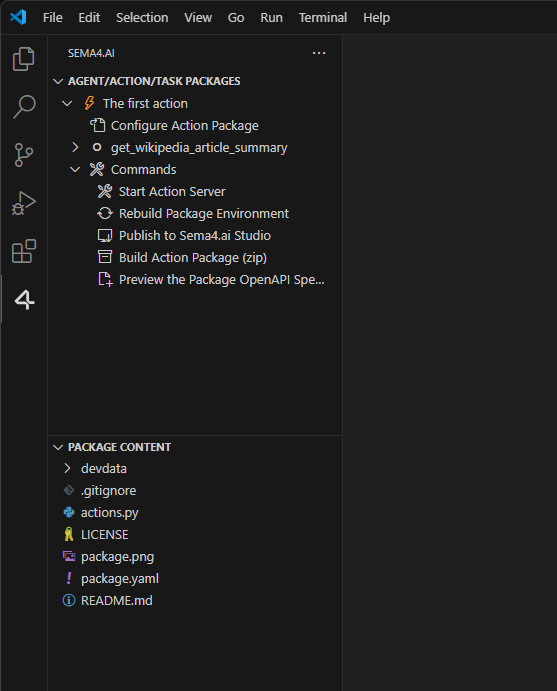
With the package created, the sidebar reloads with new content. If you don't see your new action package there, hover over the Agent/Action/Task Packages section header and click the ↻ button.
By now, the contents of your VS Code Primary Side Bar should be similar to the following:
Run the action
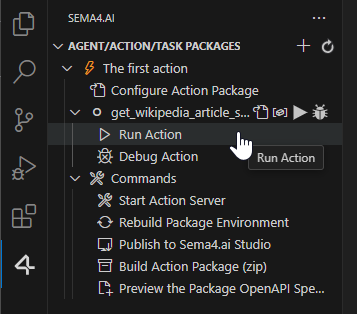
- In the Primary Side Bar, navigate to Agent/Action/task Packages > The first action > get_wikipedia_article_summary.
- Click ▷ Run Action.
- Observe the output in the Terminal pane that opens automatically.
After the action finishes, you see the 1st paragraph of the Wikipedia article on intelligence (opens in a new tab) printed twice (one from the print statement within the action, one indicating the result that is passed to the agent), similar to the code below:
dave@AMFORE:~/Sema4.ai/getWikiLeadPar$  /usr/bin/env /home/dave/.sema4ai/holotree/7173503_c5e81ff_1c0bc041/bin/python3 (...launch options...) /home/dave/Sema4.ai/getWikiLeadPar/actions.py
Running with sema4ai.actions version: 0.9.0

Collecting action get_wikipedia_article_summary from: /home/dave/Sema4.ai/getWikiLeadPar/actions.py
==================== Running: get_wikipedia_article_summary ====================
Intelligence has been defined in many ways (...the lead paragraph continues here...) within an environment or context.[1]
get_wikipedia_article_summary status: PASS
result:
"Intelligence has been defined in many ways (...the lead paragraph continues here...) within an environment or context.[1]"
================================================================================
Robocorp Log (html): /home/dave/.sema4ai/temp/858b13de585d8aba/sema4ai-vscode-actions/run-action-22/log.html
That’s it. Congratulations, you’ve run your first Sema4.ai action!