Creating prediction models
In addition to querying data, Sema4.ai Data Access lets you create powerful prediction models to help agent reason over future data. These machine learning models are trained using the data from your data sources and files. For example if you have historic sales data in your database, you can train a model to predict future sales.
Data Server supports for example following prediction types:
- Classification - predict a categorical value
- Regression - predict a numerical value
- Time Series - predict a value in the future
Models can be joined with your data to provide predictions. The models are persisted in the Data Server and can be used in your agent through names queries decorated with the @predict decorator.
This tutorial walks you through the process of creating a prediction model, using the template that comes with our extension. Let's go!
Lifecycle of a model
The lifecycle of a prediction model in Data Access can be divided into two main phases:
-
Local machine - When developing actions and agents locally, the models are persisted in the Data Server (that runs for both Studio and SDK), thus training the model can be done once, and then model can be used by actions in VS Code or Cursor and agents in Studio. You have control over the model in Studio's Data Source view.
-
In the cloud - Once you deploy your agent to the cloud, the models will be automatically trained for each agent separately (as each agent has its own Data Server dedicated for it). Control Room and Agent Compute will handle the training and deployment of the models, but the user has control over retraining through each agent's details view.
Next versions of Data Access will add support for more models and prediction types, as well as automated jobs for retraining models in production.
Step-by-step guide
The following steps will guide you through the process of creating a prediction model, using the template that comes with our extensions.
Bootstrap predictions template in VS Code or Cursor
Start from an empty folder, and open it up in VS Code or Cursor. Tip! writing code . in the terminal will open the current folder in VS Code.
Then create a new Action project using the Data Access template. Open the Command Palette (Cmd/Ctrl + Shift + P) and run Sema4.ai: Create Action Package.
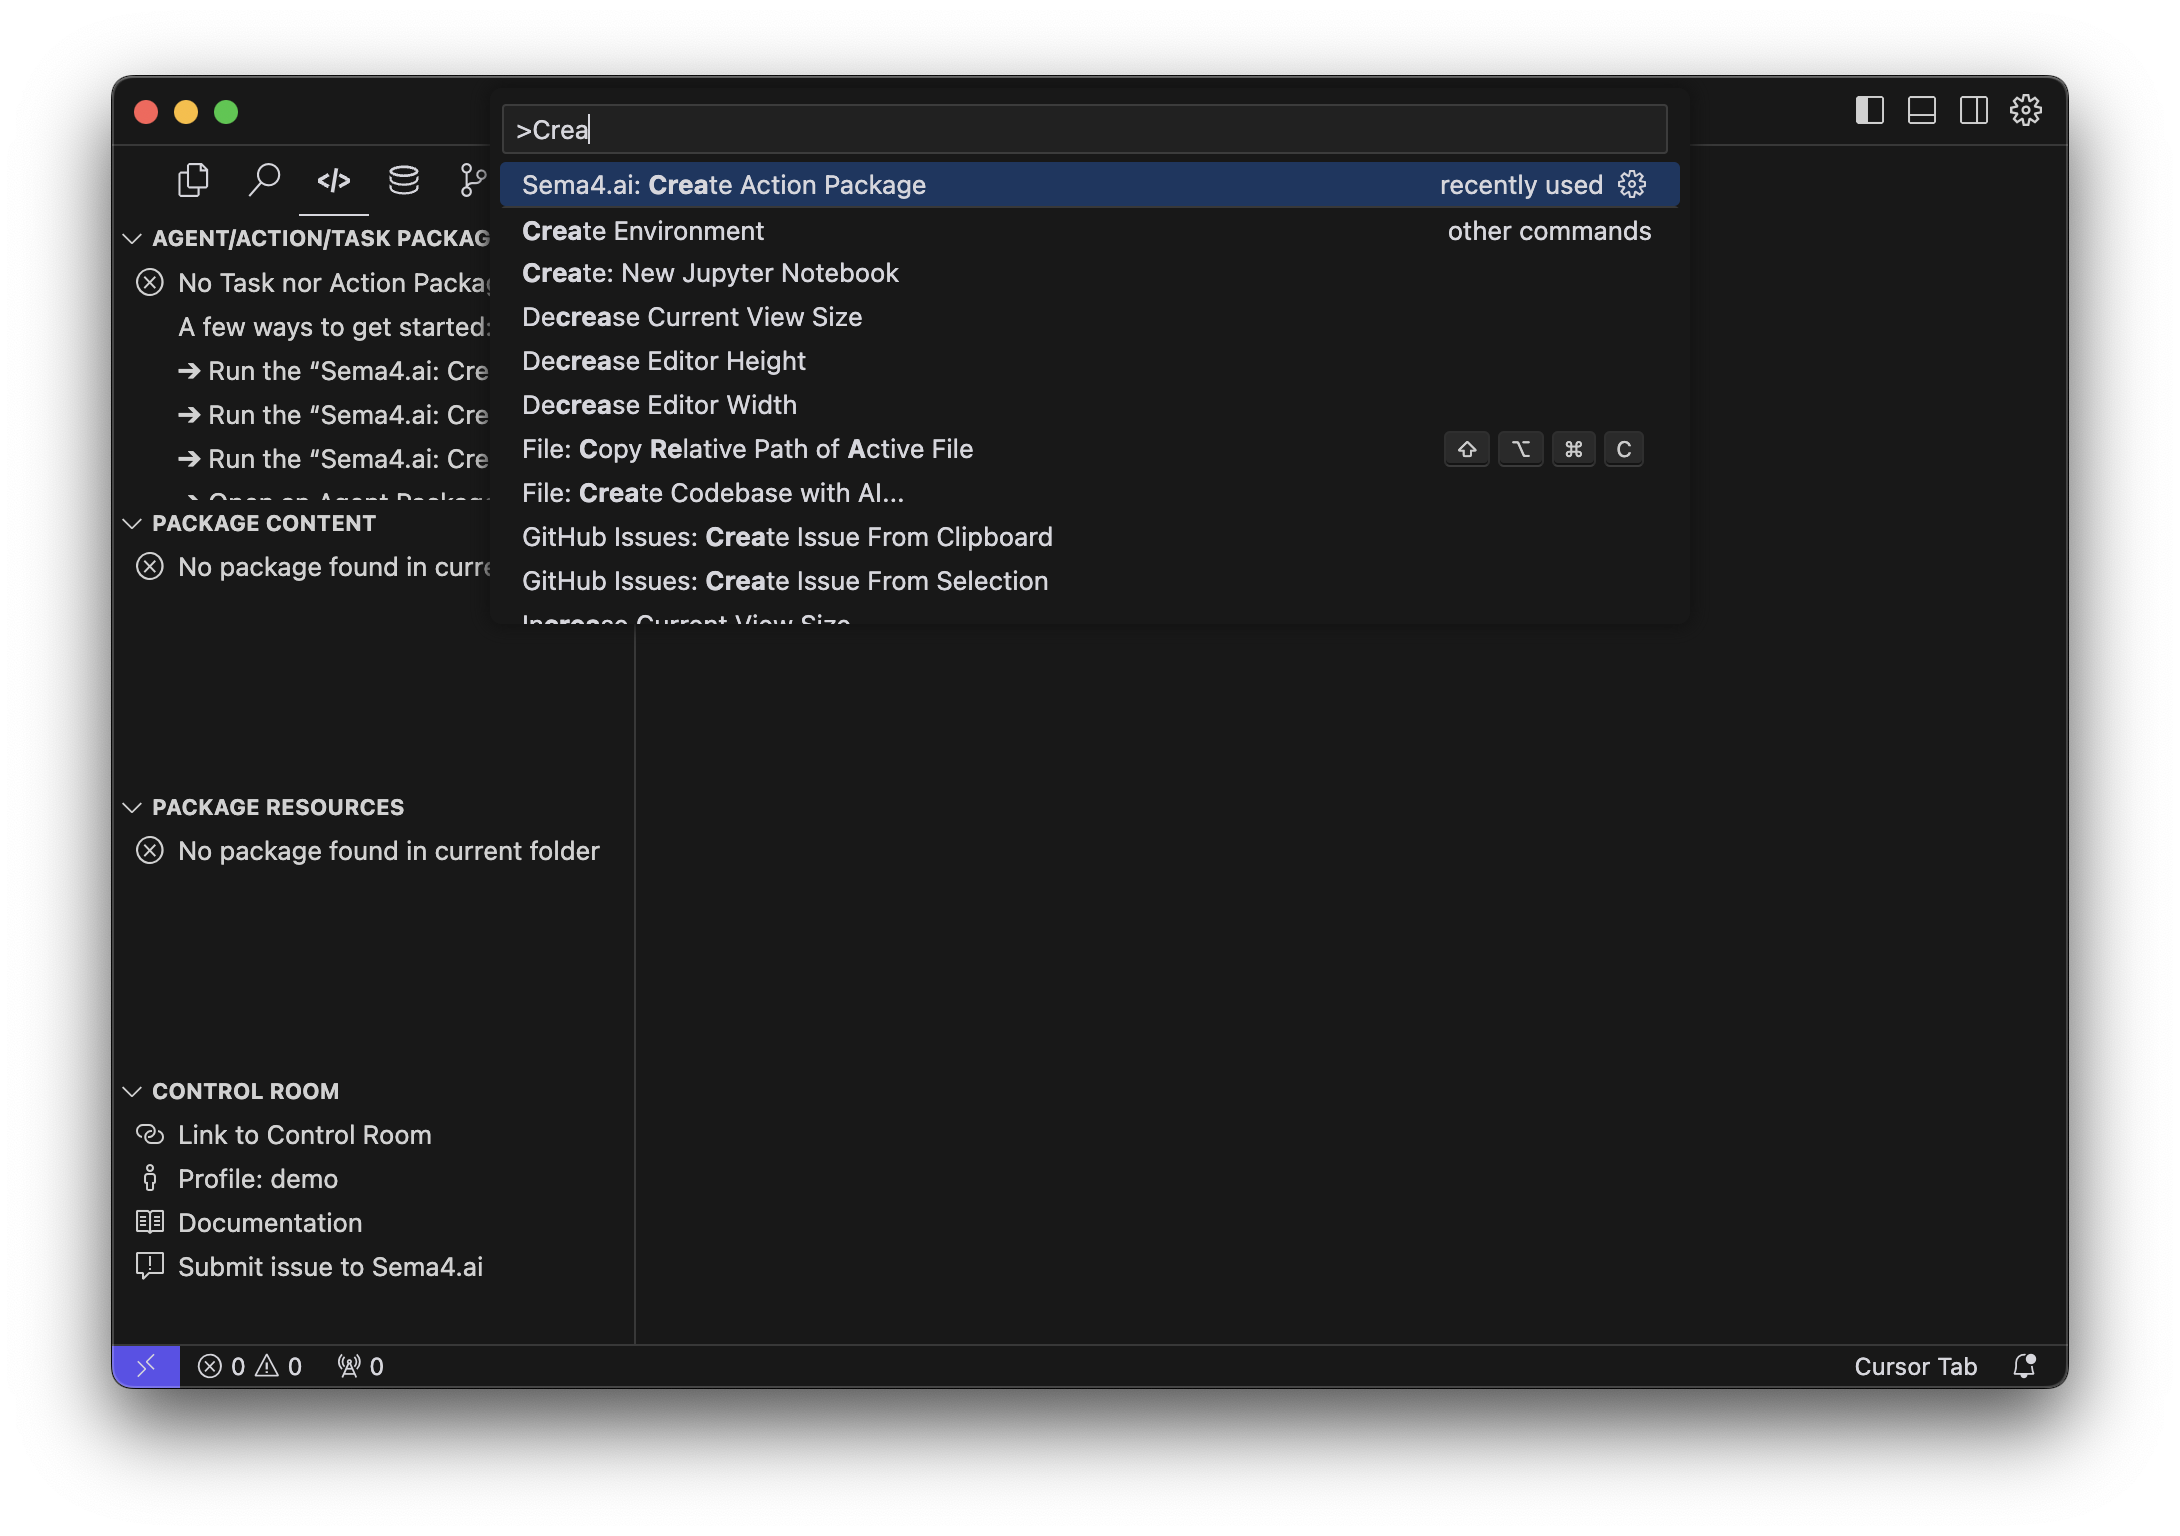
Wait until all the components are downloaded, you'll first choose the location (if you opened an empty folder, choose current folder) and the name of the project, for example my-predict-actions. Then when prompted choose the Data Access/Predictions template.
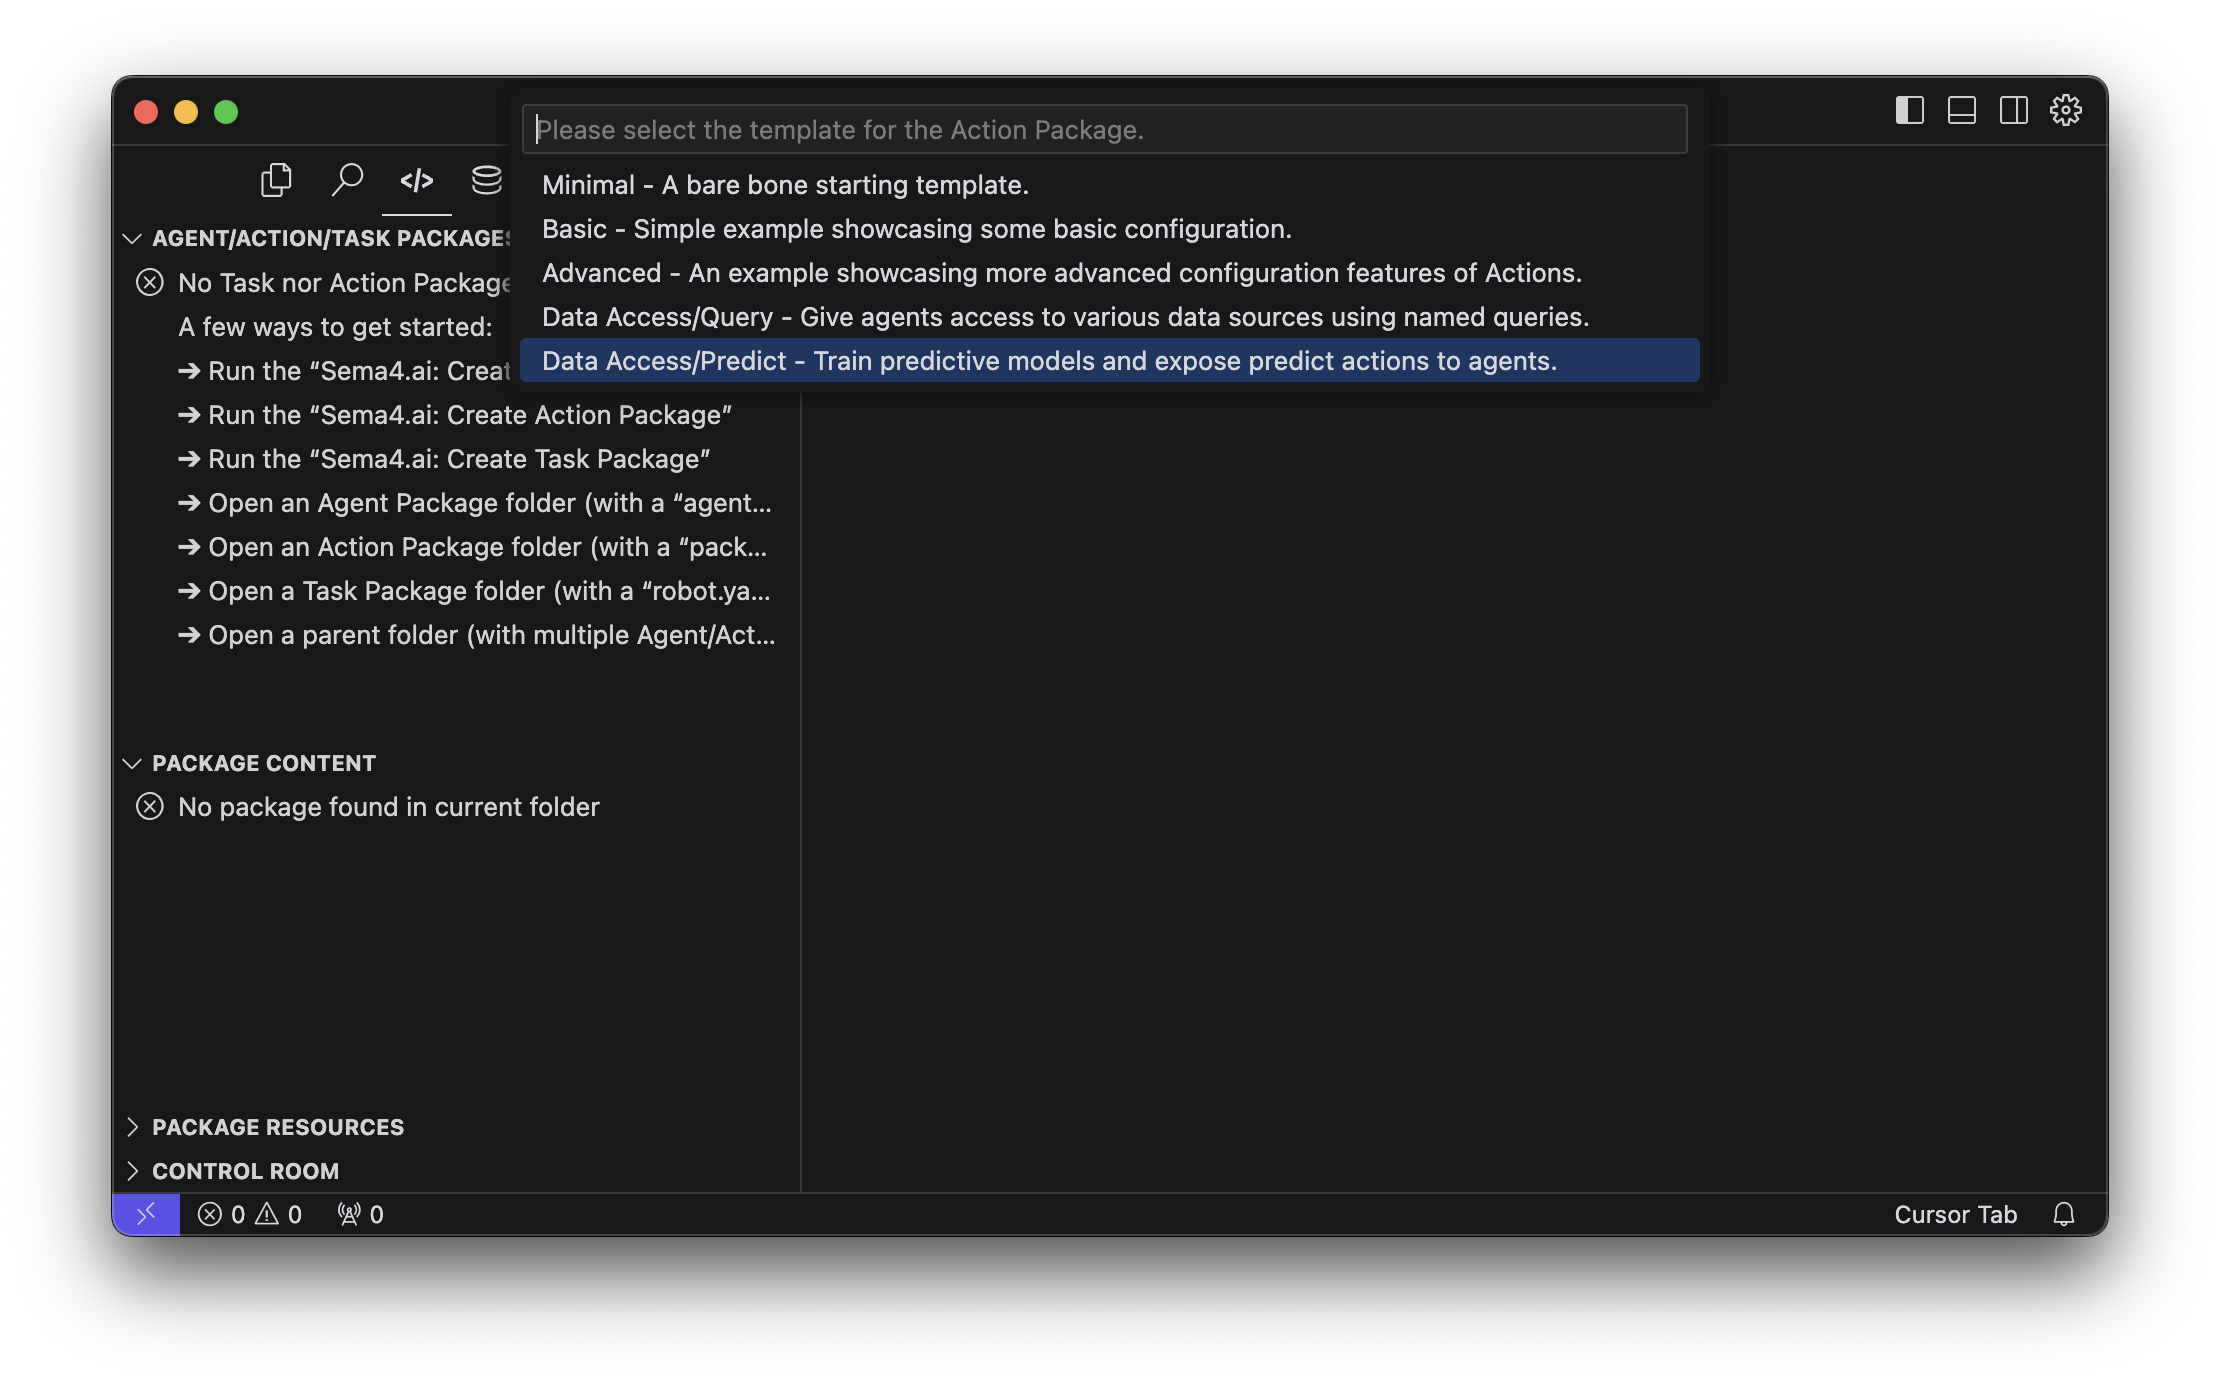
This will create a new template project with everything in place to start working on models and predictions, and finally publish them as actions to your agent!
The first time you create a Data Access action project, it'll take some minutes to download, prepare and start all components and environments.
Add data sources
Before you can create a prediction model, you need to have a data source that contains the data you want to use for training. Review the data sources documentation to learn how to add them to your project.
The template project comes with a /files/customer_classification.csv file that we'll use for the tutorial. It contains a sample dataset of customers with their attributes and a classification label. The goal of our model will be to predict the classification label for new customers.
Your first step is to add this file as a data source. Navigate to the Data Access extension, and in the data explorer Activity Panel (usually on the left) find the files row, and click the add button to add a new file.
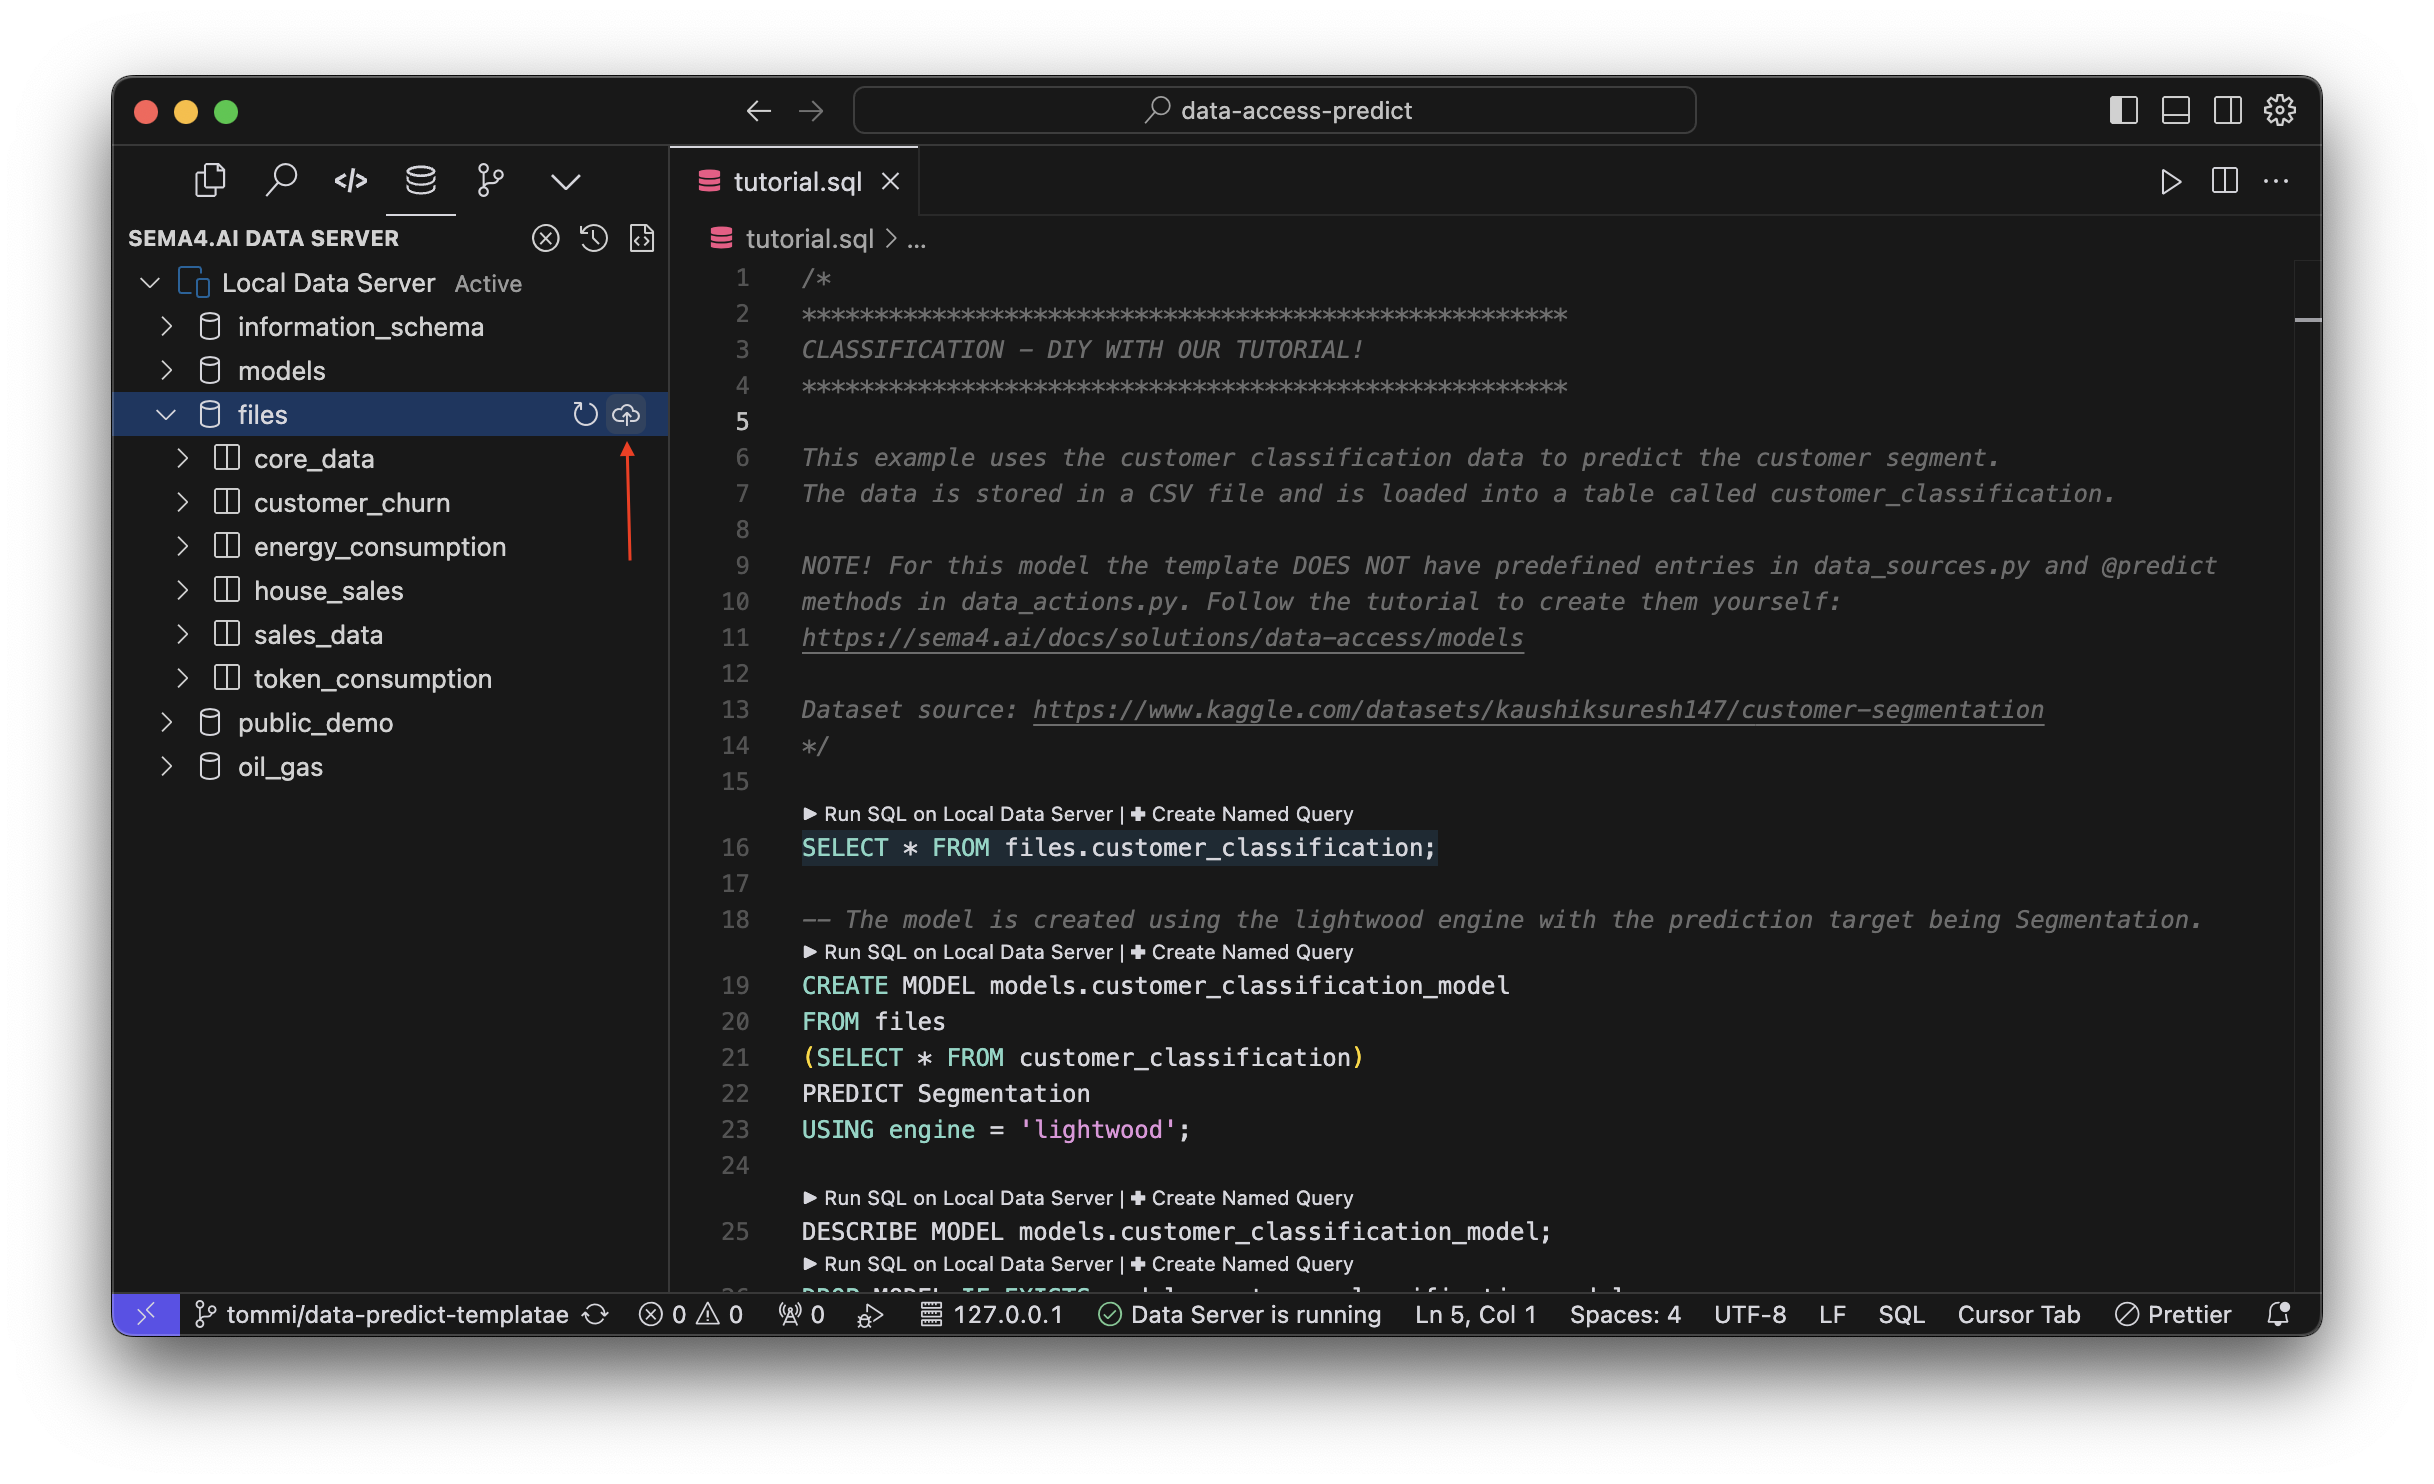
You will be promoted to choose the location of the file with a file picker dialog. Choose the files/customer_classification.csv file from the template project. Then you'll be asked to give the data source a name, use the suggested name customer_classification.
Now your local data server will have a new data source (table) called customer_classification!
Create a prediction model
Prediction models are created using SQL. While developing your model for the first time, you can use the Data Access extension and any .sql file to test your SQL queries and see the results in your development environment in real time. The best practice is to keep your SQL statements in a .sql file in your project and version controlled, so that you can always refer back to them to make improvements.
Later, we will show how the model creation is added to the action project so that it can be used by agents.
The template project comes with a scratchpad.sql file, where we have included the SQL statements for a linear regression and timeseries forcast models. These two models have all the necesary components also in the data_actions.py and data_sources.py files, and you can explore them at your own pace.
For the tutorial, we will focus on a classification model, with the starting point being the tutorial.sql file and no pre-existing code in actions of data sources.
Let's run some SQL to get going! Open the tutorial.sql spot the first SQL statement and run it by clicking the Run SQL command above the statement. (If it doesn't show up, start your Data Server first).
SELECT * FROM files.customer_classification LIMIT 5;This will simply show you the first 5 rows of the customer_classification table, which we are going to use for training our model.
You can also run the selected SQL statement by hitting shortcut Ctrl+Enter on your keyboard.
Now let's train a classification model using a CREATE MODEL statement. Here's a breakdown of the statement:
CREATE MODEL models.customer_classification_modelTells that we want to create a model called customer_classification_model in the models project. This project is automatically created when you start your Data Server so it's available for you to use out of the box. You may also create your own projects for models, but for now let's stick with the default one.
FROM files
(SELECT * FROM customer_classification)
This part defines the training data for your model. We will use all of the rows from the customer_classification table from the files data source.
PREDICT SegmentationPREDICT tells what we want to predict. In this case we want to predict the value of the Segmentation column, given the other columns as features.
USING engine = 'lightwood';Finally, USING engine = 'lightwood' tells that we want to use the lightwood engine for training the model. Lightwood is a machine learning engine that is optimized for tabular data, and it's the default engine for Data Access. Lightwood automatically prepares your data for training, chooses the suitable model and it's parameters. Read more about Lightwood here (opens in a new tab). You may also omit this part in the model creation query, and the model will be trained using the lightwood engine by default. Later, you will learn about the other engines that Data Access supports.
Once you run the SQL statement, the model training will start. The time it will take to complete depends on the size of the dataset. Our example dataset is small, so it should complete well below a minute.
When training timeseries models pay attention to the format of your datetime columns. A format that typically works well is YYYY-MM-DD.
View the status of the model
At any time, you can check the status of the model with the following SQL statement:
DESCRIBE MODEL models.customer_classification_model;Look for a STATUS column in the output. When the model is ready, the status will change to complete. If you end up with an error, you can find more information about it in the ERROR column.
Alternatively, you can also view the status of the model in the Data Access extension, in the data explorer Activity Panel (usually on the left). Find the models project and click on the customer_classification_model model to view its status.
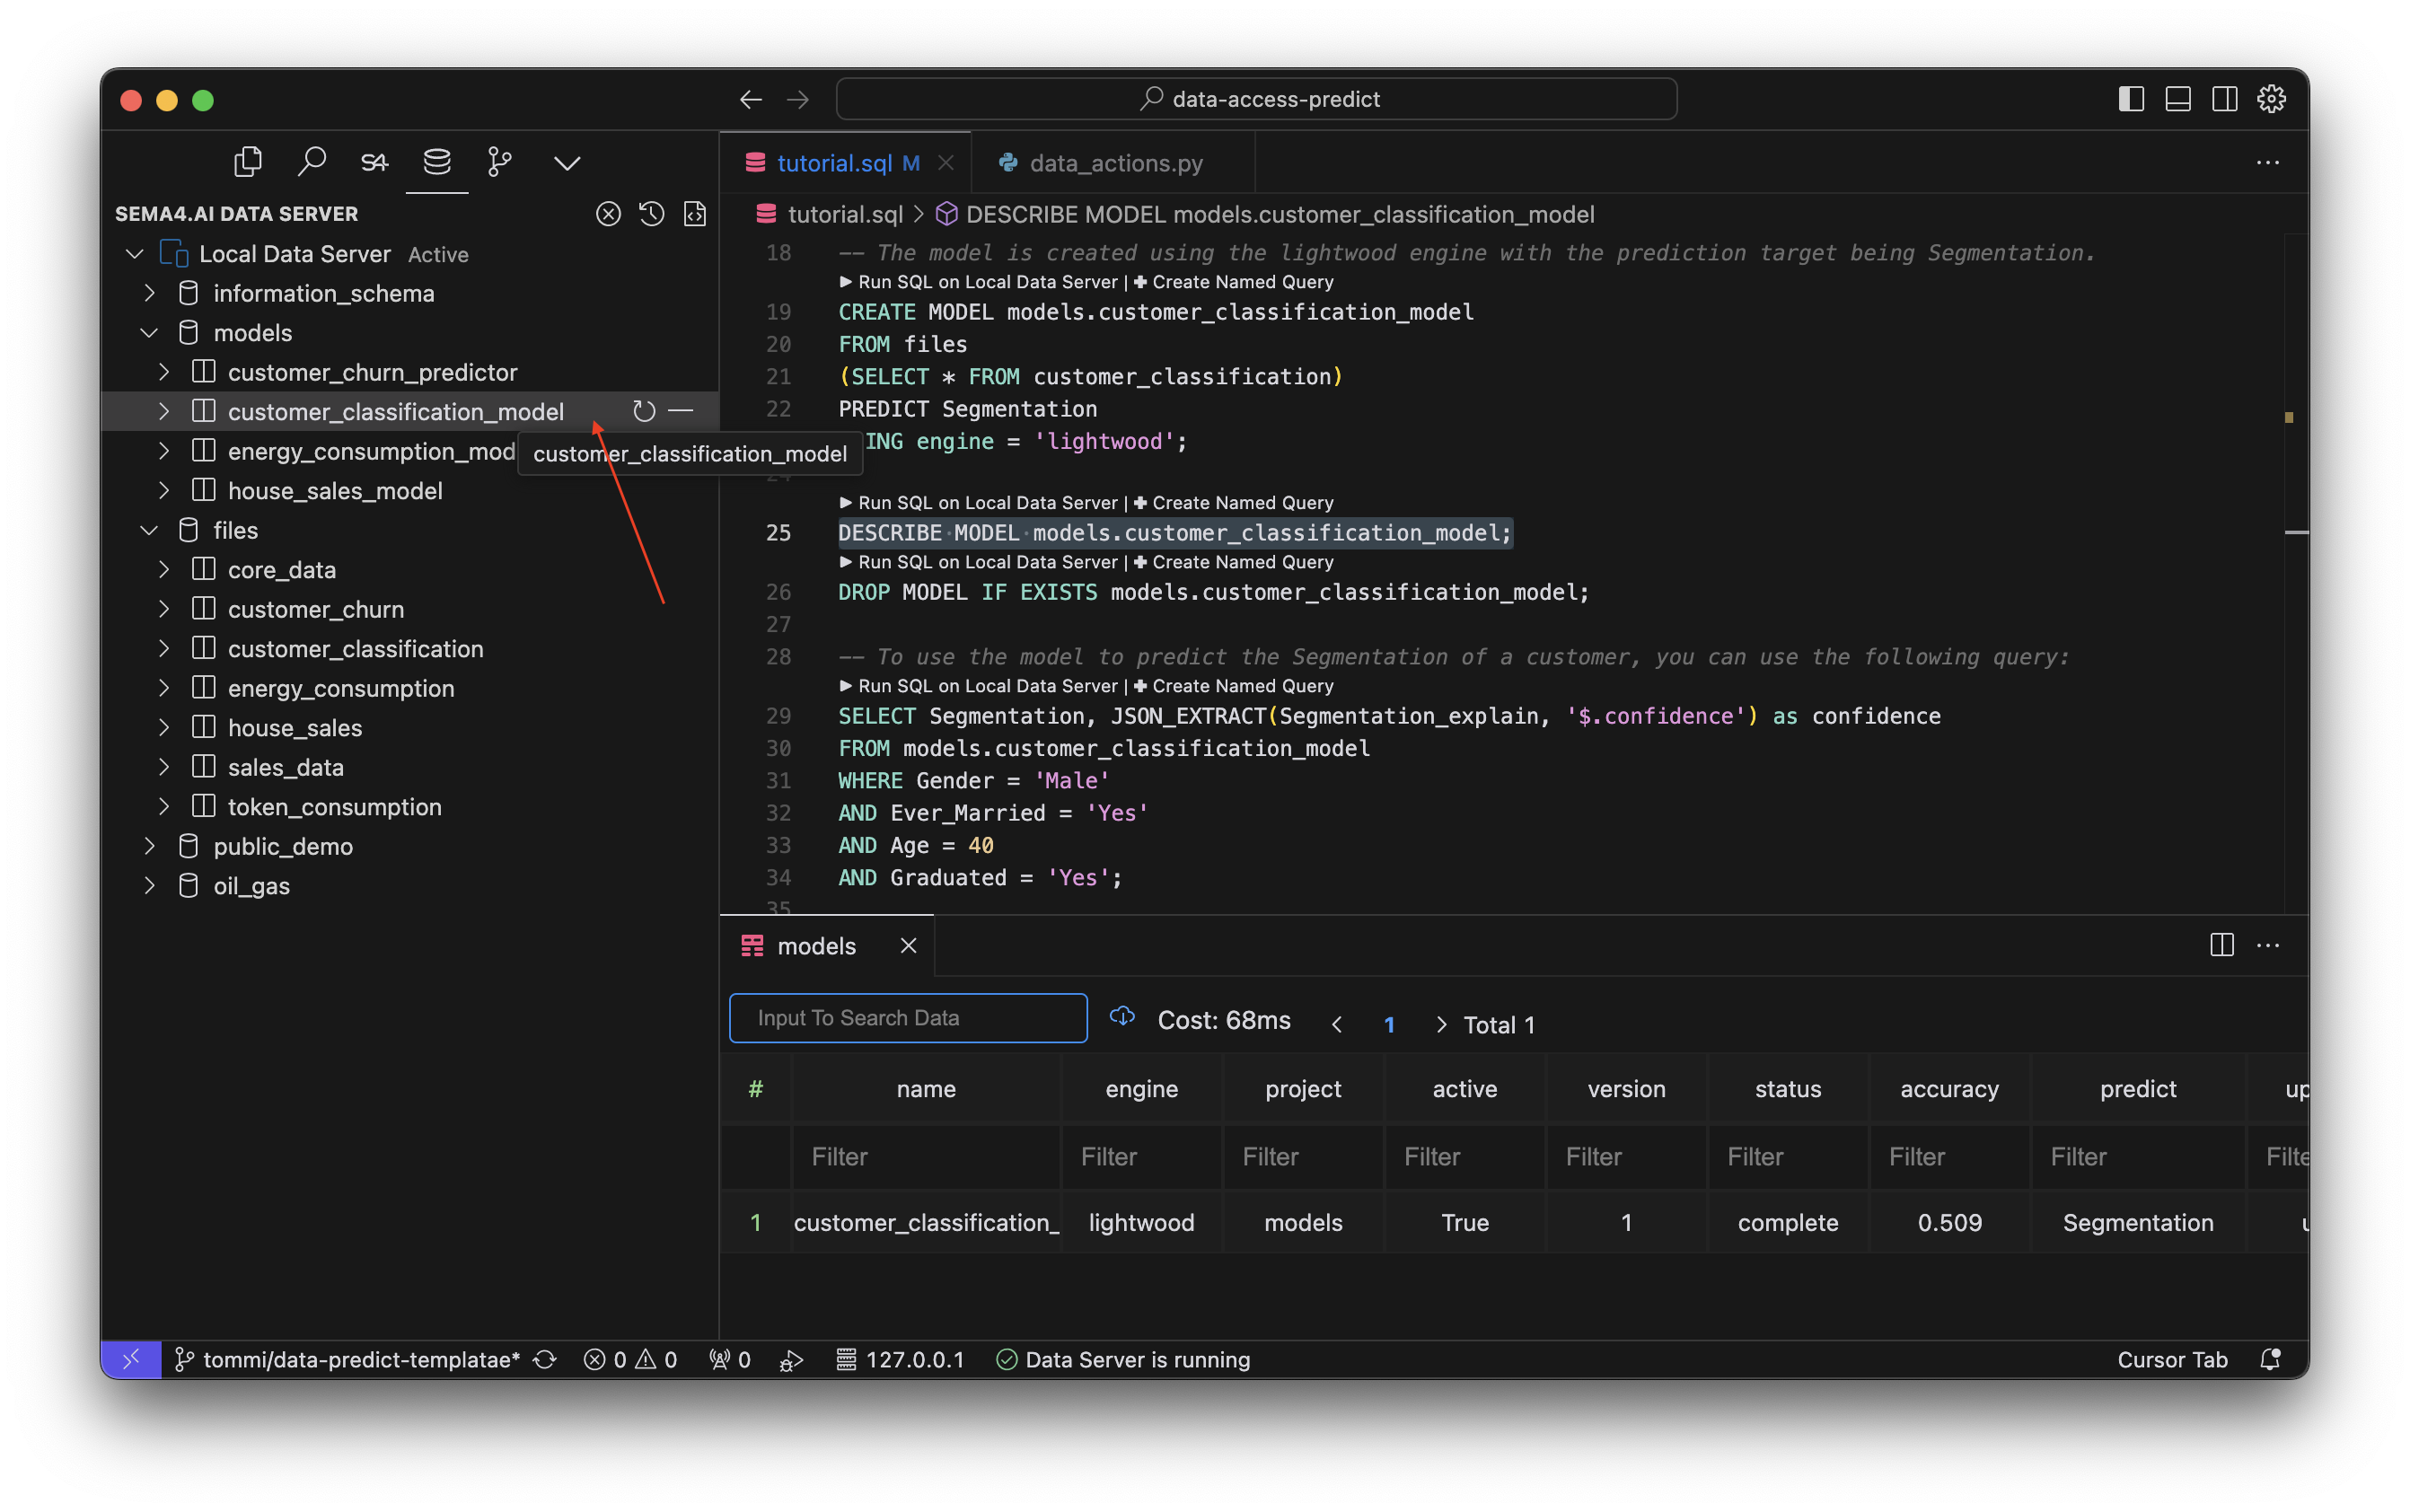
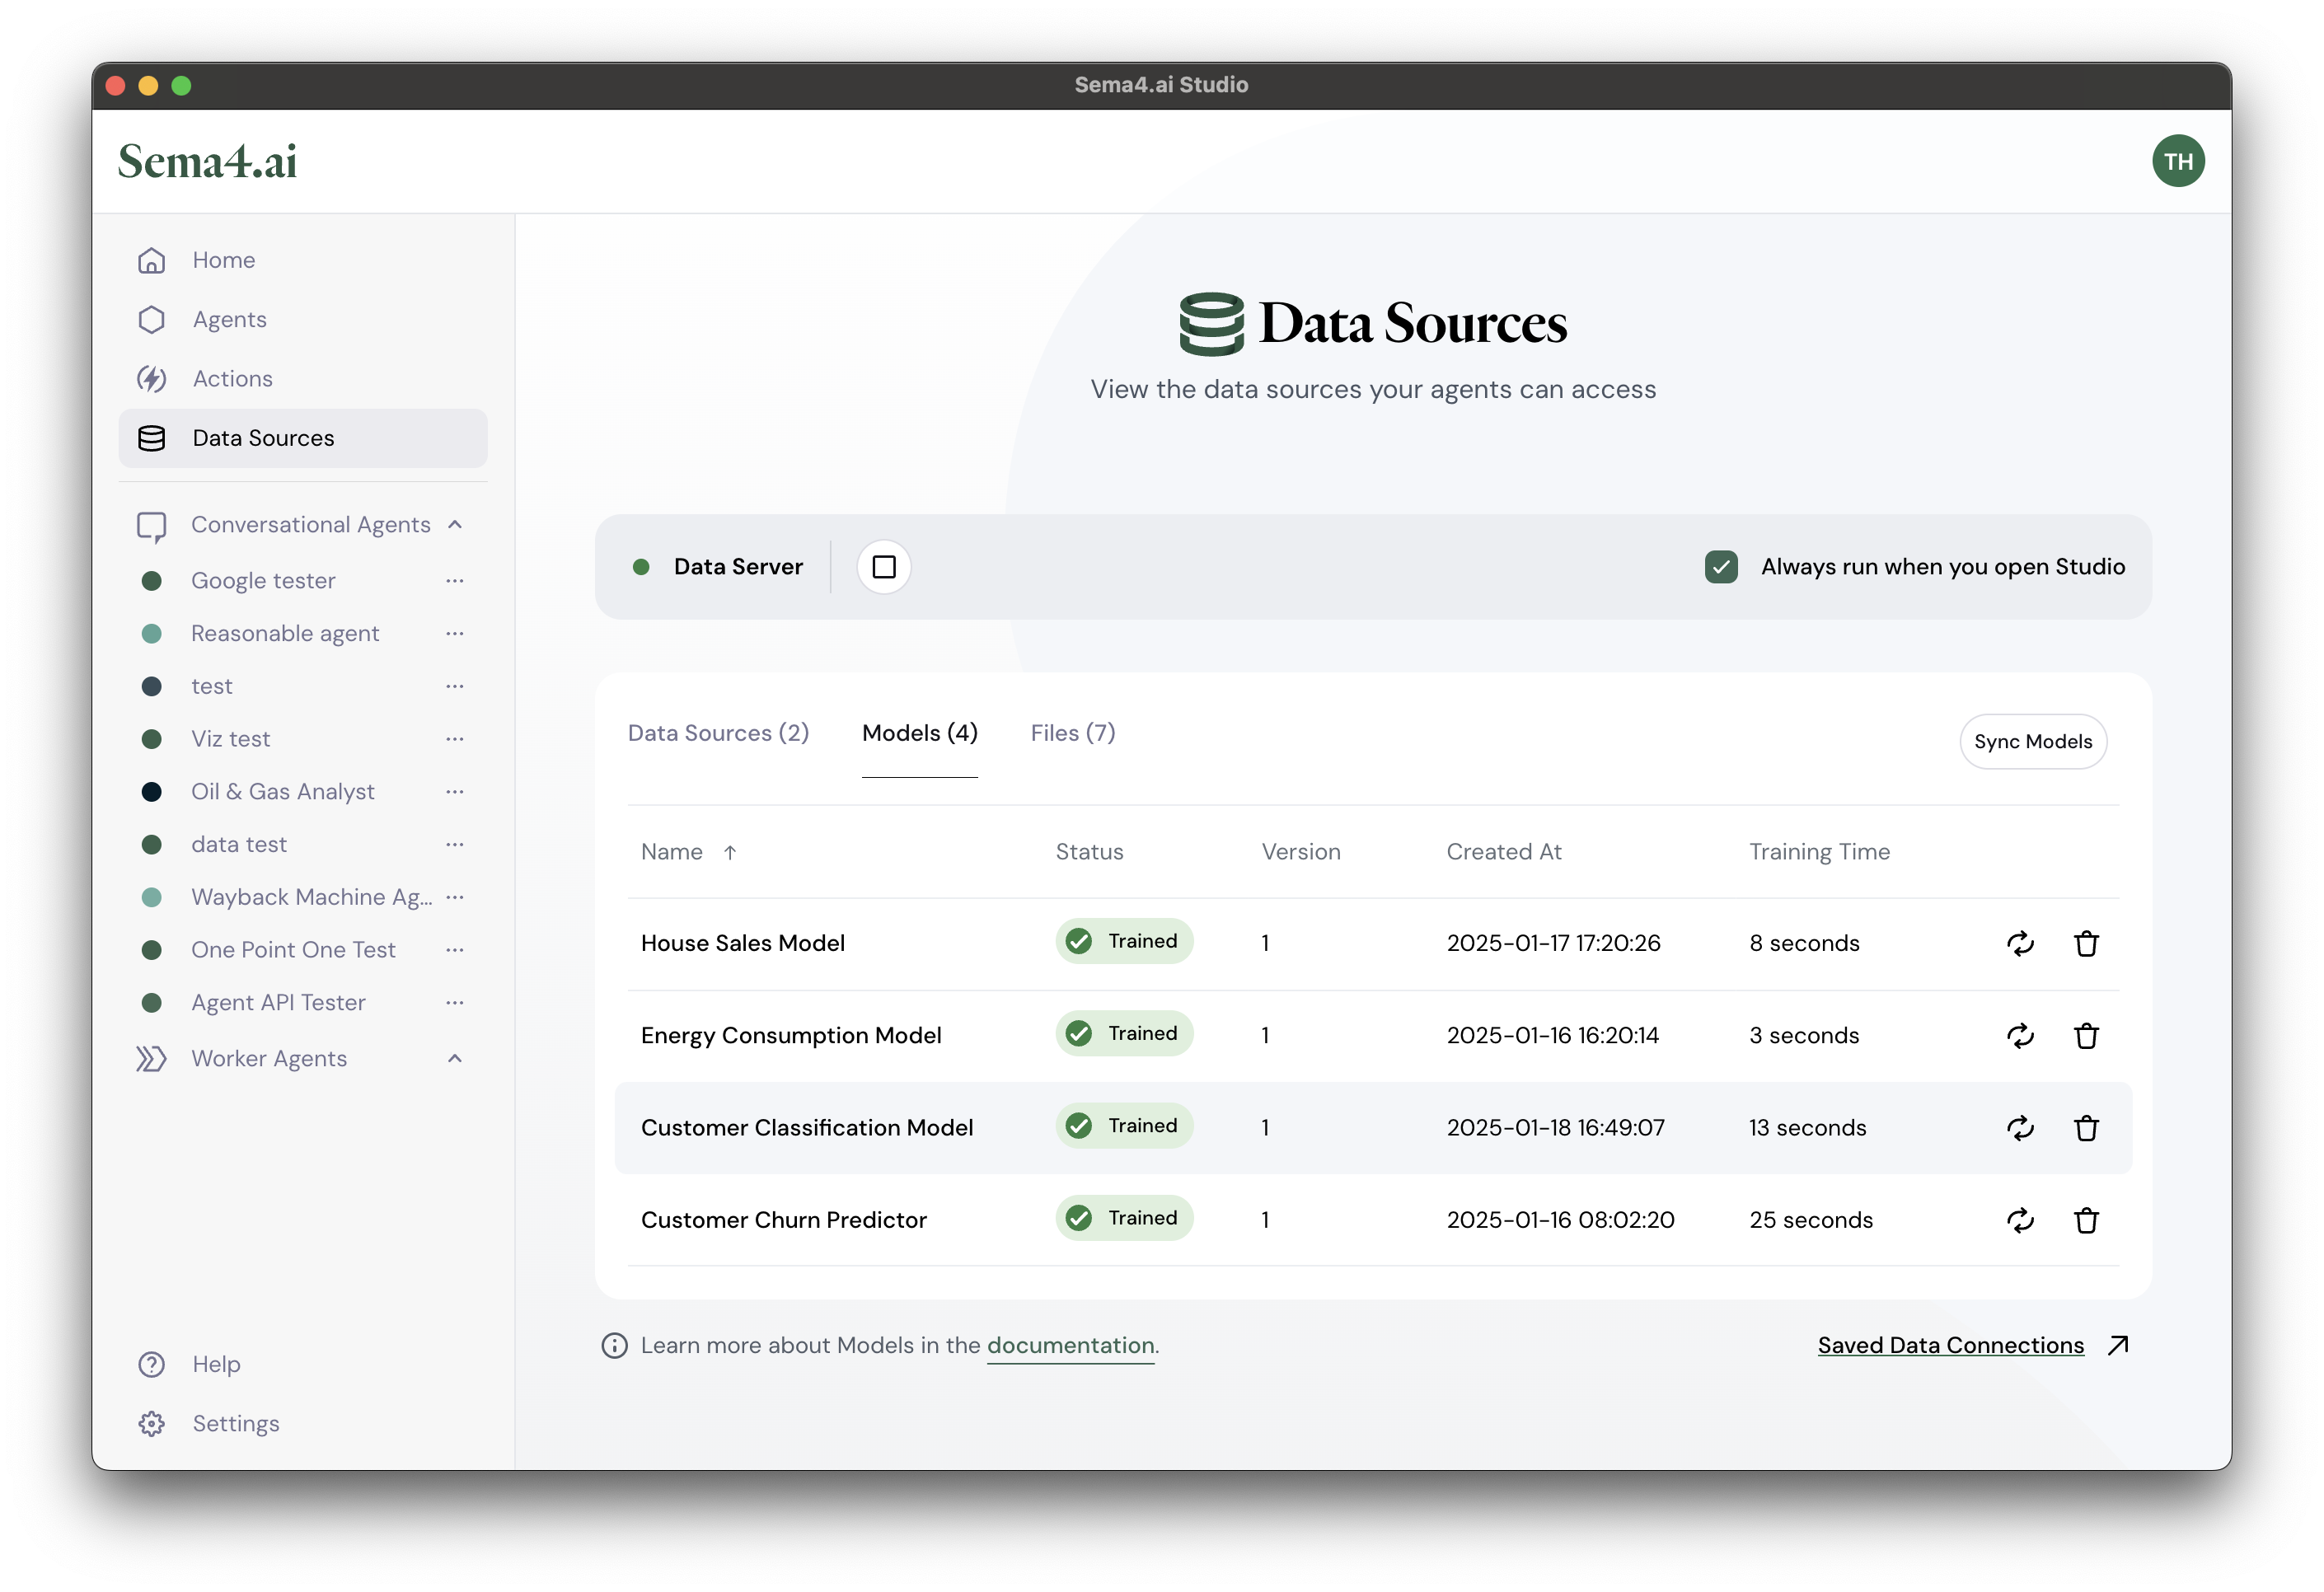
Remember that SDK and Studio share the same Data Server, so you can also view the status of the model in Studio by going to the Data Sources view and clicking on the Models tab.
Using the model for predictions
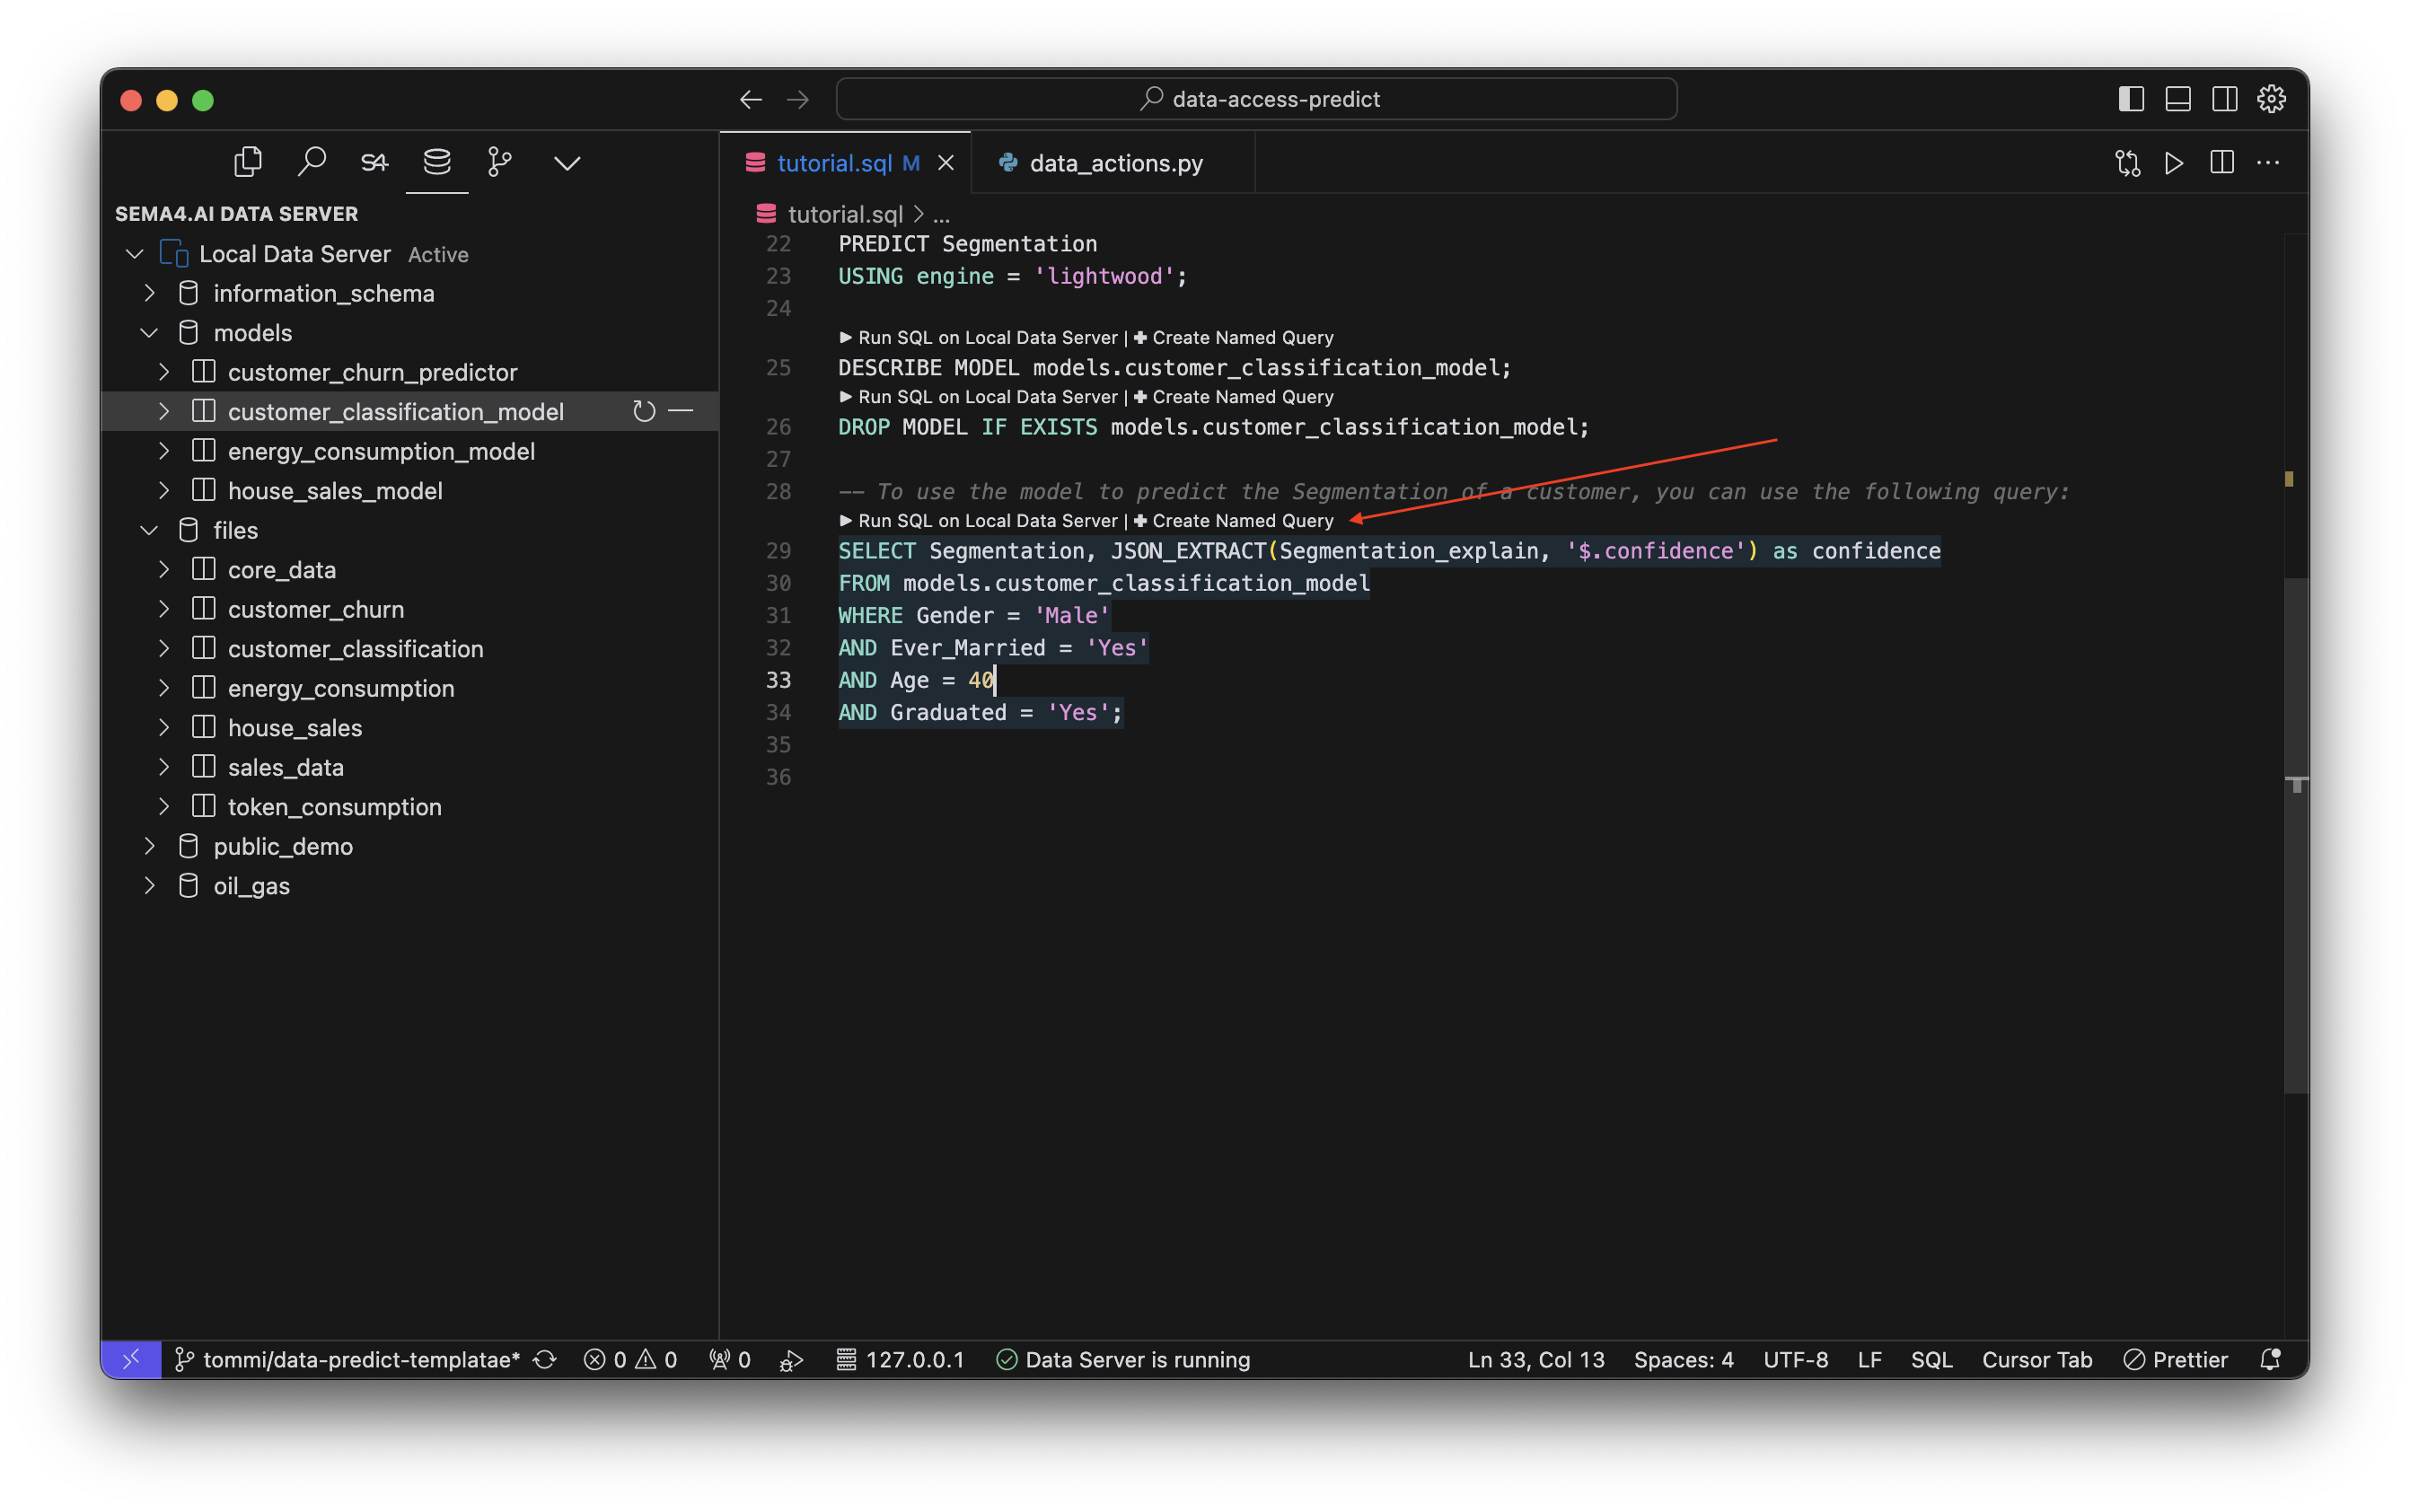
Now the real deal! Let's use the model for predictions. Our example tutorial.sql file already contains a SELECT statement that uses the model for predictions.
SELECT Segmentation, JSON_EXTRACT(Segmentation_explain, '$.confidence') as confidence
FROM models.customer_classification_model
WHERE Gender = 'Male'
AND Ever_Married = 'Yes'
AND Age = 40
AND Graduated = 'Yes';
The basic principle is that you can use the model in the same way you would use a normal table, with the exception that the model will return predictions instead of actual data. In the SQL statement above, we are predicting the Segmentation column, and also extracting the confidence value from the Segmentation_explain JSON column. The data comes from the customer_classification_model, with WHERE giving the input parameters for the prediction.
In this case, the output from the model could be something like this:
| Segmentation | Confidence |
|---|---|
| A | 0.6813186813186813 |
Try changing the parameters yourself to see how the predictions change!
Create a named query
Named queries are actions that an agent can use to make queries and predictions. Now it's time to create a named query out of your SQL statement that you used to make predictions. This way your agent can use the predictions safely and correctly every time.
If this is your first time creating a named query, please review a more complete tutorial for creating named queries.
Hit the Create Named Query button above your SQL statement to get started.
This opens a dialog for you to configure the named query. Give it a name, for example predict_customer_classification. Name needs to be a valid Python method name, so no spaces or - and so on. Then add a detailed description of what the prediction does (remember, your agent will see this description and determine when to use the predictions).
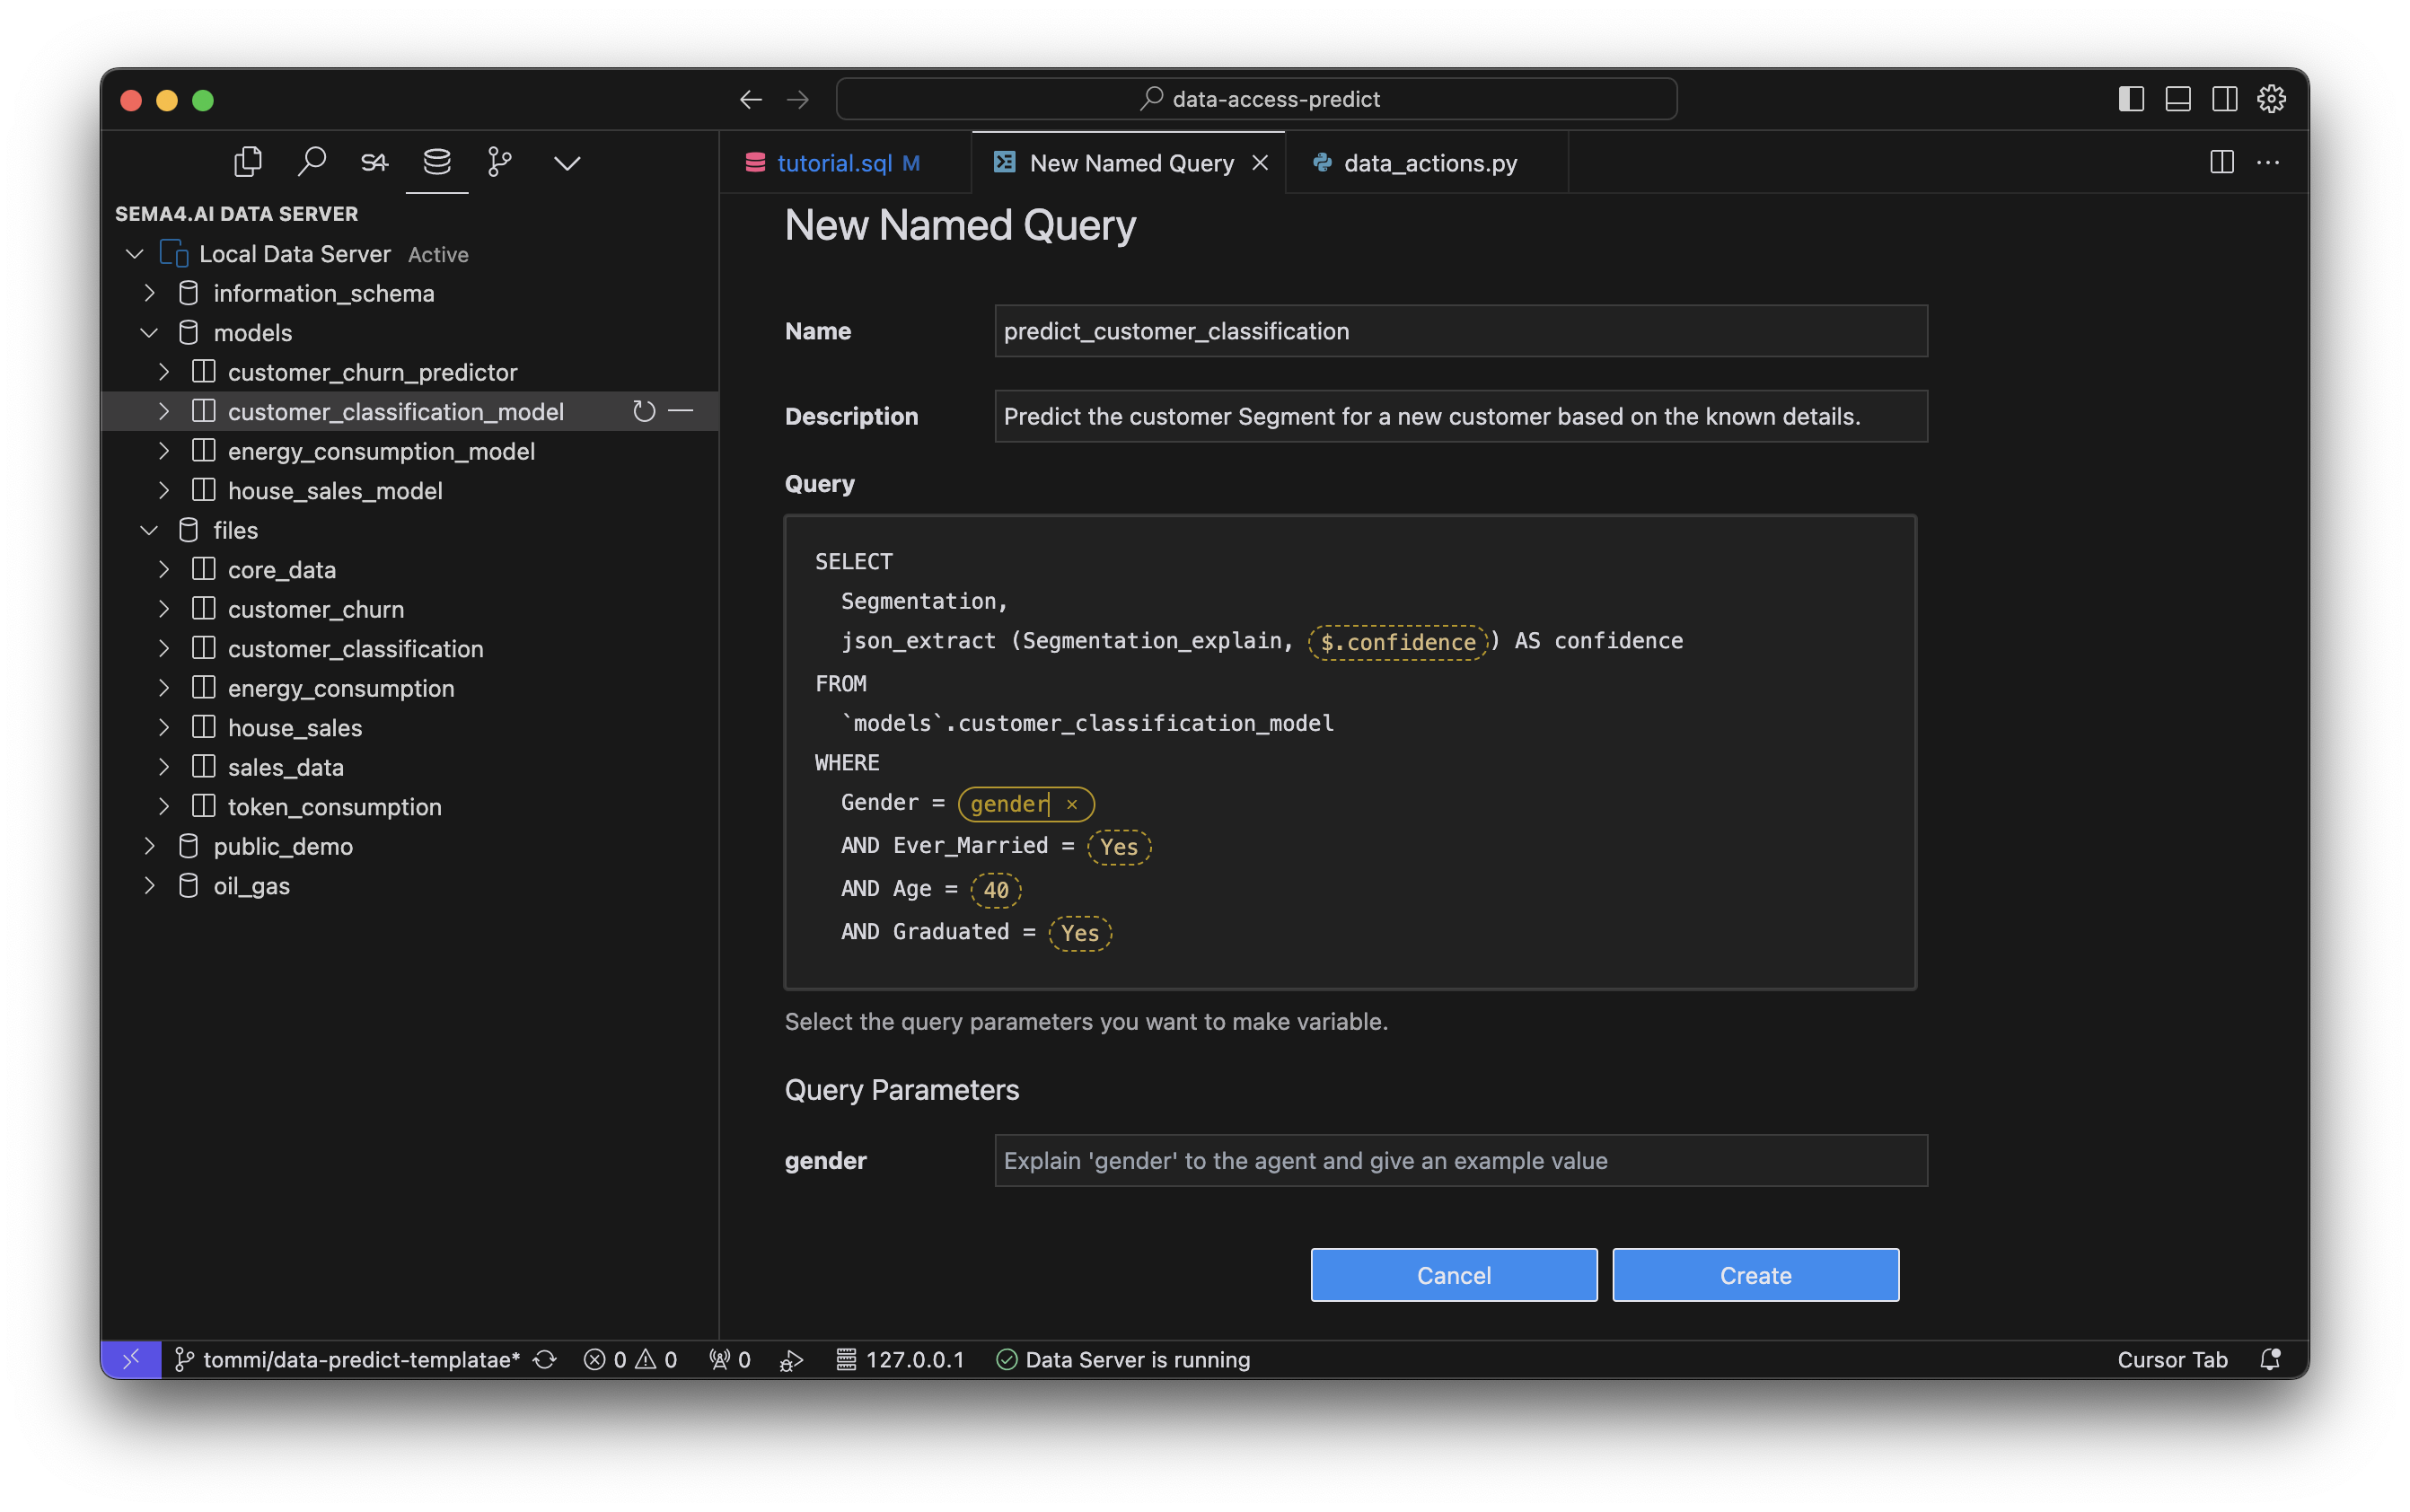
Next, you'll pick all the parameters that you want your agent to be able to pass to the prediction. In this case, we want to be able to pass the Gender, Ever_Married, Age and Graduated parameters to the prediction. Click all those yellow dotted line boxes, and give a name to each of the parameters. You also need to give the description for each of the parameters. Again, be specific and detailed, so that your agent knows what to give you.
Now, hit the Create button to create the named query!
If you are prompted for the file, it means that you need to pick a python file where you want to place your @predict named query. Your typical choice would be data_actions.py.
Next steps are prompted to you in the Command Palette. You need to give the model creation SQL query. This is used later when you deploy your agent to the cloud (or pass it to someone else), so that the model can always be recreated. Paste your CREATE MODEL SQL statement into the text box. You can grab it from below if you need to.
CREATE MODEL models.customer_classification_model
FROM files
(SELECT * FROM customer_classification)
PREDICT Segmentation
USING engine = 'lightwood';
Finally choose the file or a data source where your training data is located in. In this case it's the customer_classification. Once done, the following assets will be created in your project:
- In the
data_sources.pyfile: a new file datasource as well as the model definition - In the
data_actions.pyfile:predict_customer_classificationnamed query (starts with@predictdecorator) - In the
devdatafolder: a new json file calledinput_predict_customer_classification.jsonwith the test inputs for the prediction when ran in the SDK.
Not sure what all things above mean? Revisit the Sema4.ai data actions project structure here.
Now try running the prediction in the SDK by running Sema4.ai: Run Action in the Command Palette (Cmd/Ctrl + Shift + P). If your terminal output shows no errors, you are good to go publishing the actions to Studio!
Retraining models
In a typical production scenario more (training) data is produced all the time, and it means that also the model needs to be updated frequently. There are a few ways the retraining can be done with Data Server.
Manual: SQL statement in SDK
You may always come back to SDK, recreate your model from the scratch with new data and publish an updated version of your action package. (Remember to update the version number in package.yaml.) If you don't want to drop and create the model from the scratch you can also use the following SQL command:
RETRAIN models.customer_classification_model;This will create a new version of the model, keeping the existing version alive and in use until the new version is successfully trained.
This method is the least optimal as it requires a new action package version published every time. There are better ways, read on!
Manual: Retrain in Studio
While working with Sema4.ai Studio, you can manually retrain your model anytime by navigating to Data Sources page and Models tab. Each model row has retraining icon on the right. You also see how long the training took the previous time.

Manual: Retrain in Control Room
Any agent with models deployed to a workspace will automatically start the first model training during the deployment. You can see your models in the Data section of the Deployed agent details view in Control Room.
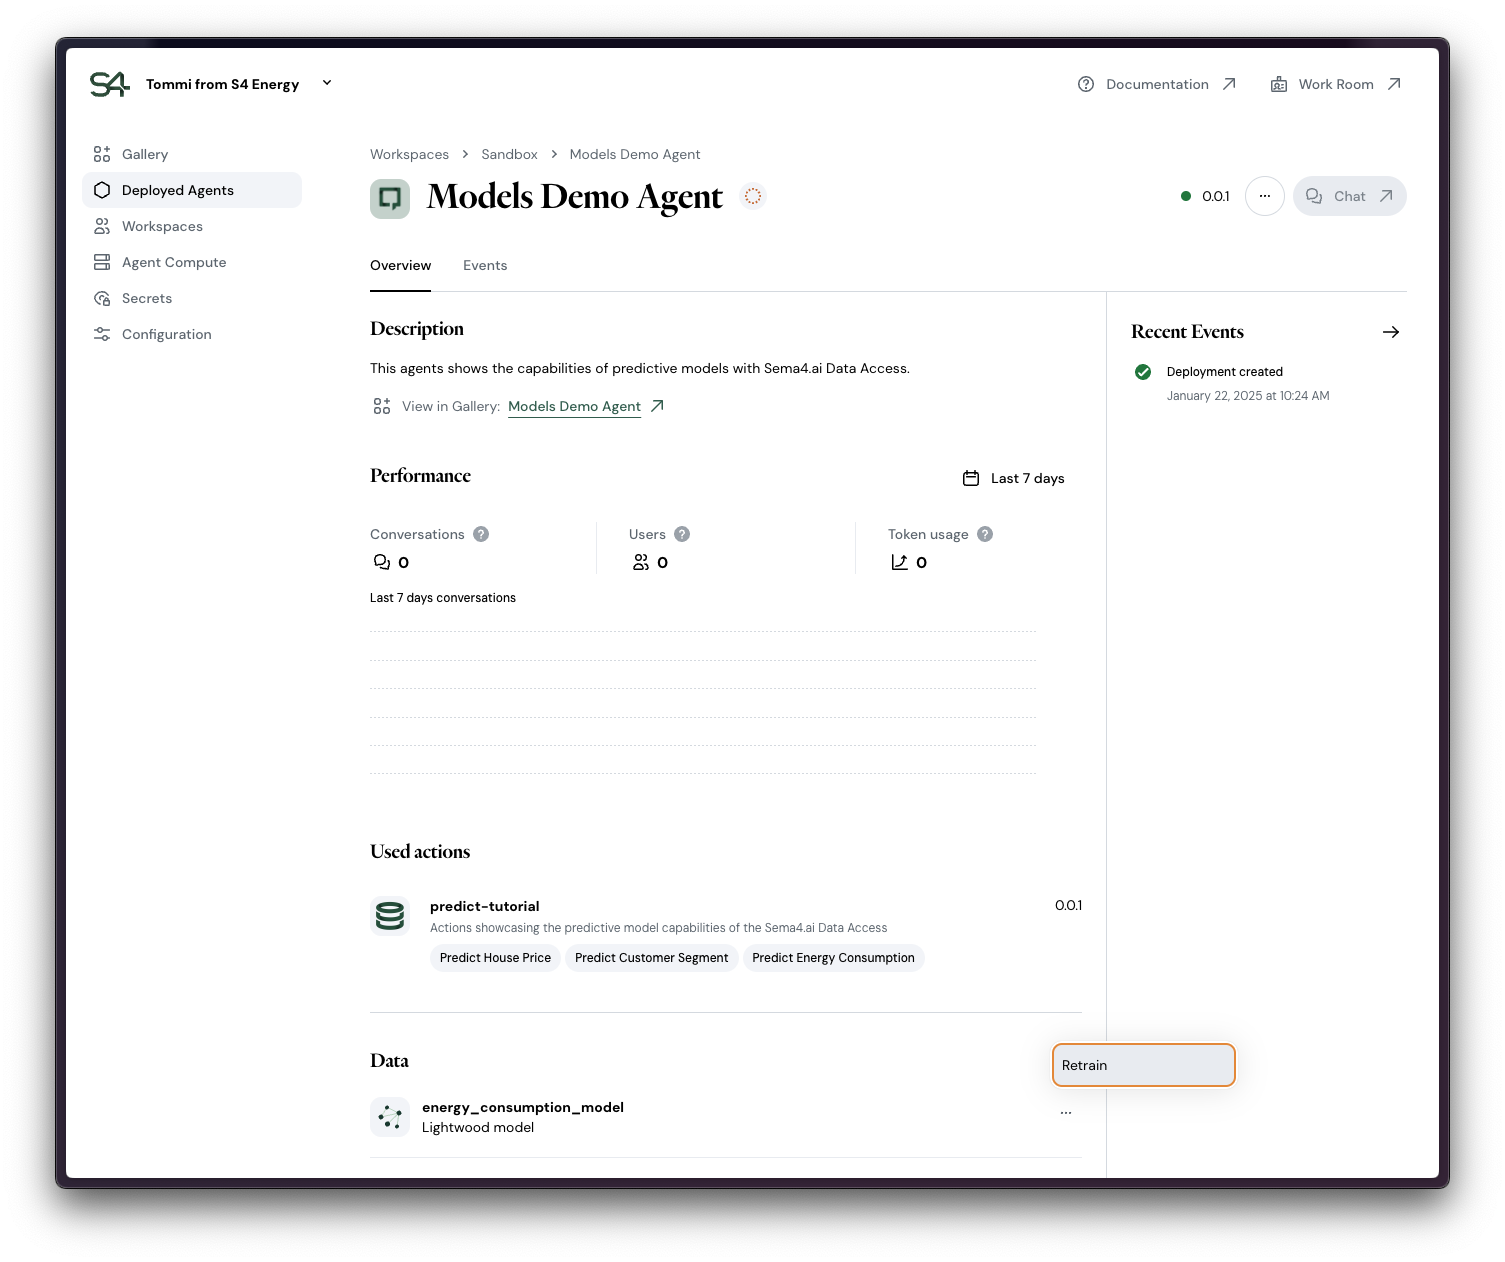
In this same view you can manually trigger the retraining. As the old version is in use until the new version of the model is ready, the model retraining does not cause disruptions to your agent's users in the Work Room.
Automatic: Create a retraining job
It is possible to create a scheduled job for retraining your models in the Data Server. In order for the job to be carried over to deployed agents in Agent Compute, the job needs to be declared in the setup_sql parameter of the model data source specification.
Tutorial coming soon!
Model Engines
Following chapters introduce the available engines and their typical characteristics. Check back frequently, as we keep on adding more capabilities to the platform!
Check back soon for more tutorials on other engines!
Lightwood
The tutorials in the template covers examples using the default engine Lightwood. It's handy and fast way to get started and covers for example linear regression, classification and time series forecasting use cases.
Linear regression example in the template also shows how to use optional parameters for predictions. Check it out!